MKS D - Handkreissäge NL - Handcirkelzaag CZ - Ruční okruźní pila PL - Pilarka tarczowa ręczna... 66
|
|
|
- Lavīze Skuja
- pirms 3 gadiem
- Skatījumi:
Transkripts

1 MKS D - Handkreissäge... 4 CZ - Ruční okruźní pila F - Scie circulaire NL - Handcirkelzaag PL - Pilarka tarczowa ręczna TR - El Testeresi GB - Circular Saw ORIGINALBETRIEBSANLEITUNG Překlad originálního návodu na obsluhu Traduction du manuel d utilisation original Translation of the Original Instructions Vertaling van de originele gebruiksaanwijzing Tłumaczenie oryginalnej instrukcji obsługi Orjinal iµletme talimat n n tercümesi Nr. WU Handkreissaege_man.indd :27


2 Abb a Laserklasse a = 190 mm b = 30 mm Handkreissaege_man.indd :27


3 Abb. 2 Abb A 45 B 14 Abb B Abb. 5a Abb. 5b Abb. 6 Abb Handkreissaege_man.indd :27
4 D Inhalt Betriebsanleitung & Sicher heits hinweise WARNUNG! Zur Verringerung eines Verletzungsrisikos Betriebsanlei tung bitte vor der ersten Inbe trieb nahme sorg fältig lesen und zusammen mit der Maschine aufbe wahren! Bei Weitergabe des Gerätes an andere Nutzer muss diese Betriebs anleitung ebenfalls weitergege ben werden. 4 Seite 1 Lieferumfang 4 2 Technische Informationen 4 3 Bauteile 5 4 Bestimmungsgemäßer Gebrauch 5 5 Allgemeine Sicherheitshinweise 7 1 Lieferumfang 1 Handkreissäge 1 Parallelanschlag 1 Sägeblatt 1 Innensechskantschlüssel 1 Adapter für externe Staubabsaugung Betriebsanleitung Garantieurkunde 2 Technische Informationen Technische Daten Netzspannung V~/50 Hz Leistungsaufnahme 1500 W Leerlaufdrehzahl n 0 = 4700 min -1 Schnitttiefe bei mm Schnitttiefe bei mm Schnittwinkel 0/90 45 Sägeblatt Ø 190 x 30 mm Anschlusskabel 3 m Seite 6 Gerätespezifische Sicherheitshinweise 12 7 Montage und Einstellarbeiten 13 8 Betrieb 14 9 Arbeitsweise Wartung und Umweltschutz Service-Hinweise 15 Lasereinrichtung Laserklasse 2 Wellenlänge 650 nm Ausgangsleistung < 1mW Technische Änderungen vorbehalten. ist ein eingetragenes Warenzeichen der Conmetall Meister GmbH, Wuppertal/Germany Lärmemission/Vibration Lärmemission L pa : 91,5 db(a), L WA : 102,5 db(a) Messunsicherheit: K pa : 3,0 db(a), K WA : 3,0 db(a) Hand-/Arm schwingungen Sägen von Holz: - Handgriff: a h : 5,6 m/s 2 - Zusatzhandgriff: a h : 5,3 m/s 2 ; Messunsicherheit K: 1,5 m/s Handkreissaege_man.indd :27
5 Geräusch-/Vibrationsinformation Messwerte ermittelt entsprechend EN Der angegebene Schwing ungs emis sionswert wurde nach einem genorm ten Prüfverfahren gemessen und kann zum Vergleich eines Elektro werk zeugs mit ei nem anderen verwen det werden. Der angegebene Schwingungs emissions wert kann auch zu einer einleitenden Ein schätzung der Be einträchtigung verwen det werden. ACHTUNG! Der Schwingungsemissionswert kann sich wäh rend der Benutzung des Elektro werk zeugs vom Angabewert unterschei den, ab hängig von der Art und Weise wie das Elektro werkzeug verwendet wird. Versuchen Sie, die Belastung durch Vibrationen so gering wie möglich zu halten. Beispielhafte Maßnahmen zur Verringerung der Vibrationsbelastung sind das Tragen von Handschuhen beim Gebrauch des Werkzeugs und die Be grenzung der Arbeitszeit. Dabei sind alle Anteile des Betriebszyklus sind zu berücksichtigen (beispielsweise Zeiten, in denen das Elektrowerkzeug abgeschal tet ist, und solche, in denen es zwar eingeschaltet ist, aber ohne Belastung läuft). ACHTUNG! Eine gewisse Lärmbelästigung durch dieses Gerät ist nicht vermeidbar. Verlegen Sie daher lärmintensive Arbeiten auf zugelassene und dafür bestimmte Zeiten. Halten Sie sich ggf. an Ruhezeiten und beschränken Sie die Arbeitsdauer auf das Notwendigste. ACHTUNG! Die Einwirkung von Lärm kann zu Schädigungen des Gehörs führen. Daher nur mit einem geeigneten Gehörschutz arbeiten. In der Nähe befindliche Personen sollten daher ebenfalls einen geeigneten Gehörschutz tragen. 3 Bauteile 1 Ein-/Ausschalter Laser-Markierhilfe 2 Handgriff 2a Zusatzhandgriff 3 Laser-Markierhilfe 4 Schnittwinkel-Skala 5 Schnittwinkeleinstellung 6 Feststellschraube Parallelanschlag 7 Sägeschuh 8 Pendelschutzhaube 9 Innensechskantschraube 10 Hebel der Pendelschutzhaube 11 Anschluss für Staubabsaugung 12 Ein-/Ausschalter 13 Schnitttiefen-Skala 14 Schnitttiefeneinstellung 15 LED-Betriebsanzeige 16 Spindelarretierung (Abb. 5a) 17 Parallelanschlag 18 Adapter für externe Staubabsaugung 19 Innensechskantschlüssel 4 Bestimmungsgemäßer Gebrauch Diese Handkreissäge darf nur im handge führten Betrieb im häuslichen Bereich ver wen det werden. Sie ist mit dem mitgelie fer ten Säge blatt für gerade Schnitte in Holz und Holz werkstoffe gemäß den Angaben in dieser Bedienungsanleitung geeignet. Dieses Gerät ist nur zum Einsatz im häuslichen Bereich bestimmt. Dieses Gerät ist nicht dafür bestimmt, durch Personen (einschließlich Kin der) mit eingeschränkten physischen, sensorischen oder geistigen Fähig keiten oder Handkreissaege_man.indd :27
6 6 mangels Erfahrung und/ oder mangels Wissen benutzt zu wer den. Kinder sollten beauf sichtigt werden, um sicherzustellen, dass sie nicht mit dem Gerät spielen. ACHTUNG! Durch bestimmungswi drige Verwendung, Ver änderungen am Gerät und den Gebrauch von Teilen, die nicht vom Hersteller geprüft und frei ge ge ben sind, kön nen unvorhersehbare Schä den entstehen. Nicht bestimmungsgemäßer Gebrauch Alle Anwendungen mit dem Gerät die nicht im Kapitel Bestimmungsgemäßer Gebrauch genannt sind, gelten als eine nicht bestimmungsgemäße Ver wendung. Dieses Elektrowerkzeug ist nicht geeignet zum Fällen von Bäumen. Verwendungen, für die das Elektrowerkzeug nicht vorgesehen ist, können Ge fährdungen und Verletzungen verursa chen. Verwenden Sie kein Zubehör, das nicht speziell für dieses Elektrowerkzeug vorgesehen ist. Nur weil Sie das Zubehör an Ihrem Elektrowerkzeug befestigen können, garantiert das keine sichere Verwendung. Die zulässige Drehzahl des Einsatz werkzeugs muss mindestens so hoch sein wie die auf dem Elektrowerkzeug angegebene Höchstzahl. Zubehör, das sich schneller als zulässig dreht, kann zerbrechen und umherfliegen. Außendurchmesser, Bohrungsdurchmes ser und Dicke des Ein satzwerkzeugs müs sen den Maß an gaben Ihres Elektrowerkzeugs ent sprechen. Falsch bemessene Ein satzwerkzeuge können nicht aus reichend abgeschirmt oder kontrolliert werden. Es besteht Verletzungsgefahr. Für alle daraus entstandenen Sachschäden sowie Personenschäden, die auf Grund einer Fehlanwendung entstanden sind, haftet der Benutzer des Gerätes. Bei Verwendung anderer bzw. nicht Original Bauteile an der Maschine erlischt herstellerseitig die Garantieleistung. Restrisiken: Die Betriebsanleitung zu diesem Elektrowerkzeug enthält ausführliche Hin weise zum sicheren Arbeiten mit Elektro werkzeugen. Dennoch birgt jedes Elektrowerkzeug gewisse Rest risiken, die auch durch die vorhandenen Schutz vorrichtungen nicht völlig auszuschließen sind. Bedienen Sie deshalb Elektro werk zeuge immer mit der notwendigen Vorsicht. Restrisiken können zum Beispiel sein: Berühren von beweglichen Teilen oder Einsatzwerkzeugen. Verletzung durch umher fliegende Werkstücke oder Werkstückteile. Brandgefahr bei unzureichender Belüftung des Motors. Beeinträchtigung des Gehörs bei Arbeiten ohne Gehörschutz. Ein sicheres Arbeiten hängt auch von der Vertrautheit des Bedienpersonals im Um gang mit dem jeweiligen Elektrowerkzeug ab! Entsprechende Maschi -nenkenntnis so wie umsichtiges Verhalten beim Arbei ten helfen bestehende Restrisiken zu minimieren Handkreissaege_man.indd :27
7 WARNUNG! Dieses Elektrowerkzeug erzeugt während des Be triebs ein elektromagnetisches Feld. Dieses Feld kann unter bestimmten Umständen aktive oder passive medizi nische Im plantate beeinträch tigen. Um die Gefahr von ernsthaften oder tödlichen Verletz un gen zu ver ringern, empfehlen wir Perso nen mit medizinischen Implantaten ihren Arzt und den Hersteller vom medi zini schen Implantat zu konsultieren, bevor das Elektrowerkzeug bedient wird. 5 Allgemeine Sicherheitshin weise für den Um gang mit Elektrowerkzeugen WARNUNG! Lesen Sie alle Si cherheitshinweise und Anweisun gen. Versäumnisse bei der Einhaltung der Sicherheitshinweise und An weisungen können elektrischen Schlag, Brand und/oder schwere Verletzungen verursachen. Bewahren Sie alle Sicherheitshin wei se und Anweisungen für die Zukunft auf. Der in den Sicherheitshinweisen ver wen dete Begriff Elektrowerkzeug be zieht sich auf netzbetriebene Elektro werkzeuge (mit Netzkabel) und auf akku betrie bene Elektrowerkzeuge (ohne Netzkabel). 1 Arbeits platz si cherheit a Halten Sie Ihren Arbeitsbereich sau ber und gut beleuchtet. Un ordnung und unbeleuchtete Arbeits bereiche können zu Unfällen führen. b Arbeiten Sie mit dem Elektrowerkzeug nicht in explosions gefährdeter Umgebung, in der sich brennbare Flüssigkeiten, Gase oder Staub befinden. Elektro werk zeuge erzeugen Funken, die den Staub oder die Dämpfe entzünden können. c Halten Sie Kinder und andere Personen während der Benut zung des Elektrowerkzeugs fern. Bei Ablenkung können Sie die Kon trolle über das Gerät verlieren. 2 Elektri sche Sicherheit a Der Anschlussstecker des Elektro werkzeuges muss in die Steckdose passen. Der Stecker darf in keiner Weise verändert werden. Verwen den Sie keine Adapterstecker gemein sam mit schutzge erd e ten Elektro werk zeug. Unver änderte Stecker und passende Steckdosen verringern das Risiko eines elektrischen Schlages. b Vermeiden Sie Körperkontakt mit geerdeten Oberflächen, wie von Rohren, Heizungen, Herden und Kühlschränken. Es besteht ein erhöhtes Risiko durch elektrischen Schlag, wenn Ihr Körper geerdet ist. c Halten Sie das Gerät von Regen oder Nässe fern. Das Eindringen von Wasser in ein Elektrogerät er höht das Risiko eines elektri schen Schlages. d Zweckentfremden Sie das Kabel nicht, um das Elektrowerkzeug zu tragen, aufzuhängen oder um den Netzstecker aus der Steck dose zu ziehen. Halten Sie das Kabel fern von Hitze, Öl, schar fen Kanten oder sich bewegen den Geräteteilen. Beschä digte oder verwickelte Kabel erhöhen das Risiko eines elektrischen Schla ges. e Wenn Sie mit einem Elektrowerkzeug im Freien arbeiten, verwen den Sie nur Verlängerungskabel, die Handkreissaege_man.indd :27
8 8 auch für den Außenbereich zugelassen sind. Die Anwendung eines für den Außenbereich geeig neten Verlängerungskabels ver rin gert das Risiko eines elektrischen Schlages. f Wenn der Betrieb des Elektrowerkzeugs in feuchter Umgebung nicht vermeidbar ist, verwenden Sie einen Fehlerstromschutz schal ter. Der Einsatz eines Fehler strom schutzschalters vermindert das Risiko eines elektrischen Schla ges. 3 Sicher heit von Personen a Seien Sie aufmerksam, achten Sie darauf, was Sie tun, und gehen Sie mit Vernunft an die Arbeit mit ei nem Elektrowerkzeug. Benutzen Sie kein Elektro werk zeug, wenn Sie müde sind oder unter dem Einfluss von Drogen, Alkohol oder Medikamen ten stehen. Ein Moment der Unacht samkeit beim Gebrauch des Elektro werkzeugs kann zu ernsthaften Ver letzungen führen. b Tragen Sie persönliche Schutz ausrüstung und immer eine Schutz brille. Das Tragen persön li cher Schut z aus rüstung, wie Staub maske, rutschfeste Sicherheits schu he, Schutzhelm oder Gehör schutz, je nach Art und Einsatz des Elektrowerkzeuges, verringert das Risiko von Verletzungen. c Vermeiden Sie eine unbeabsichtigte lnbetriebnahme. Vergewis sern Sie sich, dass das Elektro werkzeug ausgeschaltet ist, be vor Sie es an die Stromversor gung und/oder den Akku an schlie ßen, es aufnehmen oder tragen. Wenn Sie beim Tragen des Geräts den Finger am Schalter haben oder das Gerät eingeschaltet an die Stromversorgung anschlie ßen, kann dies zu Unfällen führen. d Entfernen Sie Einstellwerkzeuge oder Schraubenschlüssel, bevor Sie das Elektrowerkzeug ein schalten. Ein Werkzeug oder Schlüs sel, der sich in einem dre henden Geräteteil befindet, kann zu Verletzungen führen. e Vermeiden Sie abnormale Kör perhaltung. Sorgen Sie für einen sicheren Stand und halten Sie jederzeit das Gleichgewicht. Dadurch können Sie das Elektro werkzeug in unerwarte ten Situ ationen besser kontrollieren. f Tragen Sie geeignete Kleidung. Tra gen Sie keine weite Kleidung oder Schmuck. Halten Sie Haare, Kleidung und Handschuhe fern von sich bewe gen den Teilen. Lockere Kleidung, Schmuck oder lange Haare können von sich be wegenden Teilen erfasst werden. g Wenn Staubabsaug- und -auf fangeinrichtungen montiert wer den können, vergewissern Sie sich, dass diese angeschlossen sind und richtig verwendet wer den. Verwendung einer Staubab saugung kann Gefährdun gen durch Staub verringern. h Wiegen Sie sich nicht in falscher Sicherheit und setzen Sie sich nicht über die Sicherheitsregeln für Elektrowerkzeuge hinweg, auch wenn Sie nach vielfachem Gebrauch mit dem Elektrowerkzeug vertraut sind. Achtloses Handeln kann binnen Se kun denbruchteilen zu schweren Verletzungen führen. 4 Ver wen dung und Behandlung des Elektro werkzeuges a Überlasten Sie das Gerät nicht. Verwenden Sie für Ihre Arbeit das dafür bestimmte Elektrowerk zeug. Mit dem passenden Elektro werkzeug Handkreissaege_man.indd :27
9 arbeiten Sie besser und sicherer im angegebenen Leis tungs bereich. b Benutzen Sie kein Elektrowerkzeug, dessen Schalter defekt ist. Ein Elektrowerkzeug, das sich nicht mehr ein- oder ausschalten lässt, ist gefährlich und muss repariert werden. c Ziehen Sie den Stecker aus der Steckdose und/oder entfernen Sie den Akku, bevor Sie Geräte ein stellungen vornehmen, Zube hörteile wechseln oder das Gerät weglegen. Diese Vorsichtsmaß nahme verhindert den unbeabsich tig ten Start des Elektro werkzeuges. d Bewahren Sie unbenutzte Elek trowerkzeuge außerhalb der Reichweite von Kindern auf. Lassen Sie Personen das Gerät nicht benutzen, die mit diesem nicht vertraut sind oder diese Anweisungen nicht gelesen haben. Elektrowerkzeuge sind ge fährlich, wenn Sie von unerfah renen Personen benutzt werden. e Pflegen Sie Elektrowerkzeuge und Einsatzwerkzeug mit Sorgfalt. Kontrollieren Sie, ob bewegliche Teile einwandfrei funktionieren und nicht klemmen, ob Teile gebrochen oder so beschädigt sind, dass die Funktion des Elektrowerkzeugs beeinträchtigt ist. Lassen Sie beschädigte Teile vor dem Einsatz des Elektrowerkzeuges reparieren. Viele Unfälle haben ihre Ursache in schlecht gewarteten Elektrowerkzeugen. f Halten Sie Schneidwerkzeuge scharf und sauber. Sorgfältig ge pflegte Schneidwerkzeuge mit schar fen Schneidkanten verklem men sich weniger und sind leichter zu führen. g Verwenden Sie Elektrowerkzeug, Zubehör, Einsatzwerkzeuge usw. entsprechend diesen Anweisun gen. Berücksichtigen Sie dabei die Ar beitsbedingungen und die auszuführende Tätigkeit. Der Gebrauch von Elektrowerkzeugen für andere als die vorgesehenen Anwendungen kann zu gefährlichen Situationen führen. h Halten Sie Griffe und Griffflächen trocken, sauber und frei von Öl und Fett. Rutschige Griffe und Griffflächen erlauben keine sichere Bedienung und Kontrolle des Elektrowerkzeugs in unvorhergesehenen Situationen. 5 Service a Lassen Sie Ihr Elektrowerkzeug nur von qualifiziertem Fachperso nal und nur mit Originalersatztei len reparieren. Dadurch wird sichergestellt, dass die Sicherheit des Elektrowerkzeuges erhalten bleibt. b Wenn die Anschlussleitung beschädigt wird, muss sie um Ge fährdungen zu ver mei den vom Hersteller oder seinem Kun den dienst vertreter ersetzt werden. 6 Sicherheitshinweise für alle Sägen Sägeverfahren a GEFAHR: Kommen Sie mit Ihren Händen nicht in den Sä gebereich und an das Sägeblatt. Hal ten Sie mit Ihrer zweiten Hand den Zusatzgriff oder das Motorgehäuse. Wenn beide Hände die Säge halten, können diese vom Sägeblatt nicht verletzt werden. b Greifen Sie nicht unter das Werkstück. Die Schutzhaube kann Sie unter dem Werkstück nicht vor dem Sägeblatt schützen Handkreissaege_man.indd :27
10 10 c Passen Sie die Schnitttiefe an die Dicke des Werkstücks an. Es sollte weniger als eine volle Zahnhöhe unter dem Werkstück sichtbar sein. d Halten Sie das zu sägende Werkstück niemals in der Hand oder über dem Bein fest. Sichern Sie das Werkstück an einer stabilen Aufnah me. Es ist wichtig, das Werkstück gut zu befestigen, um die Gefahr von Körperkontakt, Klemmen des Sägeblattes oder Verlust der Kontrolle zu minimieren. e Halten Sie das Elektrowerkzeug an den isolierten Griffflächen, wenn Sie Arbeiten ausführen, bei denen das Einsatzwerkzeug verborgene Stromleitungen oder die eigene Anschlussleitung treffen kann. Kontakt mit einer spannungsführen den Leitung setzt auch die Metallteile des Elektrowerkzeugs unter Span nung und führt zu einem elektrischen Schlag. f Verwenden Sie beim Längs schneiden Immer einen Anschlag oder eine gerade Kantenführung. Dies verbessert die Schnittgenauigkeit und verringert die Möglichkeit, dass das Sägeblatt klemmt. g Verwenden Sie Immer Sägeblätter in der richtigen Größe und mit passender Aufnahmebohrung (z. B. sternförmig oder rund). Sägeblätter, die nicht zu den Montageteilen der Säge passen, laufen unrund und führen zum Verlust der Kontrolle. h Verwenden Sie niemals beschädigte oder falsche Sägeblatt-Unterlegscheiben oder -Schrauben. Die Säge blatt-unterlegscheiben und -Schrauben wurden speziell für Ihre Säge konstruiert, für optimale Leistung und Betriebssicherheit. 7 Weitere Sicherheitshinweise für alle Sägen Rückschlag Ursachen und entsprechende Sicherheitshinweise Ein Rückschlag ist die plötzliche Re ak tion infolge eines hakenden, klemmenden oder falsch ausgerichteten Sägeblattes, die dazu führt, dass eine unkontrollierte Säge abhebt und sich aus dem Werkstück heraus in Richtung der Bedienperson bewegt. Wenn sich das Sägeblatt in dem sich schließenden Sägespalt verhakt oder verklemmt, blockiert es, und die Mo tor kraft schlägt die Säge in Richtung der Bedienperson zurück. Wird das Sägeblatt im Sägeschnitt verdreht oder falsch ausgerichtet, können sich die Zähne der hinteren Sägeblattkante in der Oberfläche des Werkstücks verhaken, wodurch sich das Sägeblatt aus dem Sägespalt herausbewegt und die Säge in Richtung der Bedienperson zurückspringt. Ein Rückschlag ist das Ergebnis falscher und/oder ungeeigneter Anwendung der Säge. Er kann durch geeignete Vorsichtsmaßnahmen, wie nachfolgend beschrieben, verhindert werden. a Halten Sie die Säge mit beiden Hän den fest und bringen Sie Ihre Arme in eine Stellung, in der Sie die Rückschlagkräfte abfangen können. Halten Sie sich Immer seitlich des Sägeblattes, nie das Sägeblatt in eine Linie mit Ihrem Körper bringen. Bei einem Rückschlag kann die Kreissäge rückwärts springen, jedoch kann die Bedienperson durch geeignete Vorsichtsmaßnahmen die Rückschlagkräfte beherrschen Handkreissaege_man.indd :27
11 b Falls das Sägeblatt verklemmt oder Sie die Arbeit unterbrechen, schalten Sie die Säge aus und halten Sie sie im Werkstoff ruhig, bis das Sä ge blatt zum Stillstand gekommen ist. Versuchen Sie nie, die Säge aus dem Werkstück zu entfernen oder sie rückwärts zu ziehen, solange das Sägeblatt sich bewegt, sonst kann ein Rückschlag erfolgen. Er mitteln und beheben Sie die Ursache für das Verklemmen des Sägeblattes. c Wenn Sie eine Säge, die im Werkstück steckt, wieder starten wollen, zentrieren Sie das Sägeblatt im Sägespalt und überprüfen Sie, ob die Sägezähne nicht im Werkstück verhakt sind. Klemmt das Sägeblatt, kann es sich aus dem Werkstück herausbewegen oder einen Rück schlag verursachen, wenn die Säge erneut gestartet wird. d Stützen Sie große Platten ab, um das Risiko eines Rückschlags durch ein klemmendes Sägeblatt zu vermindern. Große Platten können sich unter ihrem Eigengewicht durch biegen. Platten müssen auf beiden Seiten abgestützt werden, sowohl in Nähe des Sägespalts als auch an der Kante. e Verwenden Sie keine stumpfen oder beschädigten Sägeblätter. Säge blätter mit stumpfen oder falsch ausgerichteten Zähnen verursachen durch einen zu engen Sägespalt eine erhöhte Reibung, Klemmen des Sägeblattes und Rückschlag. f Ziehen Sie vor dem Sägen die Schnitt tiefen- und Schnitt winkeleinstellungen fest. Wenn sich während des Sägens die Einstellungen verändern, kann sich das Sägeblatt verklemmen und ein Rückschlag auftreten. g Seien Sie besonders vorsichtig beim Sägen in bestehende Wände oder andere nicht einsehbare Bereiche. Das eintauchende Sägeblatt kann beim Sägen in verborgene Objekte blockieren und einen Rückschlag verursachen. 8 Sicherheitshinweise für Handkreissägen Funktion der unteren Schutzhaube a Überprüfen Sie vor jeder Benutzung, ob die untere Schutzhaube einwandfrei schließt. Verwenden Sie die Säge nicht, wenn die untere Schutzhaube nicht frei beweglich ist und sich nicht sofort schließt. Klemmen oder binden Sie die untere Schutzhaube niemals in geöffneter Position fest. Sollte die Säge unbeabsichtigt zu Boden fallen, kann die untere Schutzhaube verbogen werden. Öffnen Sie die Schutzhaube mit dem Rückziehhebel und stellen Sie sicher, dass sie sich frei bewegt und bei allen Schnittwinkeln und tiefen weder Sägeblatt noch andere Teile berührt. b Überprüfen Sie die Funktion der Feder für die untere Schutzhaube. Lassen Sie die Säge vor dem Ge brauch warten, wenn untere Schutz haube und Feder nicht einwandfrei arbeiten. Beschädigte Teile, klebrige Ablagerungen oder Anhäufungen von Spänen lassen die untere Schutzhaube verzögert arbeiten. c Öffnen Sie die untere Schutzhaube von Hand nur bei besonderen Schnit ten wie Tauch- und Winkelschnitten. Öffnen Sie die untere Schutzhaube mit dem Rückziehhebel und lassen Sie diesen los, sobald das Sägeblatt in das Werkstück eintaucht. Bei allen anderen Handkreissaege_man.indd :27
12 12 Sägearbeiten soll die untere Schutzhaube automatisch arbeiten. d Legen Sie die Säge nicht auf der Werkbank oder dem Boden ab, ohne dass die untere Schutzhaube das Sägeblatt bedeckt. Ein unge schütztes, nachlaufendes Sägeblatt bewegt die Säge entgegen der Schnittrichtung und sägt, was ihm im Weg ist. Beachten Sie dabei die Nachlaufzeit der Säge. 6 Gerätespezifische Sicherheitshinweise Sägeblätter aus hochlegiertem Schnellschnitt-Stahl (HSS-Stahl) dür fen nicht verwendet werden. Es dürfen nur Sägeblätter nach EN mit dieser Säge verwendet werden. Sägeblätter, die den in dieser Ge brauchsanweisung angegebenen Kenndaten nicht entsprechen, dürfen nicht verwendet werden. Es ist sicherzustellen, dass alle be weg lichen Teile des Sägeblattschut zes ohne Klemmen funktionieren. Nur scharfe Sägeblätter und geeigne tes Zubehör verwenden. Niemals Schleifscheiben in der Säge verwenden. Kleine Holzteile vor der Bearbeitung fest einspannen. Nie mit der Hand festhalten. Verwenden Sie keine Flansche/ Flanschmuttern, deren Bohrung größer oder kleiner ist, als diejenige des Sägeblattes. Das Sägeblatt darf nicht von Hand gebremst werden. Die Maschine nicht im stationären Betrieb einsetzen. Beim Sägen Staubschutzmaske und Schutzbrille anlegen. Verwenden Sie nur Sägeblätter mit Durchmessern entsprechend den Aufschriften auf der Säge. Verwenden Sie nur empfohlene Sägeblätter. Suchen Sie das richtige Sägeblatt entsprechend dem zu sägenden Werkstoff aus. Verwenden Sie nur Sägeblätter mit einer Drehzahl-Kennzeichnung, die der auf dem Elektrowerkzeug angegebenen Drehzahl entspricht oder höher ist. Sicherheitshinweise für die Laser- Markierhilfe Vorsicht! Wenn andere, als die in der Be triebsanleitung beschriebenen Be die nungs- und Justiereinrichtungen ver wen det oder andere Verfahrenswei sen aus geführt werden, kann dies zu gefähr licher Strahlungseinwirkung führen. Das Elektrowerkzeug wird mit Warnschildern ausgeliefert, deren Anbringung der Abb. 1 auf Seite 2 zu entnehmen ist. Nicht in den Laserstrahl blicken. Das Betrachten des Laserausganges mit optischen Instrumenten (z.b. Lupen und Mikroskopen) kann innnerhalb von 100 mm Abstand mit einer Au gengefährdung verbunden sein Handkreissaege_man.indd :27
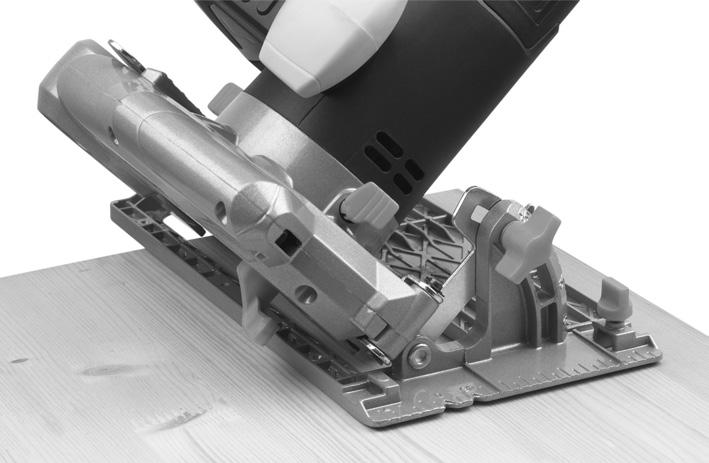
13 Laser-Lichtstrahl nicht auf Mensch oder Tier richten. Laser-Lichtstrahl nicht auf stark re flektierenden Materialien verwenden. Gefahr durch reflektierendes Licht. Reparaturen an der Laser-Markierhilfe nur von Fachleuten ausführen lassen. Keine harten Gegenstände in die Laser-Optik (3) einführen. Laser-Optik mit einem weichen, trockenen Pinsel reinigen. Bedeutung der Symbole Betriebsanleitung lesen! Freiwilliges Gütesiegel geprüfte Sicherheit Gehäuse ist doppelt schutziso liert Gerät entspricht geltenden EU-Richtlinien) Wichtig! Schutzbrille tragen! Wichtig! Gehörschutz tragen! Wichtig! Atemschutzmaske tragen! Tragen Sie geeignete Schutzhand schuhe. Achtung Laserstahlung. Nicht in den Strahl blicken (Laserklasse 2) Warnhinweis nach EN Nicht in den Hausmüll entsorgen! n 0 : 4700 min-1 Leerlaufdrehzahl pro Minute ohne Belastung Ø: 190 mm Zulässiger Sägeblatt-Durchmesser Weitere Symbole und deren Erklärung im Text dieser Anleitung: BJ SN: Baujahr Seriennummer SN: XXXXX Die ersten beiden unterstrichenen Ziffern geben den Herstellungsmonat an. 7 Montage und Einstellarbeiten ACHTUNG! Vor allen Montageund Einstellarbeiten Stillstand des Werkzeugs abwarten und den Netzstecker aus der Steckdose ziehen. Parallelschnitt (Abb. 2) 1. Feststellschraube (6) lösen. 2. Parallelanschlag (17) lt. Skala einstellen, auf Sägeblattbreite achten. 3. Feststellschraube (6) wieder festziehen. ACHTUNG! Probeschnitt mit einem Abfallholz durchführen. Kerbe A senkrechter Schnitt 90 Kerbe B schräger Schnitt 45 Schnittiefe einstellen (Abb. 3) 1. Feststellhebel der Schnitttiefeneinstellung (14) lösen Handkreissaege_man.indd :28
14 14 2. Sägeschuh (7) nach unten schwen ken. 3. Schnitttiefe nach Skala (13) einstellen. Zahn spitze muss ca. 2 mm aus dem Holz heraus ragen. 4. Feststellhebel (14) wieder festziehen. Sägeschuh verstellen (Winkelschnitt) (Abb. 4) 1. Die Feststellschraube der Schnittwinkeleinstellung (5) lösen. 2. Sägeschuh auf der Schnittwinkel Skala (4) auf gewünschte Gradzahl einstellen 0/ Feststellschraube fest anziehen. Sägeblatt wechseln (Abb. 5a + b) 1. Schnitttiefe auf den kleinsten Wert einstellen. 2. Pendelschutzhaube (8), mit Hilfe des Hebels (10) bis zum An schlag hochschieben, festhalten und gleich zeitig die Sägespindelarre tierung (16) drücken und festhalten. 3. Mit dem Innensechskantschlüssel (19), die Innensechskantschraube (9) ent gegen dem Uhrzeigersinn lösen und den Flansch abnehmen. 4. Sägeblatt nach unten abnehmen und ersetzen. Die Zahnung muss in Sägerichtung zeigen! Abmessungen be achten! ACHTUNG! Die Pfeilmarkierungen auf Sägeblatt und Säge blattab deckung müssen überein stimmen! 5. Sägeblatt mit Flansch und Sechskantschraube befestigen. 8 Betrieb (Abb ) Die LED-Betriebsanzeige (15) leuchtet grün, sobald die Maschine mit der Netzspannung gekoppelt ist. Die Maschine ist betriebsbereit. Ein-/Ausschalten Die Maschine verfügt über eine Zwei- Knopf-Sicherheitsschaltung: Die Ma schine kann nur in Betrieb genommen werden, wenn der Hand griff fest um schlossen ist und beide Knöpfe ge drückt wer den. Bei Loslassen des Hand griffs schal tet die Maschine automatisch ab, sodass unbe absichtigter Lauf nicht möglich ist. ACHTUNG! Maschine vor dem Kontakt mit dem Werkstück einschalten! 9 Arbeitsweise Die Pendelschutzhaube wird vom Werkstück automatisch zurückgeschoben. Mit der Kreissäge leicht und gleichmäßig vorrücken. Das herabfallende Werkstück sollte sich auf der rechten Seite der Kreissäge befinden, damit der breite Teil des Auflage ti sches auf seiner ganzen Flä che aufliegt. Laser-Markierhilfe (3) Der Lichtstrahl der Laser-Markierhilfe er leichtert das Ausführen gerader Schnitte a) entlang einer vorgezeichneten Schnitt linie auf dem Werkstück b) durch Anpeilen eines markierten Fix Handkreissaege_man.indd :28
15 punktes auf dem Werkstück. Die Reichweite des Laserstrahls be trägt je nach Umgebungslicht ca. 65 cm. Die Laser-Markierhilfe wird mit dem Ein-/Aus schalter (1) bei Bedarf zu- und aus ge schaltet. Staubabsaugung Über den Staubsaugeranschluss (11) ist die Staubab saugung mittels Staubsauger möglich. Das Ein atmen von Schleif stäu ben ist ge sund heitsschädlich, daher grundsätzlich mit eingeschalteter Staub absau gung arbei ten. Gegebenenfalls den mitgelieferten Adapter (18) ver wenden, um einen handelsüblichen Saugschlauch anzuschließen. 10 Wartung und Umweltschutz Ziehen Sie vor allen Arbeiten am Elektrowerkzeug den Netzstecker aus der Steckdose. Halten Sie das Elektrowerkzeug und die Lüftungsschlitze sauber, um gut und sicher zu arbeiten. Die Pendelschutzhaube muss sich immer frei bewegen und selbsttätig schließen können. Halten Sie deshalb den Bereich um die Pendelschutzhaube stets sauber. Entfernen Sie Staub und Späne durch Ausblasen mit Druckluft oder mit einem Pinsel. Nicht beschichtete Sägeblatter können durch eine dünne Schicht säurefreies Öl vor Korrosionsansatz geschützt werden. Entfernen Sie vor dem Sägen das Öl wieder, da das Holz sonst fleckig werden kann. Harz- oder Leimreste auf dem Sägeblatt beeinträchtigen die Schnittqualität. Reinigen Sie deshalb Sägeblatter gleich nach dem Gebrauch. ACHTUNG! Nicht mehr brauchbare Elektro- und Akkugeräte gehören nicht in den Hausmüll! Sie sind ent sprechend der Richtlinie 2012/19/EU für Elektro- und Elektronik- Altgeräte getrennt zu sammeln und einer umwelt- und fachgerechten Wiederverwertung zuzuführen. Bitte führen Sie nicht mehr brauchbare Elektrogeräte einer örtlichen Sammel stelle zu. Verpackungsmaterialien nach Sorten getrennt sammeln und gemäß den örtlichen Bestimmungen entsorgen. Einzelheiten erfragen Sie bitte bei Ihrer Gemeindeverwaltung. 11 Service-Hinweise Bewahren Sie die Maschine, Betriebsan leitung und ggf. Zubehör in der Ori ginal verpackung auf. So haben Sie alle Infor ma tionen und Teile stets griffbereit. Meister-Geräte sind weitgehend war tung s frei, zum Reinigen der Ge häu se ge nügt ein feuchtes Tuch. Zusätz liche Hinweise entnehmen Sie bitte der Betriebs an leitung. Meister-Geräte unterliegen einer stren gen Qualitätskontrolle. Sollte dennoch ein mal eine Funk tionsstö rung auf treten, so senden Sie das Gerät bitte an unsere Service- Anschrift. Die Reparatur erfolgt umgehend Handkreissaege_man.indd :28
16 Eine Kurzbeschreibung des Defekts verkürzt die Fehlersuche und Reparaturzeit. Während der Garantiezeit legen Sie dem Gerät bitte Garantie- Urkunde und Kauf beleg bei. Sofern es sich um keine Garantiereparatur handelt, werden wir Ihnen die Reparaturkosten in Rechnung stellen. WICHTIG! Öffnen des Gerätes führt zum Erlöschen des Garantieanspruchs! WICHTIG! Wir weisen ausdrücklich darauf hin, dass wir nach dem Produkthaftungsgesetz nicht für durch unsere Geräte hervorgerufene Schäden einzustehen haben, sofern diese durch unsachgemäße Reparatur verursacht oder bei einem Teileaustausch nicht unsere Originalteile bzw. von uns freigegebene Teile verwendet wurden und die Reparatur nicht vom Conmetall Meister GmbH Kundenservice oder einem autorisierten Fachmann durchgeführt wurde! Entsprechendes gilt für die ver wen deten Zubehörteile. Zur Vermeidung von Transportschäden das Gerät sicher verpacken oder die Original verpackung verwenden. Auch nach Ablauf der Garantiezeit sind wir für Sie da und werden eventuelle Repa ra turen an Meister-Geräten kosten günstig ausführen Handkreissaege_man.indd :28
17 CZ Návod k obsluze a bezpečnostní pokyny Obsah VAROVÁNÍ! Za účelem snížení rizika zranění si důkladně přečtěte návod na obsluhu před prvním uvedením do provozu. Návod na obsluhu uložte ke stroji! Při předání přístroje jiným uživatelům se musí předat i tento návod na obsluhu. Strana 1 Rozsah dodávky 17 2 Technické informace 17 3 Součásti 18 4 Použití k danému účelu 18 5 Všeobecné bezpečnostní pokyny 20 6 Speciální bezpečnostní pokyny pro zařízení 24 1 Rozsah dodávky 1 Ruční kotoučová pila 1 Paralelní doraz 1 Pilový list 1 Imbusový klíč 1 Adaptér pro externí odsávání vzduchu Návod na použití Záruční listina 2 Technické informace Technické údaje Napětí sítě V~/50 Hz Příkon 1500 W Volnoběžné otáčky n 0 = 4700 min -1 Hloubka řezu mm Hloubka řezu mm Úhel řezu 0/90 45 Pilový list Ø 190 x 30 mm Připojovací kabel 3 m Strana 7 Montáž a nastavení 26 8 Provoz 26 9 Způsob práce Údržba a ochrana životního prostředí Pokyny pro servis 28 Laserový značkovač Třída laseru 2 Vlnová délka 650 nm Výstupní výkon < 1mW je zaregistrovaná zbožní značka společnosti Conmetall Meister GmbH, Wuppertal/Germany Technické změny vyhrazeny. Emise hluku/vibrace Emise hluku L pa : 91,5 db(a), L WA : 102,5 db(a) Nejistota měření: K pa : 3,0 db(a), K WA : 3,0 db(a) Vibrace ruky/paže Řezání dřeva: - Rukojeť: a h : 5,6 m/s 2 ; - Přídavná rukojeť: a h : 5,3 m/s 2 ; Nejistota měření K: 1,5 m/s Handkreissaege_man.indd :28
18 18 Informace o hluku/vibracích Naměřené hodnoty stanovené podle EN Uvedená emisní hodnota vibrací byla naměřena podle normovaného zkušebního postupu a může se používat k porovnání jednoho elektrického nářadí s druhým. Uvedená emisní hodnota vibrací se může používat i na počáteční posouzení omezení. POZOR! Hodnota emise vibrací se může během používání elektrického nářadí odlišovat od uvedené hodnoty v závislosti na druhu a způsobu, jakým se elektrické nářadí používá. Snažte se udržovat zatížení vibracemi pokud možno na minimu. Příkladným opatřením ke snížení zatížení vibracemi je nošení rukavic při používání nástroje a omezení pracovní doby. Přitom se musejí zohlednit všechny prvky provozního cyklu (například doby, během nichž je elektrický nástroj vypnutý, a takové doby, během nichž je elektrický nástroj sice zapnutý, avšak běží bez zatížení). POZOR! Určitému obtěžování hlukem se u tohoto nástroje nelze vyhnout. Práce s vysokou intenzitou hluku proto přeložte na povolené a vyhrazené denní doby. Dodržujte příp. doby odpočinku a trvání práce omezte na nejnutnější. POZOR! Působení hluku může vést k poškození sluchu. Proto pracujte pouze s vhodnou ochranou sluchu. Osoby nacházející se v blízkosti by rovněž měly nosit vhodnou ochranu sluchu. 3 Součásti 1 Zapínač/vypínač laserového značkovače 2 Rukojeť 2a Přídavná rukojeť 3 Laserový značkovač 4 Stupnice úhlu řezu 5 Nastavení úhlu řezu 6 Aretační šroub pro paralelní doraz 7 Základová deska 8 Výkyvný ochranný kryt 9 Šroub s vnitřním šestihranem 10 Páčka výkyvného ochranného krytu 11 Přípojka pro odsávání prachu 12 Zapínač/vypínač 13 Stupnice hloubky řezu 14 Nastavení hloubky řezu 15 LED provozní ukazatel 16 Aretace vřetena (obr. 5a) 17 Paralelní doraz 18 Adaptér pro externí odsávání vzduchu 19 Imbusový klíč 4 Použití k danému účelu Tato ruční kotoučová pila se smí používat pouze v rámci manuálního provozu v domácím prostředí. Spolu s dodaným pilovým listem je vhodná k provádění rovných řezů do dřeva a dřevěných materiálů v souladu s údaji uvedenými v tomto návodu na použití. Tento nástroj je určen pouze k domácímu použití. Tento přístroj není určen k tomu, aby jej používaly osoby (včetně dětí) s omezenými fyzickými, smyslovými nebo duševními schopnostmi nebo nedostatkem zkušeností a/nebo znalostí. Děti by měly být pod dozorem, aby se zajistilo, že si nebudou s přístrojem hrát. POZOR! Použitím, které je v rozporu s určením, změnami na pří Handkreissaege_man.indd :28
19 stroji nebo použitím dílů, které nebyly přezkoušeny a schváleny výrobcem, mohou vzniknout nepředvídatelné škody. Použití v rozporu s určením Veškerá použití přístroje, která nejsou uvedena v kapitole Použití k danému účelu, jsou považována za použití v rozporu s účelem. Tento elektrický nástroj není vhodný ke kácení stromů. Použití, pro které není elektrický nástroj určen, může mít za následek ohrožení a úrazy. Nepoužívejte žádné příslušenství, které není zvlášť určeno pro tento elektrický nástroj. Samotná skutečnost, že je možné příslušenství upevnit k vašemu elektrickému přístroji, nezaručuje bezpečné použití. Dovolené otáčky vložného nástroje musejí být minimálně tak vysoké, jak vysoké jsou maximální otáčky uvedené na elektrickém nástroji. Příslušenství, které se otáčí rychleji než je dovoleno, může prasknout a rozlétnout se všemi směry. Vnější průměr a tloušťka vložného nástroje musejí odpovídat rozměrovým údajům vašeho elektrického nástroje. Nesprávně dimenzované vložné nástroje nelze dostatečně krýt nebo kontrolovat. Vložné nástroje, které přesně nesedí na brusném vřetenu elektrického nástroje, se otáčejí nerovnoměrně, silně vibrují a mohou způsobit ztrátu kontroly. Hrozí nebezpečí úrazu. Za všechny takto vzniklé hmotné škody a úrazy osob, vzniklé následkem nesprávného používání, ručí uživatel přístroje. Při použití jiných nebo neoriginálních součástí na stroji pozbývá záruka výrobce platnost. Zbývající rizika: Návod k obsluze tohoto elektrického nástroje obsahuje podrobné pokyny pro bezpečnou práci s elektrickými nástroji. Navzdory tomu v sobě každý elektrický nástroj skrývá určitá zbývající rizika, která nelze zcela vyloučit ani pomocí disponibilních ochranných zařízení. Proto elektrické nástroje obsluhujte s potřebnou opatrností. Zbývající rizika mohou být například: Kontakt s pohyblivými díly nebo vložnými nástroji. Zranění odletujícími obrobky nebo částmi obrobku. Nebezpečí požáru v případě nedostatečného odvětrávání motoru. Poškození sluchu při práci bez ochrany sluchu. Bezpečná práce závisí i na zběhlosti obslužného personálu v zacházení s příslušným elektrickým nástrojem! Odpovídající znalost stroje, jakož i obezřetné chování napomáhají při práci minimalizovat existující zbývající rizika. Varování! Tento elektrický nástroj vytváří během provozu elektromagnetické pole. Toto pole může za určitých okolností ovlivňovat aktivní a pasivní zdravotnické implantáty. Pro zmírnění nebezpečí vážných nebo smrtelných zranění doporučujeme, aby osoby se zdravotnickými implantáty prokonzultovaly používání elektrického nástroje se svým lékařem nebo výrob Handkreissaege_man.indd :28
20 cem zdravotnického implantátu, než začnou elektrický nástroj obsluhovat. 5 Všeobecné bezpečnostní pokyny pro zacházením s elektrickým nářadím VAROVÁNÍ! Přečtěte si všechny bezpečnostní pokyny a instrukce. Opomenutí při dodržování bezpečnostních pokynů a instrukcí může zapříčinit zásah elektrickým proudem, požár a/nebo těžká zranění. Uschovejte veškeré podklady, v nichž jsou uvedeny bezpečnostní pokyny a instrukce, pro použití v budoucnu. Výraz elektrický nástroj, uvedený v bezpečnostních pokynech, platí pro elektrické nástroje, které jsou napájené ze sítě (se síťovým kabelem), a elektrické nástroje napájené z akumulátorů (bez síťového kabelu). 1 Pracoviště a Udržujte své pracoviště v čistotě a uklizené. Nepořádek a neosvětlené pracoviště může vést k úrazům. b Nepracujte se zařízením ve výbušném prostředí, ve kterém se nacházejí hořlavé kapaliny, plyny nebo prachy. Elektrické nářadí vytváří jiskry, které mohou zapálit prach nebo páry. c Během používání elektrického nářadí zamezte přístupu dětí a jiných osob. Při odvedení pozornosti můžete ztratit kontrolu nad zařízením. 2 Elektrická bezpečnost žádném případě nesmí upravovat. Nepoužívejte společně s přístroji s ochranou uzemněním žádné adaptéry na zástrčky. Zástrčky, na kterých nebyly provedeny žádné změny a vhodné zásuvky snižují riziko úrazu elektrickým proudem. b Vyhýbejte se tělesnému kontaktu s uzemněnými povrchy, jako jakou trubky, topná tělesa, sporáky nebo chladničky. Když je Vaše tělo uzemněné, hrozí zvýšené riziko úrazu elektrickým proudem. c Nevystavujte přístroj dešti nebo vlhku. Vniknutí vody do elektrického spotřebiče zvyšuje riziko úrazu elektrickým proudem. d Nepoužívejte kabel k jiným účelům než pro které byl určen, pro přenášení přístroje, jeho zavěšování nebo pro vytahování zástrčky ze zásuvky. Udržujte kabel v bezpečné vzdálenosti od působení tepla, oleje, ostrých hran nebo pohybujících se částí přístroje. Poškozené nebo zamotané kabely zvyšují riziko úrazu elektrickým proudem. e Když pracujete s elektrickým nářadím venku, používejte jen prodlužovací kabely, které jsou schválené i pro používání ve venkovním prostředí. Používání kabelu vhodného pro venkovní prostředí snižuje riziko úrazu elektrickým proudem. f Pokud nelze zabránit používání elektrického nářadí ve vlhkém prostředí, je třeba použít proudový chránič. Použití proudového chrániče zamezuje nebezpečí úrazu elektrickým proudem. 20 a Připojovací zástrčka přístroje musí odpovídat zásuvce. Zástrčka se v Handkreissaege_man.indd :28
21 3 Bezpečnost osob a Buďte opatrní, dbejte na to, co děláte a k práci s elektrickým nářadím přistupujte rozumně. Zařízení nepoužívejte, když jste unavení a nebo jste pod vlivem drog, alkoholu nebo léků. Chvilková nepozornost při používání přístroje může vést k vážným poraněním. b Noste osobní ochrannou výstroj a vždy ochranné brýle. Nošení osobní ochranné výstroje jako je protiprachová maska, neklouzavá bezpečnostní obuv, ochranná přílba nebo chrániče sluchu, podle způsobu a použití elektrického nářadí, snižuje riziko poranění. c Zabraňte neúmyslnému uvedení do provozu. Dříve než zastrčíte zástrčku do zásuvky se ujistěte, že je spínač v poloze OFF (VYP). Když máte při přenášení přístroje prst na spínači nebo když připojujete zapnutý přístroj do sítě, může to způsobit úrazy. d Dříve než přístroj zapnete, odstraňte nastavovací nástroje nebo klíče na šrouby. Nástroj nebo klíč, který se nachází v otáčející se části přístroje, může způsobit zranění. e Nepřeceňujte se. Dbejte na bezpečné stání a udržujte neustále rovnováhu. Tím můžete přístroj v neočekávaných situacích lépe kontrolovat. f Noste vhodný oděv. Nenose volný oděv nebo šperky. Vlasy, oděv a rukavice udržujte v bezpečné vzdálenosti od pohybujících se částí. Pohybující se části by mohly volný oděv, šperky nebo dlouhé vlasy zachytit. g Pokud je možné namontovat zařízení na odsávání a zachycování prachu, ubezpečte se, že jsou připojená a že se správně používají. Používání těchto zařízení snižuje ohrožení prachem. h Nenechte se ovlivnit falešným pocitem bezpečí a stále dodržujte bezpečnostní pravidla pro elektrické nástroje, i když jste po dlouhodobém a častém používání s elektrickými nástroji důkladně obeznámeni. Neopatrné jednání může mít za následek vážné zranění během zlomku sekundy. 4 Pečlivé zacházení a používání elektrického nářadí a Přístroj nepřetěžujte. Používejte pro práci elektrické nářadí, které je pro ni určeno. Vhodným elektrickým nářadím pracujete lépe a bezpečněji v uvedeném rozsahu výkonu. b Nepoužívejte žádné elektrické nářadí, jehož spínač je poškozený. Elektrické nářadí, které se již nedá zapnout nebo vypnout, je nebezpečné a musí se opravit. c Před tím, než začněte provádět nastavení na přístroji, vyměňovat příslušenství nebo přístroj odložíte, vytáhněte zástrčku ze zásuvky. Toto bezpečností opatření zabraňuje neúmyslnému spuštění přístroje. d Uchovávejte nepoužívané elektrické nářadí mimo dosah dětí. Nenechávejte s přístrojem pracovat osoby, které s ním nejsou obeznámeny nebo které nečetly tento návod. Elektrické nářadí je nebezpečné, když ho používají nezkušené osoby. e Elektrické nářadí a nástroj ošetřujte pečlivě. Kontrolujte, jestli pohybující se části zařízení fungují bezchybně a neváznou, jestli části nejsou Handkreissaege_man.indd :28
22 zlomené nebo natolik poškozené, že by byla ohrožena funkce přístroje. Před použitím elektrického nástroje nechte poškozené díly opravit. Mnoho úrazů je způsobeno nesprávně udržovaným elektrickým nářadím. f Udržujte řezací nástroje ostré a čisté. Pečlivě ošetřované řezací nástroje s ostrými řeznými hranami se méně zasekávají a dají se snáze vodit. g Používejte elektrické nářadí, příslušenství, násady atd. podle tohoto návodu a tak, jak je to pro tento speciální typ přístroje předepsáno. Dbejte přitom na pracovní podmínky a na prováděnou činnost. Použití elektrických nástrojů pro jiné než určené účely může přivodit nebezpečné situace. h Rukojeti a plochy rukojetí udržujte suché, čisté, zabraňte kontaktu s oleji a tuky. Elektrický nástroj s kluzkou rukojetí a kluzkými plochami rukojetí nelze bezpečně používat a kontrolovat v nepředvídatelných situacích. 5 Servis a Nářadí svěřte do opravy jen kvalifikovanému odbornému personálu a jen s originálními náhradními díly. Tím je zaručeno, že zůstane bezpečnost přístroje zachována. b Pokud se poškodí připojovací vedení, musí ho - aby se předešlo ohrožením - vyměnit výrobce nebo zástupce jeho zákaznického servisu. 6 Bezpečnostní pokyny pro všechny pily/pilování a NEBEZPEČÍ: Vaše ruce se nesmějí dostat do oblasti řezání a na pilový list. Svojí druhou rukou přidržujte pilu za přídavnou rukojeť nebo pouzdro motoru. Pokud držíte pilu oběma rukama, nemůže pilový list ruce poranit. b Nesahejte pod obráběný kus. Pod obráběným předmětem vás ochranný kryt před pilovým listem nechrání. c Přizpůsobte hloubku řezu tloušťce obráběného předmětu. Pod obráběným předmětem by mělo být vidět méně než celá výška zubu. d Řezaný předmět nikdy nepřidržujte rukou nebo nad nohou. Obráběný předmět zajistěte ve stabilním úchytu. Je důležité obráběný předmět řádně upevnit, aby se snížilo nebezpečí kontaktu s tělem, uváznutí pilového listu nebo ztráta kontroly. e Při vykonávání prací, při nichž se vkládaný nástroj může dotknout skrytých elektrických vedení nebo samotného síťového kabelu, držte elektrický nástroj pouze za izolované plochy rukojeti. V důsledku kontaktu s vedením pod napětím jsou i kovové díly elektrického nástroje pod napětím, což vede k zásahu elektrickým proudem. f Při podélném řezání používejtevždy zarážku nebo rovné vedení hran. Zlepšuje to přesnost řezu a snižuje se možnost zaseknutí pilového listu. 22 g Vždy používejte pilové listy správné velikosti a s vhodným otvorem úchytu (např. ve tvaru hvězdy nebo kulaté). Pilové listy, které se nehodí k Handkreissaege_man.indd :28
23 montážním dílům pily, se nepohybují v kruhu a vedou ke ztrátě kontroly. h Nikdy nepoužívejte poškozené nebo nesprávné podložky nebo šrouby pilového listu. Podložky a šrouby pilového listu byly zkonstruovány speciálně pro vaši pilu, pro optimální výkon a provozní bezpečnost. 7 Další bezpečnostní pokyny pro všechny pily Zpětný ráz - příčiny a příslušné bezpečnostní pokyny Zpětný náraz je náhlá reakce následkem zaseknutého, vzpříčeného nebo nesprávně vyrovnaného pilového listu, která vede k tomu, že nekontrolovaná pila se nadzvedne a vyskočí z obráběného předmětu směrem k obsluze. Pokud se pilový list zasekne nebo vzpříčí v zavírající se štěrbině pilování, zablokuje se a motorová síla odrazí pilu zpět směrem k obsluze. Pokud se pilový list při řezání pilou přetočí nebo nesprávně vyrovná, mohou se zuby zadní hrany pilového listu zaseknout v povrchu obráběného předmětu, následkem toho pilový list vyskočí ze štěrbiny pilování a odskočí směrem k obsluze. Zpětný náraz je výsledkem nesprávného a/nebo nevhodného používání pily. Zabránit tomu můžete přijetím vhodných preventivních opatření dle následujícího popisu. a Pilu držte pevně oběma rukama a horními končetinami zaujměte polohu, ve které dokážete odolat silám zpětného nárazu. Držte se vždy bokem od pilového listu. Pilový list se nikdy nesmí dostat do jedné přímky s vaším tělem. V případě zpětného nárazu může kotoučová pila odskočit dozadu. Obsluha však díky přijatým preventivním opatřením dokáže ovládat síly zpětného nárazu. b Pokud se pilový list vzpříčí nebo přerušíte práci, vypněte pilu a držte ji v klidu v obráběném předmětu, dokud se pilový list nezastaví. Nikdy se nepokoušejte vyjmout pilu z obráběného předmětu nebo ji tahat dozadu, dokud se pilový list pohybuje, v opačném případě může dojít ke zpětnému nárazu. Zjistěte a odstraňte příčinu zaseknutí pilového listu. c Pokud chcete nastartovat pilu, která zůstala zaseknutá v obráběném předmětu, vycentrujte pilový list ve štěrbině pilování a zkontrolujte, zda pilové zuby neuvázly v obráběném předmětu. Pokud se pilový list zasekne, může po opětovném nastartování pily vypadnout z obráběného předmětu nebo způsobit zpětný náraz. d Podepřete ho velkými deskami, abyste zabránilo riziku zpětného nárazu zaseknutým pilovým listem. Velké desky se pod vlastní hmotností mohou prohnout. Desky musejí být podepřené na obou stranách, teda v blízkosti štěrbiny pilování i na okraji. e Nepoužívejte tupé nebo poškozené pilové listy. Pilové listy s tupými nebo nesprávně vycentrovanými zuby zapříčiní v důsledku příliš úzké štěrbiny pilování zvýšené tření. Uváznutí pilového listu a zpětný náraz. e Nepoužívejte tupé nebo poškozené pilové listy. Pilové listy s tupými nebo nesprávně vycentrovanými zuby zapříčiní v důsledku příliš úzké štěrbiny pilo Handkreissaege_man.indd :28
24 24 vání zvýšené tření, zaseknutí pilového listu a zpětný náraz. f Před řezáním dotáhněte nastavení hloubky a úhlu řezu. Pokud se nastavení změní během řezání, může se pilový list zaseknout a může dojít ke vzniku zpětného nárazu. g Buďte mimořádně opatrní při řezání do stávajících stěn nebo jiných prostorů, do nichž není vidět. Ponořený pilový list se při zaříznutí do skrytých objektů může zablokovat a způsobit zpětný náraz. 8 Bezpečnostní upozornění pro ruční kotoučové pily Funkce spodního ochranného krytu a Před každým použitím zkontrolujte, zda se spodní ochranný kryt bezchybně zavírá. Pilu nepoužívejte tehdy, pokud není spodní ochranný kryt volně pohyblivý a okamžitě se nezavře. Spodní ochranný kryt nikdy neupínejte a neupevňujte v otevřené poloze. Pokud pila nechtíc spadne na zem, může se spodní ochranný kryt zdeformovat. Ochranný kryt otvírejte pomocí vratné páky a zabezpečte, aby se volně pohyboval a při všech úhlech a hloubkách řezů nedotýkal pilového listu ani jiných částí. b Zkontrolujte funkci pružiny pro spodní ochranný kryt. Pokud spodní ochranný kryt a pružina nefungují bezchybně, nechte před použitím provést údržbu pily. Poškozené části, lepkavé usazeniny nebo nahromaděné piliny způsobují opožděnou reakci dolního ochranného krytu. c Ochranný kryt otvírejte ručně jen při provádění speciálních řezů, jako např. ponorné a úhlové řezy. Spodní ochranný kryt otvírejte pomocí vratné páky a pusťte ji tehdy, jakmile se pilový list vnoří do obrobku. Při všech ostatních pracích s pilou musí spodní ochranný kryt fungovat automaticky. d Pilu nepokládejte na pracovní stůl nebo na zem, aniž by ochranný kryt zakrýval pilový list. Nechráněný, dobíhající pilový list uvádí pilu do pohybu proti směru řezu a řeže vše, co mu stojí v cestě. Nezapomeňte přitom na dobu doběhu pily. 6 Speciální bezpečnostní pokyny pro zařízení Nesmějí se používat pilové listy z vysokolegované rychlořezné oceli (ocel HSS). S touto pilou se smějí používat pouze pilové listy podle EN Pilové listy, které neodpovídají parametrům uvedeným v tomto návodu k použití, se nesmějí používat. Je nutné zajistit, aby všechny pohyblivé části ochrany pilového listu fungovaly bez zasekávání. Používejte pouze ostré pilové listy a vhodné příslušenství. Nikdy nepoužívejte brusné kotouče v pile. Malé kousky dřeva před opracováním pevně upevněte. Nikdy je nedržte rukama. Nepoužívejte příruby/přírubové matice, jejichž vývrt je větší nebo menší než vývrt pilového listu Handkreissaege_man.indd :28
25 Pilový list se nesmí brzdit rukou. Stroj nepoužívejte v rámci stacionárního provozu. Při řezání pilou noste ochrannou masku proti prachu a ochranné brýle. Používejte pouze pilové listy s průměry, které odpovídají údajům na pile. Používejte doporučené pilové listy. Bezpečnostní upozornění pro laserový značkovač Pozor! Použití jiných ovládacích a seřizovacích zařízení nebo jiných pracovních postupů, než které jsou uvedeny v návodu k použití, může zapříčinit nebezpečné ozáření laserovým paprskem. Elektrický nástroj se dodává s výstražnými štítky, jejichž umístění je znázorněno na obr. 1 na straně 2. Nedívejte se do laserového paprsku. Pozorování laserového výstupu pomocí optických přístrojů (např. lupy a mikroskopy) ze vzdálenosti do 100 mm může být spojeno s poškozením zraku. Laserový paprsek nemiřte na lidi ani zvířata. Laserový paprsek nepoužívejte na velmi reflexní materiály. Nebezpečí působením odrážejícího světla. Opravami laserového značkovače pověřte pouze odborníky. Do laserové optiky (3) nezavádějte žádné tvrdé předměty. Laserovou optiku vyčistěte měkkým, suchým štětcem. Význam bezpečnostních symbolů Přečtěte si návod k obsluze! Dobrovolná pečeť kvality ověřená bezpečnost Těleso má dvojitou ochrannou izolaci Přístroj odpovídá platným EU směrnicím) Důležité upozornění! Noste ochranné brýle! Důležité upozornění! Noste ochranu sluchu! Důležité upozornění! Noste ochrannou dýchací masku! Noste vhodné ochranné rukavice. Pozor - laserové záření. Nedívejte se do paprsku! (Třída laseru 2) Výstražné upozornění dle EN Neodhazujte do domovního odpadu! n 0 : 4700 min -1 Volnoběžné otáčky Ø: 190 mm Přípustný průměr pilový list Další symboly a jejich vysvětlení jsou uvedeny v textu tohoto návodu. BJ SN: Rok výroby Sériové číslo SN: XXXXX První dvě podtržené číslice znázorňují měsíc výroby Handkreissaege_man.indd :28
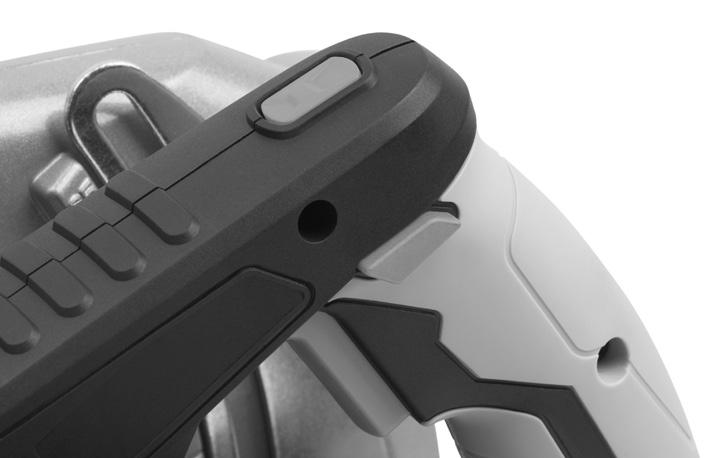
26 26 7 Montáž a nastavení POZOR! Před všemi montážními a nastavovacími pracemi počkejte na zastavení nástroje a vytáhněte zástrčku ze zásuvky. Paralelní řez (obr. 2) 1. Povolte aretační šroub (6). 2. Paralelní doraz (17) nastavte podle stupnice, dbejte na šířku pilového listu. 3. Opět utáhněte aretační šroub (6). POZOR! Proveďte zkušební řez na kusu odpadového dřeva. Zářez A svislý řez 90 Zářez B příčný řez 45 Nastavení hloubky řezu (obr. 3) 1. Povolte zajišťovací páku nastavení hloubky řezu (14). 2. Základovou desku (7) vychylte směrem dolů. 3. Podle stupnice (13) nastavte hloubku řezu. Hrot zubu musí vyčnívat cca 2 mm ze dřeva. 4. Opět utáhněte zajišťovací páku (14). Přestavení základové desky (úhlový řez) (obr. 4) 1. Povolte aretační šroub nastavení úhlu řezu (5). 2. Základovou desku nastavte na stupnici úhlu řezu (4) na požadovaný počet stupňů 0/ Aretační šroub pevně dotáhněte. Výměna pilového listu (obr. 5a + b) 1. Hloubku řezu nastavte na nejmenší hodnotu. 2. Výkyvný ochranný kryt (8) vysuňte pomocí páky (10) až na doraz, přidržte a současně stiskněte a podržte aretaci pilového vřetena (16). 3. Pomocí imbusového klíče (19) povolte šroub s vnitřním šestihranem (9) otáčením proti směru hodinových ručiček a sejměte přírubu. 4. Pilový list sejměte směrem dolů a vyměňte. Ozubení musí ukazovat ve směru řezání! Dodržujte rozměry! POZOR! Šipky na pilovém listu a krytu pilového listu se musejí shodovat! 5. Pilový list upevněte pomocí příruby a šestihranného šroubu. 8 Provoz (obr ) LED indikátor provozního stavu (15) svítí zeleně, jakmile se stroj připojí na síť. Stroj je připraven k provozu. Zapnutí/vypnutí Stroj je vybaven bezpečnostním spínačem, který se skládá ze dvou tlačítek: Stroj lze uvést do provozu pouze tehdy, pokud je rukojeť pevně uchopená a obě tlačítka jsou stisknutá. Jakmile se rukojeť pustí, stroj se automaticky vypne, takže neúmyslný chod není možný. POZOR! Stroj zapněte před kontaktem s obráběným předmětem Handkreissaege_man.indd :28
27 9 Způsob práce Výkyvný ochranný kryt se z obráběného předmětu automaticky odsune. Kotoučovou pilu přesouvejte zlehka a rovnoměrně. Padající obráběný předmět by se měl nacházet na pravé straně kotoučové pily, aby široká část úložného stolu přiléhala svojí celou plochou. Laserový značkovač (obr. 3) Světelný paprsek laserového značkovače usnadňuje provádění rovných řezů a) podél narýsované linie řezu na obráběném předmětu b) zaměřením označeného fixního bodu na obráběném předmětu. Dosah laserového paprsku je v závislosti na okolním světle cca 65 cm. Laserový značkovač se v případě potřeby zapíná a vypíná pomocí zapínače/ vypínače (1). Odsávání prachu Přes přípojku pro vysavač (11) lze provádět odsávání prachu pomocí vysavače. Vdechování brusného prachu je zdraví škodlivé, proto pracujte zásadně se zapnutým odsáváním prachu. Použijte případně dodaný adaptér (18) pro připojení běžné sací hadice. 10 Údržba a ochrana životního prostředí Než začnete provádět jakékoliv práce na elektrickém nástroji, vytáhněte nejdříve síťovou zástrčku ze zásuvky. Elektrický nástroj a větrací štěrbiny udržujte v čistotě, abyste mohli řádně a bezpečně pracovat. Výkyvný ochranný kryt se musí vždy moci pohybovat volně a samočinně zavírat. Oblast okolo výkyvného ochranného krytu udržujte vždy v čistotě. Prach a třísky odstraňujte profukováním pomocí stlačeného vzduchu nebo štětcem. Pilové listy bez povrchové úpravy lze chránit před napadením korozí pomocí tenké vrstvy oleje bez obsahu kyseliny. Před pilováním opět odstraňte olej, protože jinak mohou na dřevě vzniknout skvrny. Zbytky z pryskyřice nebo lepidla na pilovém listu ovlivňují kvalitu řezu. Proto čistěte pilové listy hned po použití. POZOR! Nepoužitelné elektrické a akumulátorové přístoje nepatří do domácího odpadul! Je třeba je shromažďovat odděleně podle směrnice 2012/19/EU pro elektrické a elektronické staré přístroje a odevzdat sekci ekologické a odborné recyklace. Odevzdávejte prosím nepoužitelné elektrické nářadí v místní sběrně. Obalový materiál shromažďujte odděleně podle druhu a likvidujte podle místních předpisů. Podrobnosti získáte od Vaší místní správy Handkreissaege_man.indd :28
28 11 Pokyny pro servis Uchovávejte stroj, návod k obsluze a případně i příslušenství v originálním balení. Takto budete mít veškeré informace i součásti neustále po ruce. Přístroje Meister téměř nevyžadují údržbu, k čištění krytu postačí vlhký hadřík. Elektrické stroje nikdy neponořujte do vody. Další pokyny jsou uvedeny v návodu k obsluze. Přístroje Meister podléhají přísné kontrole jakosti. Pokud se by přesto vyskytla porucha funkce, zašlete přístroj na adresu naší servisní služby. Opravu provedeme obratem. Stručný popis poruchy zkracuje dobu hledání místa závady i opravy. Během záruční lhůty prosím přiložte k přístroji záruční list a doklad o nákupu. Pokud se nejedná o záruční opravu, budeme vám náklady na opravu účtovat. DŮLEŽITÉ UPOZORNĚNÍ! Po otevření přístroje zaniká nárok na záruku! DŮLEŽITÉ! Výslovně upozorňujeme na to, že podle zákona o ručení za produkty neručíme za škody vzniklé našimi přístroji, pokud byly způsobeny nesprávnou opravou nebo pokud při výměně některé části nebyly použity naše originální díly popř! námi schválené díly a oprava nebyla provedena firmou Meister Werk zeuge GmbH v zákaznickém servisu nebo autorizovaným odborníkem! Totéž platí i pro použité příslušenství. Přístroj bezpečně zabalte nebo použijte originálního obalu, aby se při přepravě nepoškodil. I po uplynutí záruční doby jsme vám rádi k dispozici a případné opravy přístrojů Meister provedeme za výhodné ceny Handkreissaege_man.indd :28
29 F Mode d emploi & consignes de sécurité Pour éviter tout risque de blessure, lire le mode d emploi avant chaque mise en service et le remettre à toute personne à qui vous confiez l appareil. À conserver avec l appareil. Sommaire Page 1 Étendue des fournitures 29 2 Informations techniques 29 3 Composants 30 4 Usage conforme aux fins prévues 30 5 Consignes générales de sécurité 32 6 Consignes de sécurité spécifiques à l appareil 37 1 Étendue des fournitures 1 Scie circulaire à main 1 Butée parallèle 1 Lame de scie 1 Clé à six-pans creux 1 Adaptateur pour aspirateur à poussière externe Mode d emploi Document de garantie 2 Informations techniques Caractéristiques techniques Tension secteur V~/50 Hz Puissance absorbée 1500 W Vitesse en marche à vide n 0 = 4700 min -1 Profondeur de coupe à mm Profondeur de coupe à mm Angle de coupe 0/90 45 Lame de scie Ø 190 x 30 mm Câble de raccordement 3 m Page 7 Montage et ajustages 38 8 Fonctionnement 39 9 Mode de travail Maintenance et protection de l environnement Conseils de service 40 Aide au marquage au laser Classe laser 2 Longueur d onde 650 nm Puissance de sortie < 1mW Sous réserve de modifications techniques. est une marque déposée de Conmetall Meister GmbH, Wuppertal/Allemagne Émissions sonores/vibrations Émissions sonores L pa : 91,5 db(a), L WA : 102,5 db(a) Erreur d oscillation: K pa : 3,0 db(a), K WA : 3,0 db(a) Vibrations de la main/du bras Sciage du bois: - Poignée: a h : 5,6 m/s 2 - Poignée supplémentaire: a h : 5,3 m/s 2 ; Erreur d oscillation: K 1,5 m/s Handkreissaege_man.indd :28
30 30 Information sur les bruits/les vibrations Valeurs mesurées déterminées selon EN La valeur d émission de vibrations indiquée a été mesurée selon un procédé d essai normé et peut être utilisée pour une comparaison d un outil électrique avec un autre. La valeur d émission de vibrations indiquée peut également être utilisée pour une première estimation de la nuisance. ATTENTION! La valeur d émission de vibrations peut diverger de la valeur indiquée pendant l utilisation de l outil électrique, selon la manière dont l outil électrique est utilisé. Tentez de minimiser les nuisances causées par les vibrations. À titre d exemple, le port de gants lors de l utilisation de l outil et la limitation du temps de travail sont des mesures adéquates pour réduire les vibrations. Toutes les parts du cycle de fonctionnement doivent être prises en considération (c est-à-dire également les temps durant lesquels l outil est hors service et ceux durant lesquels il est certes en service mais sans être sollicité). ATTENTION! Une certaine nuisance sonore causée par l appareil est inévitable. Effectuez donc les travaux bruyants aux heures autorisées et fixées à cette fin. Respectez le cas échéant les périodes de repos et limitez la durée de travail au strict nécessaire. ATTENTION! Le bruit peut être responsable de lésions de l ouïe. Une protection de l ouïe est donc indispensable pour travailler. Les personnes se trouvant à proximité devraient également porter une protection de l ouïe adéquate. 3 Composants 1 Interrupteur marche/arrêt aide au marquage laser 2 Poignée 2a Poignée supplémentaire 3 Aide au marquage laser 4 Echelle pour angle de coupe 5 Réglage de l angle de coupe 6 Vis de réglage de butée parallèle 7 Semelle 8 Capot de protection à bascule 9 Vis à six pans creux 10 Levier du capot de protection à bascule 11 Raccord pour aspiration de poussière 12 Interrupteur marche/arrêt 13 Echelle pour profondeur de coupe 14 Réglage de la profondeur de coupe 15 Indicateur de service à LED 16 Dispositif d arrêt de broche (Fig. 5a) 17 Butée parallèle 18 Adaptateur pour aspirateur à poussière externe 19 Clé à six pans creux 4 Usage conforme aux fins prévues Cette scie circulaire à main doit uniquement être utilisée en mode manuel dans le secteur domestique. Avec la lame de scie fournie, elle est adaptée à des coupes droites dans le bois et les matériaux en bois, conformément aux indications de ce mode d emploi. Cet appareil est uniquement destiné à une utilisation domestique. Cet appareil n est pas conçu pour être utilisé par des personnes (y compris Handkreissaege_man.indd :28
31 des enfants) à mobilité réduite, souffrant de défaillances sensorielles ou intellectuelles ou qui ne sont pas familières du produit. Les enfants doivent être surveillés afin de s assurer qu ils ne jouent pas avec l appareil. ATTENTION! Une utilisation contraire aux dispositions, des modifications apportées à l appareil et l utilisation de pièces non contrôlées et autorisées par le fabricant peuvent être responsables de dommages imprévisibles. Utilisation non conforme aux fins prévues Toutes les applications de l appareil qui ne sont pas décrites dans le chapitre «Usage conforme aux fins prévues» sont considérées comme des utilisations non conformes. Cet outil électrique ne convient pas au sciage d arbres. Cet outil électrique n est pas destiné à Les applications pour lesquelles l outil électrique n est pas prévu peuvent être sources de dangers et occasionner des blessures. N utilisez aucun accessoire qui n est pas spécialement prévu pour cet outil électrique. Le fait que vous puissiez fixer l accessoire à votre outil électrique ne garantit pas son utilisation sûre. La vitesse autorisée de l outil utilisé doit être au moins aussi élevée que la vitesse maximale indiquée sur l outil électrique. Les accessoires dont la vitesse de rotation est plus élevée que celle autorisée peuvent se casser et être projetés. Le diamètre extérieur et l épaisseur de l outil utilisé doivent correspondre aux indications de votre outil électrique. Les outils utilisés mal dimensionnés ne peuvent pas être suffisamment blindés ou contrôlés. Il y a risque de blessures. L utilisateur de l appareil est responsable de tous les dommages matériels et corporels résultant d une fausse utilisation. La garantie du fabricant expire en cas d utilisation d autres composants ou de composants autres que ceux d origine sur la machine. Risques résiduels : Le mode d emploi de cet outil électrique contient des indications détaillées sur la manière de se servir en toute sécurité d outils électriques. Chaque outil électrique comporte cependant certains risques résiduels qui ne peuvent pas totalement être exclus malgré la mise en place de dispositifs de protection. L utilisation d outils électriques requiert donc une attention toute particulière. Ce qui suit peut constituer par exemple des risques résiduels : Contact avec des pièces mobiles ou les outils utilisés. Blessures provoquées par l éjection de pièces ou de fragments de pièces. Risque d incendie en cas d aération insuffisante du moteur. Altération de l ouïe lors de travaux sans protection des oreilles. Un travail en toute sécurité dépend également du degré d initiation du personnel de commande chargé d utiliser l outil électrique respectif! Une connaissance Handkreissaege_man.indd :28
32 32 adéquate de la machine et un comportement prudent lors des travaux contribuent à minimiser les risques résiduels. Avertissement! Pendant son fonctionnement, cet outil électrique génère un champ électromagnétique. Sous certaines circonstances, ce champ peut perturber les implants médicaux actifs ou passifs. Pour réduire lerisque de blessures graves ou mortelles, nous recommandons aux personnes portant des implants médicaux de consulter leur médecin et le fabricant de ces implants avant de se servir de l outil électrique. 5 Consignes générales de sécurité pour l utilisation d outils électriques ATTENTION! Lire toutes les instructions de sécurité et toutes les indications. Le non-respect des instructions indiquées ci-après peut entraîner un choc électrique, un incendie et/ ou de graves blessures. Conserver les instructions de sécurité et indications pour une utilisation ultérieure. La notion d «outil électroportatif» mentionnée dans les avertissements se rapporte à des outils électriques raccordés au secteur (avec câble de raccordement) et à des outils électriques à accu (sans câble de raccordement). 1 Endroit de travail a Maintenez l endroit de travail propre et bien rangé. Un lieu de travail en désordre ou mal éclairé augmente le risque d accidents. b N utilisez pas l appareil dans un environnement présentant des risques d explosion et où se trouvent des liquides, des gaz ou poussières inflammables. Les outils électroportatifs génèrent des étincelles risquant d enflammer les poussières ou les vapeurs. c Tenez les enfants et autres personnes éloignés durant l utilisation de l outil électroportatif. En cas d inattention vous risquez de perdre le contrôle sur l appareil. 2 Sécurité relative au système électrique a La fiche de secteur de l outil électroportatif doit être appropriée à la prise de courant. Ne pas modifier en aucun cas la fiche. Ne pas utiliser de fiches d adaptateur avec des appareils avec mise à la terre. Les fiches non modifiées et les prises de courant appropriées réduisent le risque de choc électrique. b Eviter le contact physique avec des surfaces mises à la terre tels que tuyaux, radiateurs, fours et réfrigérateurs. Il y a un risque élevé de choc électrique au cas où votre corps serait relié à la terre. c Ne pas exposer l outil électroportatif à la pluie ou à l humidité. La pénétration d eau dans un outil électroportatif augmente le risque d un choc électrique. d Ne pas utiliser le câble à d autres fins que celles prévues, ne pas utiliser le câble pour porter l appareil ou pour l accrocher ou encore pour le débrancher de la prise de courant. Maintenir le câble éloigné des sources de chaleur, des parties Handkreissaege_man.indd :28
33 grasses, des bords tranchants ou des parties de l appareil en rotation. Un câble endommagé ou torsadé augmente le risque d un choc électrique. e Au cas où l outil électroportatif serait utilisé à l extérieur, utiliser une rallonge autorisée homologuée pour les applications extérieures. L utilisation d une rallonge électrique homologuée pour les applications extérieures réduit le risque d un choc électrique. 3 Sécurité des personnes a Rester vigilant, surveiller ce que vous faites. Faire preuve de bon sens en utilisant l outil électroportatif. Ne pas utiliser l appareil lorsqu on est fatigué ou après avoir consommé de l alcool, des drogues ou avoir pris des médicaments. Un moment d inattention lors de l utilisation de l appareil peut entraîner de graves blessures sur les personnes. b Portez des équipements de protection personnels. Portez toujours des lunettes de protection. L utilisation d équipements de protection tels que masque antipoussière, chaussures anti-dérapantes, casque ou protection acoustique suivant l endroit de travail, réduit le risque de blessures. c Eviter toute mise en service accidentelle. S assurer que l outil électroportatif est effectivement éteint avant d être raccordé à l alimentation en courant/à l accu, avant d être soulevé ou d être porté. Le fait de porter l appareil avec le doigt sur l interrupteur ou de brancher l appareil sur la source de courant lorsque l interrupteur est en position de fonctionnement, peut être source d accidents. d Enlever tout outil de réglage ou toute clé avant de mettre l appareil en fonctionnement. Une clé ou un outil se trouvant sur une partie en rotation peut causer des blessures. e Ne pas se surestimer. Veiller à garder toujours une position stable et équilibrée. Ceci vous permet de mieux contrôler l appareil dans des situations inattendues. f Porter des vêtements appropriés. Ne pas porter de vêtements amples ni de bijoux. Maintenir cheveux, vêtements et gants éloignés des parties de l appareil en rotation. Des vêtements amples, des bijoux ou des cheveux longs peuvent être happés par des pièces en mouvement. g Si des dispositifs servant à aspirer ou à recueillir les poussières doivent être utilisés, vérifier que ceux-ci soient effectivement raccordés et qu ils sont correctement utilisés. L utilisation de tels dispositifs réduit les dangers dus aux poussières. h Ne vous croyez pas faussement en sécurité et respectez les règles de sécurité des outils électriques, même si vous êtes familier avec l outil électrique. Un maniement négligent peut entraîner des blessures graves en une fraction de seconde. 4 Utilisation et emploi soigneux d outils électroportatifs a Ne pas surcharger l appareil. Utiliser l outil électroportatif approprié au travail à effectuer. Avec l outil électroportatif approprié, vous travaillerez mieux et avec plus de sécurité à la vitesse pour laquelle il est prévu Handkreissaege_man.indd :28
34 34 b Ne pas utiliser un outil électroportatif dont l interrupteur est défectueux. Un outil électroportatif qui ne peut plus être mis en ou hors fonctionnement est dangereux et doit être réparé. c Retirer la fiche de la prise de courant avant d effectuer des réglages sur l appareil, de changer les accessoires, ou de ranger l appareil. Cette mesure de précaution empêche une mise en fonctionnement de l appareil par mégarde. d Garder les outils électroportatifs non utilisés hors de la portée des enfants. Ne pas permettre l utilisation de l appareil à des personnes qui ne se sont pas familiarisées avec celui-ci ou qui n ont pas lu ces instructions. Les outils électroportatifs sont dangereux lorsqu ils sont utilisés par des personnes non initiées. e Prenez soin des outils électriques et de l outil utilisé. Vérifier que les parties en mouvement fonctionnent correctement et qu elles ne soient pas coincées, et contrôler si des parties sont cassées ou endommagées de telle sorte que le bon fonctionnement de l appareil s en trouve entravé. Faites réparer les pièces endommagées avant d utiliser l outil électrique. De nombreux accidents sont dus à des outils électroportatifs mal entretenus. f Maintenir les outils de coupe aiguisés et propres. Des outils soigneusement entretenus avec des bords tranchants bien aiguisés se coincent moins souvent et peuvent être guidés plus facilement. g Utiliser les outils électroportatifs, les accessoires, les outils à monter etc. conformément à ces instructions et aux prescriptions en vigueur pour ce type d appareil. Tenir compte également des conditions de travail et du travail à effectuer. L utilisation des outils électroportatifs à d autres fins que celles prévues peut entraîner des situations dangereuses. h Maintenez les sèches, propres et exemptes d huile et de graisse. Les poignées glissantes ne permettent pas d utiliser et de contrôler l outil électrique en toute sécurité dans des situations imprévues. 5 Service a Ne faire réparer l outil électroportatif que par un personnel qualifié et seulement avec des pièces de rechange d origine. Ceci permet d assurer la sécurité de l appareil. a Si le câble de raccordement est endommagé, il doit être remplacé par le fabricant ou par son représentant du service après-vente pour éviter tout risque. 6 Consignes de sécurité pour toutes les scies/processus de sciage a DANGER: N intervenez pas avec vos mains dans la zone de sciage et sur la lame de scie. Tenez la poignée supplémentaire ou le carter de moteur avec votre deuxième main. Si les deux mains tiennent la scie, elles ne peuvent pas être blessées par la lame de scie. b N intervenez pas sous la pièce d usinage. Le capot de protection ne peut pas vous protéger contre la lame de scie sous la pièce d usinage Handkreissaege_man.indd :28
35 c Adaptez la profondeur de coupe à l épaisseur de la pièce d usinage. Moins d une hauteur de dent totale doit être visible sous la pièce d usinage. d Ne tenez jamais la pièce d usinage à scier dans la main ou sur la jambe. Sécurisez la pièce sur un logement stable. Il est important de bien fixer la pièce afin de réduire le risque de contact corporel, le coincement de la lame de scie ou la perte de contrôle e Tenez l outil électrique par les poignées isolées lorsque vous réalisez des travaux pour lesquels l outil utilisé risque d entrer en contact avec des conduites de courant dissimulées ou avec son propre câble d alimentation. Le contact avec une conduite conductrice d électricité met aussi les parties métalliques de l outil électrique sous tension et provoque une décharge électrique. f Lors d une coupe longitudinale, utilisez toujours une butée ou des bords droits. Cela améliore la précision de coupe et réduit la possibilité que la lame de scie se coince. g Veillez à toujours utiliser des lames de scie avec la taille correcte et un perçage de logement adapté (par ex. en forme d étoile ou rond). Les lames de scie non adaptées aux composants de montage fonctionnent mal et cause la perte du contrôle. h N utilisez jamais des rondelles ou des vis de lame endommagées ou erronées. Les rondelles et vis de lame ont été spécialement construites pour votre scie, pour une performance optimale et une sécurité de fonctionnement. 7 Consignes de sécurité supplémentaires pour toutes les scies Rebond Causes et consignes de sécurité correspondantes: Le rebond est la réaction soudaine à la suite d une lame de scie mal installée qui s accroche ou se coince et qui cause le soulèvement incontrôlé d une scie et son déplacement hors de la pièce d usinage en direction de l opérateur. Si la lame de scie s accroche ou se coince dans la fente de scie qui se referme, elle se bloque et la force du moteur fait rebondir la scie en direction de l opérateur. Si la lame de scie vrille dans l entaille ou est mal orientée, les dents du bord de lame arrière peuvent s accrocher sur la surface de la pièce d usinage, ce qui entraînerait la sortie de la lame de scie hors de la fente et son rebond en direction de l opérateur. Un rebond est la conséquence d une utilisation inappropriée et / ou erronée de la scie. Il peut être évité par des mesures de précaution appropriées, telles que décrites ci-après. a Tenez fermement la scie avec les deux mains et mettez vos bras dans une position dans laquelle vous pouvez amortir les forces du rebond. Tenez-vous toujours sur le côté de la lame de scie, n alignez jamais la lame avec votre corps. En cas de rebond, la scie circulaire peut sauter en arrière, mais l opérateur peut maîtriser les forces du rebond grâce à des mesures de précaution appropriées. b Si la lame de scie se coince ou si vous interrompez le travail, cou Handkreissaege_man.indd :28
36 36 pez la scie et maintenez-la calme jusqu à l arrêt complet de la lame de scie. Ne tentez jamais de retirer la scie de la pièce d usinage ou de la tirer vers l arrière tant que la lame bouge, sans quoi un rebond peut se produire. Déterminez et supprimez la cause du coincement de la lame de scie. c Si vous voulez redémarrer une scie coincée dans une pièce d usinage, centrez la lame dans la fente et vérifiez si les dents de scie ne sont pas accrochées dans la pièce d usinage. Si la lame est coincée, elle peut sortir de la pièce ou causer un rebond lorsque la scie est redémarrée. d Appuyez les grandes plaques afin de réduire le risque d un rebond dû à une lame de scie coincée. Les grandes plaques peuvent plier sous leur propre poids. Les plaques doivent être appuyées sur les deux côtés, et ce aussi bien à proximité de la fente que sur le bord. e N utilisez pas de lames de scie émoussées ou endommagées. Les lames de scie avec des dents émoussées ou mal orientées causent, du fait d une fente trop étroite, un frottement plus élevé, un coincement de la lame et un rebond. f Avant le sciage, définissez les réglages de profondeur de coupe et d angle de coupe. Si les réglages changent pendant le sciage, la lame de scie peut se coincer et un rebond risque de se produire. g Faites particulièrement attention lorsque vous sciez dans des parois existantes ou d autres zones non visibles. La lame de scie plongeante peut se bloquer dans des objets dissimulés et provoquer un rebond. 8 Consignes de sécurité pour scies circulaires à main Fonction du capot de protection inférieur a Avant toute utilisation, contrôlez que le capot de protection inférieur se ferme parfaitement. N utilisez pas la scie si le capot de protection inférieur ne se déplace pas librement et ne se ferme pas immédiatement. Ne coincez ou n attachez jamais le capot de protection inférieur en position ouverte. Si la scie tombe accidentellement au sol, le capot de protection inférieur risque de se plier. Ouvrez le capot de protection avec le levier et contrôlez qu il se déplace librement et qu il ne touche ni la lame de scie, ni d autres pièces, dans aucun angle de coupe ni aucune profondeur de coupe. b Contrôlez le fonctionnement des ressorts pour le capot de protection inférieur. Patientez avant d utiliser la scie au cas où le capot de protection inférieur et les ressorts ne fonctionnent pas parfaitement. Les pièces endommagées, dépôts collants ou accumulations de copeaux entraînent un fonctionnement ralenti du capot de protection inférieur. c N ouvrez le capot de protection inférieur à la main que pour des coupes particulières telles que les coupes plongeantes et d angle. Ouvrez le capot de protection inférieur avec le levier et relâchez-le dès que la lame de scie plonge dans la pièce d usinage. Pour tous les autres travaux de sciage, le capot de protection inférieur doit fonctionner en mode automatique. d Ne déposez pas la scie sur l établi ou au sol, sans que le capot de pro Handkreissaege_man.indd :28
37 tection inférieur recouvre la lame de scie. Une lame de scie non protégée, qui continue de tourner, déplace la scie dans le sens opposé au sens de coupe et scie tout ce qui se trouve sur son chemin. Respectez ainsi la course de freinage de la scie. 6 Consignes de sécurité spécifiques à l appareil Ne pas utiliser de lames de scie en acier de coupe rapide, fortement allié (acier HSS). Seules des lames de scie selon l EN doivent être utilisées avec cette scie. Ne pas utiliser de lames de scie qui ne correspondent pas aux données caractéristiques indiquées dans ce mode d emploi. Assurez-vous que toutes les pièces mobiles de la protection de lame fonctionnent sans borniers. N utiliser que des lames de scie acérées et des accessoires appropriés. Ne jamais utiliser de meules de ponçage dans la scie. Tendre fermement les pièces en bois avant l usinage. Ne jamais les tenir à la main. Ne pas utiliser de brides/écrous à brides dont le perçage est plus grand ou plus petit que celui de la lame de scie. La lame de scie ne doit pas être freinée à la main. Ne pas utiliser la machine en mode stationnaire. Lors du sciage, porter un masque de protection contre la poussière et des lunettes de protection. N utilisez que des lames de scie avec des diamètres correspondant aux inscriptions sur la scie. N utilisez que les lames de scie recommandées. Consignes de sécurité pour l aide au marquage laser Attention! L utilisation d autres dispositifs de fonctionnement et de réglage, ou d autres procédés de travail que ceux décrits dans le manuel d utilisation peut rendre le rayonnement dangereux. L outil électrique est livré avec des signaux d avertissement. Pour savoir où les apposer, veuillez consulter l illustration 1 en page 2. Ne regardez pas le rayon laser. L observation de la sortie laser au moyen d instruments optiques (par exemple une loupe ou un microscope) à une distance de moins de 100 mm peut présenter des risques pour les yeux. Ne jamais diriger le rayon laser vers des êtres humains ou des animaux. Ne pas utiliser le rayon laser sur des matériaux fortement réfléchissants. Danger lié à la lumière réfléchissante. Ne faire exécuter les réparations sur l aide au marquage laser que par des spécialistes. Ne pas introduire d objets durs dans l optique laser (3) Handkreissaege_man.indd :28
38 Nettoyer l optique laser avec un pinceau doux, sec. Signification des symboles de sécurité Obligation de lire les instructions d utilisation! Label de qualité volontaire «Sécurité contrôlée» Le carter est doublement isolé L appareil répond aux directives de l UE en vigueur Important! Portez des lunettes de protection! Important! Portez une protection auditive! Important! Portez un masque respiratoire! Portez des gants de protection appropriés. Attention - rayon laser! Ne dirigez jamais le regard dans le rayon laser! (Classe laser 2) Avertissement selon EN Ne jetez pas l appareil dans les déchets ménagers! n 0 : 4700 min -1 Vitesse en marche à vide Ø: 190 mm Diamètre de la lame de scie admissible Autres symboles et leur explication dans le texte des présentes instructions. SN: XXXXX Les deux premiers chiffres soulignés indiquent le mois de fabrication. 7 Montage et ajustages ATTENTION! Avant tous les travaux de montage et de réglage, patienter jusqu à l arrêt de l outil et débrancher la fiche secteur de la prise. Coupe parallèle (Fig. 2) 1. Dévisser la vis de serrage (6) 2. Régler la butée parallèle (17) suivant l échelle, tenir compte de la largeur de la lame de scie 3. Resserrez la vis de serrage (6) ATTENTION! Réaliser une coupe d essai avec du bois de chute. Rainure A coupe verticale 90 Rainure B coupe oblique 45 Régler la profondeur de coupe (Fig. 3) 1. Dévisser le levier de blocage pour le réglage de la profondeur de coupe (14). 2. Basculer la semelle (7) vers le bas. 3. Régler la profondeur de coupe suivant l échelle. La pointe de la dent doit dépasser d env. 2 mm hors du bois. 4. Resserrez le levier de blocage (14) Décaler la semelle (coupe angulaire) (Fig. 4) 38 BJ SN: année de construction Numéro de série 1. Dévisser la vis de blocage pour le réglage de l angle de coupe (5) Handkreissaege_man.indd :28
39 2. Régler la semelle sur l échelle d angle de coupe (4) sur l angle souhaité 0/ Resserrer les vis de blocage fermement. Remplacer la lame de scie (Fig. 5a + b) 1. Régler la profondeur de coupe sur la plus petite valeur. 2. Relever le capot de protection à bascule (8) à l aide du levier (10) jusqu à la butée, le maintenir en place et appuyer et maintenir simultanément le dispositif d arrêt de broche de la scie (16). 3. Avec la clé à six-pans creux (19), desserrer la vis à six pans creux (9) dans le sens antihoraire et retirer la bride. 4. Retirer la lame de scie vers le bas et la remplacer. La denture doit être orientée dans le sens de sciage! Respecter les dimensions! ATTENTION! Les marquages de flèche sur la lame de scie et le couvercle de lame de scie doivent correspondre! 5. Fixer la lame de scie avec la bride et la vis à six pans creux. 8 Fonctionnement (Fig ) L indicateur de service à LED (15) est allumé en vert dès que la machine est raccordée à la tension de secteur. La machine est prête à l emploi. Marche/arrêt La machine dispose d un commutateur de sécurité à deux boutons : La machine peut uniquement être mise en service si la poignée est fermement tenue et que les deux boutons sont appuyés. Au relâchement de la poignée, la machine est coupée automatiquement de sorte qu un fonctionnement involontaire n est pas possible. ATTENTION! Activer la machine avant le contact avec la pièce d usinage! 9 Mode de travail Le capot de protection à bascule est repoussé automatiquement par la pièce d usinage. Avancer légèrement et régulièrement avec la scie circulaire. La pièce d usinage chutant doit se trouver sur le côté droit de la scie circulaire afin que la partie large de la servante se trouve sur sa surface complète. Aide au marquage laser (3) Le rayon lumineux de l aide au marquage laser facilite la réalisation des coupes droites a) le long d une ligne de découpe prédessinée sur la pièce b) en se dirigeant vers un point fixe marqué sur la pièce. Selon la lumière environnante, la portée du rayon laser est d env. 65 cm Handkreissaege_man.indd :28
40 40 L aide au marquage laser est activée et éteinte, au besoin, avec l interrupteur de marche / arrêt (1). Aspiration de poussière Le raccord d aspiration de poussière (11) permet d aspirer la poussière à l aide d un aspirateur. L inhalation de poussières de meulage est dangereuse pour la santé et il faut donc généralement travailler avec l aspiration de poussière en marche. Utiliser éventuellement l adaptateur (18) fourni afin de raccorder un tuyau d aspiration courant. 10 Maintenance et protection de l environnement Avant tous les travaux sur l outil électrique, débranchez la fiche secteur de la prise. Veillez à la propreté de l outil électrique et des fentes d aération afin de travailler correctement et en toute sécurité. Le capot de protection à bascule doit toujours pouvoir se déplacer librement et se fermer automatiquement. Ainsi, veillez toujours à la propreté autour du capot de protection à bascule. Eliminez la poussière et les copeaux en soufflant avec de l air comprimé ou à l aide d un pinceau. Les lames de scie sans revêtement peuvent être protégées contre l apparition de corrosion par une fine couche d huile non acide. Avant le sciage, éliminez l huile sans quoi le bois pourrait être taché. Les restes de résine ou de colle sur la lame de scie entravent la qualité de coupe. Ainsi, nettoyez les lames de scie immédiatement après l utilisation. ATTENTION! Les appareils et accumulateurs inutilisables ne doivent pas se retrouver dans des déchets domestiques! Ils doivent être rassemblés séparément conformément à la directive 2012/19/UE concernant les vieux appareils électroniques et doivent être réutilisés selon les règles de l art dans l intérêt de l environnement. Veuillez acheminer les appareils électriques inutilisables à une déchetterie locale. Collecter les matériaux d emballage triés selon leur nature et les éliminer conformément aux dispositions locales en vigueur. Renseignezvous auprès de votre administration municipale pour plus de détails. 11 Conseils de service Conservez la machine, la mode d emploi et les accessoires éventuels dans l emballage original. Ainsi, vous aurez toutes les pièces et toutes les informations constamment à portée de main. Les appareils Meister ne nécessitent pratiquement aucune maintenance; un chiffon humide suffit pour le nettoyage des boîtiers. Ne jamais plonger dans l eau les appareils électriques. Se reporter aux instructions de service pour de plus amples détails. Les appareils Meister sont soumis à des contrôles qualité sévères. Cependant, dans le cas où une anomalie de production se produirait, Handkreissaege_man.indd :28
41 renvoyer l appareil à notre service après-vente. Une brève description de la panne peut faciliter la recherche de son origine et réduit le délai de réparation. Pendant la validité de la garantie, conservez ensemble le certificat de garantie et le bon de caisse. Dans le cas où il ne s agit pas d une réparation sous garantie, les travaux de réparation effectués par nos soins vous seront facturés. IMPORTANT! L ouverture de l appareil entraîne l annulation de la garantie! IMPORTANT: Nous attirons expressément l attention sur le fait que nous n avons pas, suivant la loi allemande sur la responsabilité du producteur pour vice de la marchandise, à nous porter responsable des dommages provoqués par nos appareils si ces dommages ont été occasionnés par une réparation incorrecte ou si, lors d un changement de pièce, des pièces d origine ou des pièces autorisées par nous n ont pas été utilisées et que la réparation n a pas été effectuée par Meister Werk zeuge GmbH le service après-vente ou un spécialiste agréé! Il en va de même pour les pièces d accessoires utilisées. Afin d éviter un endommagement de l appareil pendant son transport, l acheteur est prié d effectuer son envoi dans un emballage adapté ou dans l emballage d origine. Après expiration de la garantie, toutes les réparations d appareils Meister seront assurées par notre service aprés-vente aux prix intéressants Handkreissaege_man.indd :28
42 GB Contents Operating instructions & safety hints WARNING! To reduce the risk of injury, please read the operating instructions through carefully before using the device, and then store with the machine! When passing the device on to another user, these operating instructions must also be included! Page 1 Scope of delivery 42 2 Technical information 42 3 Components 43 4 Correct use 43 5 General safety instructions 44 6 Safety instructions relating specifically to the equipment 48 Page 7 Installation and setting 50 8 Operation 51 9 Mode of operation Maintenance and environmental protection Service instructions Scope of delivery 1 circular hand saw 1 parallel stopper 1 saw blade 1 Allen key 1 adapter for external dust extractor Operating instructions Guarantee certificate 2 Technical information Technical data Power voltage V~/50 Hz Power consumption 1500 W Idle revolutions n 0 = 4,700 min -1 Cutting depth at mm Cutting depth at mm Cutting angle 0/90 45 Saw blade Ø 190 x 30 mm Connection cable 3 m Laser marking aid Laser class 2 Wave length 650 nm Output power < 1mW Technical changes reserved. is a registered trade mark of Conmetall Meister GmbH, Wup pertal/germany Noise emission/vibration Noise emission L pa : 91.5 db(a), L WA : db(a) Measuring inaccuracy: K pa : 3.0 db(a), K WA : 3.0 db(a) Hand/arm vibrations - Handle: a h : 5.6 m/s 2 - Additional handle: a h : 5.3 m/s 2 ; Measuring inaccuracy K: 1.5 m/s 2 Noise/vibration information Measured values determined in accordance with EN The specified vibration emission value was determined when sawing wood. When used for other applications, the vibration emission value may deviate Handkreissaege_man.indd :28
43 The specified vibration emission value was measured in accordance with a normed test procedure and can be used in order to compare one electrical tool with another. The specified vibration emission value can also be used for an introductory evaluation of the influence. CAUTION! The vibration emission value may fluctuate from the specified value during use of the power tool. These fluctuations will depend on the way in which the power tool is used. Try to keep the vibration loads as low as possible. Examples of measures that may be taken to reduce the vibration load include wearing gloves when using the tool and limiting the length of the working period. All parts of the operating cycle must be taken into account for this purpose (for example, also including times in which the power tool is switched off and times in which it is switched on, but is running without load). CAUTION! A certain amount of noise is unavoidable when using this device. Ensure you carry out noise-intensive work during permitted times. Maintain the quiet periods and limit your work to the absolute minimum. CAUTION! The effects of noise may cause damage to the hearing. Only ever work with suitable ear defenders. Anybody else in the vicinity should thus also wear ear defenders. 3 Components 1 On/Off switch for laser marking aid 2 Handle 2a Additional handle 3 Laser marking aid 4 Cutting angle scale 5 Cutting angle adjustment 6 Locking screw for parallel stopper 7 Saw shoe 8 Pendulum protective cover 9 Hexagonal socket screw 10 Lever of pendulum protective cover 11 Connection for dust extractor 12 On/Off switch 13 Cutting depths scale 14 Cutting depth setting 15 LED operating display 16 Spindle lock (Figure 5a) 17 Parallel stopper 18 Adapter for external dust extractor 19 Allen wrench 4 Correct use This circular hand saw may only be operated in manually in a domestic situation. It is suitable for use with the supplied saw blade for straight cuts in wood and wood materials in accordance with the specifications provided in this operating manual. This unit is only designed for domestic use. This device is not designed to be used by people (including children) with limited physical, sensory or mental capacities or those without experience and/or knowledge. Children should be supervised to ensure that they do not play with the device. CAUTION! Improper use or modifications to the device and the use of components that are not tested and approved by the manufacturer may result in unforeseen damage! Improper use of the product All applications carried out with the device that are not listed in the Correct Handkreissaege_man.indd :28
44 44 use chapter will be considered improper use. This power tool is not suitable for cutting down trees. Uses for which the tool is not designed may cause risks and injury. Do not use accessories that are not intended specifically for this electrical tool. Just because you can affix an accessory to your electrical tool, there is no guarantee it is safe to use. The permitted revolutions of the tool insert must be at least as high as the highest value specified on the electrical tool. Accessories that turn faster than is permitted may break and fly away. The external diameter and thickness of the tool insert must match the dimensions of your electrical tool. Incorrectly measured tool inserts cannot be properly protected or checked. There is a risk of injury. The user of the device is liable for all property and personal damages occurring as the result of incorrect use. If other components or non-original components are used with the machine, the manufacturer guarantee is voided. Remaining risks: The operating instructions for this power tool contain comprehensive instructions for safely handling power tools. However, every power tool has certain remaining risks which cannot be completely excluded by the protective mechanisms on the device. Always operate power tools with necessary care. Remaining risks may be, for example: Touching moving parts or tools. Injury caused by flying work pieces or work piece parts. Risk of fire caused by insufficient ventilation of the motor. Adverse effects on hearing caused by working without hearing protection. Safe work depends on the operator s familiarity with handling the given power tool! Appropriate knowledge of the machinery and careful behaviour when working help minimise the remaining risks. Warning! During operation, this power tool generates an electromagnetic field. This field may, under certain circumstances, influence active or passive medical implants. In order to reduce the risk of serious or deadly injuries, we recommend that persons with a medical implant consult their doctor and the manufacturer of the medical implant before using the power tool. 5 General safety instructions for handling power tools WARNING! Read all safety warnings and all instructions. Failure to follow the warnings and instructions may result in electric shock, fire and/or serious injury. Save all warnings and instructions for future reference. The term power tool in the warnings refers to your mains operated (corded) power tool or battery-operated (cordless) power tool Handkreissaege_man.indd :28
45 1 Work area a Keep work area clean and well lit. Cluttered and dark areas invite accidents. b Do not operate power tools in explosive atmospheres, such as in the presence of flammable liquids, gases or dust. Power tools create sparks which may ignite the dust or fumes. c Keep children and bystanders away while operating a power tool. Di s tractions can cause you to lose control. 2 Electrical Safety a Power tool plugs must match the outlet. Never modify the plug in any way. Do not use any adapter plugs with earthed (grounded) power tools. Unmodified plugs and matching outlets will reduce risk of electric shock. b Avoid body contact with earthed or grounded surfaces, such as pipes, radiators, ranges and refrigerators. There is an increased risk of electric shock if your body is earthed or grounded. c Do not expose power tools to rain or wet conditions. Water entering a power tool will increase the risk of electric shock. d Do not abuse the cord. Never use the cord for carrying, pulling or unplugging the power tool. Keep cord away from heat, oil, sharp edges or moving parts. Damaged or entangled cords increase the risk of electric shock. e When operating a power tool outdoors, use an extension cord suitable for outdoor use. Use of a cord suitable for outdoor use reduces the risk of electric shock. 3 Personal safety a Stay alert, watch what you are doing and use common sense when operating a power tool. Do not use a power tool while you are tired or under the influence of drugs, alcohol or medication. A moment of inattention while operating power tools may result in serious personal injury. b Use personal protective equipment. Always wear eye protection. Protective equipment such as dust masks, non-skid safety shoes, hard hat, or hearing protection used for appropriate conditions will reduce personal injuries. c Prevent unintentional starting. Ensure the switch is in the off-position before connecting to power source and/or battery pack, picking up or carrying the tool. Carrying power tools with your finger on the switch or energising power tools that have the switch on invites accidents. d Remove any adjusting key or wrench before turning the power tool on. A wrench or a key left attached to a rotating part of the power tool may result in personal injury. e Do not overreach. Keep proper footing and balance at all times. This enables better control of the power tool in unexpected situations. f Dress properly. Do not wear loose clothing or jewellery. Keep your hair, clothing and gloves away from moving parts. Loose clothes, jewellery or long hair can be caught in moving parts. g If devices are provided for the connection of dust extraction and Handkreissaege_man.indd :28
46 46 collection facilities, ensure these are connected and properly used. Use of these devices can reduce dust related hazards. h Do not assume a false sense of security and do not overstep the safety rules for power tools, even if you are familiar with the power tool after many uses. Careless actions may cause serious injuries within fractions of a second. 4 Power tool use and care a Do not force the power tool. Use the correct power tool for your application. The correct power tool will do the job better and safer at the rate for which it was designed. b Do not use the power tool if the switch does not turn it on and off. Any power tool that cannot be controlled with the switch is dangerous and must be repaired. c Disconnect the plug from the power source before making any adjustments, changing accessories, or storing power tools. Such preventive safety measures reduce the risk of starting the power tool accidentally. d Store idle power tools out of the reach of children and do not allow persons unfamiliar with the power tool or these instructions to operate the power tool. Power tools are dangerous in the hands of untrained users. e Look after your power tools and tool inserts carefully. Check for misalignment or binding of moving parts, breakage of parts and any other condition that may affect the power tool s operation. Have any damaged parts repaired before using the power tool. Many accidents are caused by poorly maintained power tools. f Keep cutting tools sharp and clean. Properly maintained cutting tools with sharp cutting edges are less likely to bind and are easier to control. g Use the power tool, accessories and tool bits etc. in accordance with these instructions, taking into account the working conditions and the work to be performed. Use of the power tool for operations different from those intended could result in a hazardous situation. h Keep handles and grips dry, clean, and free from oil and grease. Slippery handles and grips do not enable safe handling and control of the power tool in the event of unexpected situations. 5 Service a Have your power tool serviced by a qualified repair person using only identical replacement parts. This will ensure that the safety of the power tool is maintained. b If connection cables are damaged, they must in order to reduce the risks be replaced by the manufacturer or by their customer service representative. 6 Safety notes for all saws/sawing procedures a DANGER: Keep hands away from the cutting area and the blade. Hold the additional handle or the engine housing with your other hand. If both hands are holding the saw, the saw blade will not be able injure them Handkreissaege_man.indd :28
47 b Do not reach underneath the work piece. The protective cover is not able to protect you from the saw blade if your hands are under the work piece. c Adjust the cutting depth to the thickness of the work piece. Less than a full tooth height below the work piece should be visible. d Never hold the work piece that is being cut in your hands or across your leg. Secure the work piece to a stable platform. It is important to support the work properly to minimise body exposure, blade binding, or loss of control. e Hold the power tool by the insulated handle surfaces when carrying out tasks during which is it possible that the tool inserts will come across hidden power cables or the tool s own connecting cable. Contact with a live cable will also cause metal parts of the device to become live, resulting in an electric shock. f When making a longitudinal cut, always use a stopper or straight edge guide. This improves the accuracy of the cut and reduces the possibility of the saw blade jamming. g Always use blades with the correct size and with the appropriate shape (star-shaped versus round) of arbour holes. Saw blades that do not correspond to the assembly parts of the saw will run unevenly and will lead to a loss of control. h Never use damaged or incorrect blade washers or bolt. The saw blade washers and screws have been designed specifically for your saw in order to ensure optimum performance and operating safety. 7 Additional saw safety notes Kickback Causes and appropriate safety precautions Kickback is a sudden reaction to a pinched, bound or misaligned saw blade, causing an uncontrolled saw to lift up and out of the work piece toward the operator. If the blade is pinched or bound tightly by the kerf closing down, the blade stalls and the motor reaction drives the unit rapidly back toward the operator. If the blade becomes twisted or misaligned in the cut, the teeth at the back edge of the blade can dig into the top surface of the wood causing the blade to move out of the kerf and jump back toward the operator. Kickback is the result of incorrect or unsuitable use of the saw. It can be prevented by the use of suitable measures, as described below: a Maintain a firm grip on the saw and position your arms to resist kickback forces. Always position yourself to the side of the blade, never have the blade in line with your body. Kickback could cause the saw to jump backwards, but kickback forces can be controlled by the operator if proper precautions are taken. b If the blade is jammed, or when interrupting a cut for any reason, release the trigger and hold the saw motionless in the material until the blade comes to a complete stop. Never attempt to remove the saw from the work or pull the saw backward while the blade is in motion or kickback may occur. Investigate and take corrective actions to eliminate the cause of blade binding Handkreissaege_man.indd :28
48 48 c When restarting a saw in the work piece, centre the saw blade in the kerf and check that saw teeth are not engaged into the material. If saw blade is jammed, it may move out or kickback from the work piece as the saw is restarted. d Support large panels to minimise the risk of blade pinching and kickback. Large panels/boards may bend under their own weight. Supports must be placed under the panel on both sides, near the line of cut and near the edge of the panel. e Do not use dull or damaged blades. Blades with blunt or incorrectly oriented teeth will, as a result of a sawn gap that is too narrow, cause increased friction and jamming of the blade as well as kickback. f Before sawing tighten the cutting depths and cutting angle settings. If the settings change during the sawing process, this may lead to the blade jamming and cause kickback. g Be especially careful when sawing into existing walls or other areas you cannot see. The inserted saw blade may block when sawing into hidden objects and cause kickback. 8 Safety notes for circular saws Function of the lower protective cover a Check before each use that the lower protective cover closes without problems. Do not use the saw if the lower protective cover does not move freely and does not close immediately. Never clamp or fix the lower protective cover in an open position. If the saw should accidentally fall to the ground, the lower protective cover may be deformed. Open the protective cover with the pullback lever and ensure that it moves freely and that it does not touch either the blade nor other parts at all cutting angles and depths. b Check the functionality of the spring on the lower protective cover. If the guard and the spring are not operating properly, they must be serviced before use. The protective cover may operate sluggishly due to damaged parts, sticky deposits or a build-up of debris. c Open the lower protective cover by hand only for special cuts, such as plunge and angle cuts. Open the lower protective cover with the pullback lever and release the lever as soon as the blade has penetrated the work piece. For every other type of sawing, the lower protective cover should function automatically. d Never put the saw down on the workbench or on the floor without ensuring that the lower protective cover protects the blade. An unprotected, switched off but still moving blade will move the saw in the direction opposite to the cutting direction and will cut everything in its path. Be aware of the time it takes for the blade to stop after the switch is released 6 Safety instructions relating specifically to the equipment Saw blades made of high alloy highspeed steel (HSS steel) may not be used Handkreissaege_man.indd :28
49 Only saw blades in accordance with EN may be used with this saw. Saw blades that do not correspond to the characteristic data specified in this operating manual may not be used. Ensure that all of the moving parts of the saw blade protector are able to move without catching. Only use sharp saw blades and suitable accessories. Never use grinding discs in the saw. Fix small wooden items in place firmly before processing. Never hold them by hand. Do not use flanges/flange nuts with drilled holes that are larger or smaller than those of the saw blade. Do not slow the saw blade by hand. The machine is not to be used for stationary operation. When sawing, wear a dust protection mask and goggles. Only use saw blades with diameters in accordance with the labelling on the saw. Only use recommended saw blades. Safety notes for the laser marking aid Caution! If methods of operation and adjustment other than those described in the operating instructions are used or other procedures carried out, this may result in hazardous laser radiation effects. The power tool is supplied with warning labels; these must be applied in accordance with Figure 1 on page 2. Do not look into the laser beam. Looking into the laser outlet from a distance of 100 mm and with optical instruments (e.g. magnifying glass or microscope) may cause a risk of damage to the eyes. Do not point the laser beam at people or animals. Do not use the laser beam on highly reflective materials. There is a risk of reflected light. Repairs to the laser marking aid may only be carried out by specialists. Do not insert solid objects into the laser lens (3). Clean the laser lens with a soft, dry brush. Meanings of the safety symbols Read the operating instructions! Voluntary geprüfte Sicherheit seal of quality (tested safety) Housing is double insulated Device meets the valid EU regulations Important! Wear safety goggles! Important! Wear ear protection! Handkreissaege_man.indd :28
50 50 Important! Wear a breathing mask! Wear suitable protective gloves. Caution laser radiation. Do not look into the beam (Laser class 2) Warning in accordance with EN Do not dispose of with household waste! n 0 : 4700 min -1 Idle revolutions Ø: 190 mm Permissible saw blade diameter Additional symbols and the associated explanations as used in the text of these instructions. BJ: SN: Year of construction Serial number SN: XXXXX The first two underlined numbers give the month of manufacture. 7 Installation and setting CAUTION! Prior to all mounting and setting work, wait for the tool to come to a complete standstill and pull the plug from the mains. Parallel cutting (Figure 2) 1. Undo the locking screw (6). 2. Adjust the parallel stopper (17) according to the scale, pay attention to the width of the saw blade 3. Tighten the fixing screw (6) again. CAUTION! Make a test cut using a piece of waste wood. Notch A vertical cut 90 Notch B angled cut 45 Setting the cutting depth (Figure 3) 1. Undo the locking lever on the cutting depth regulator (14). 2. Swivel the saw shoe (7) down. 3. Set the cutting depth using the scale (13). Tooth tips must protrude approximately 2 mm out of the wood. 4. Tighten the locking lever (14) up again. Adjusting the saw shoe (angled cut) (Figure 4) 1. Undo the locking screw on the cutting depth regulator (5). 2. Set the saw shoe using the cutting angle scale (4) to the required degrees 0/ Tighten the locking screw. Changing the saw blade (Figures 5a + b) 1. Set the cutting depth to the smallest value. 2. Use the lever (10) to push the pendulum protective cover (8) as far up as it will go, hold it and, at the same time, press and hold the saw spindle lock (16). 3. Using the Allen wrench (19), undo the hexagonal screw (9) anti-clockwise and remove the flange Handkreissaege_man.indd :28
51 4. Remove the saw blade by pulling down, and replace. The teeth must point in the sawing direction! Pay attention to dimensions! CAUTION! The arrow markings on the saw blade and saw blade cover must match! 5. Secure the saw blade with the flange and hexagonal screw. 8 Operation (Figures 6 + 7) The LED operating display (15) illuminates green as soon as the tool is connected to the mains voltage. The machine is ready to use. Switching on and off The machine has a two button security switch mechanism: The machine can only be put into operation if the handle is held firmly and both buttons are pressed. When the handle is released, the machine switches off automatically to ensure that accidental operation is not possible. CAUTION! Start the machine before bringing it into contact with the work piece! 9 Mode of operation The pendulum cover is automatically pushed back by the work piece. Gently and evenly push the circular saw forwards. The falling work piece should be located on the right-hand side of the circular saw to ensure that the largest piece is lying fully on the table. Laser marking aid (3) The beam from the laser marking aid makes it easier to carry out straight cuts a) along a pre-drawn cutting line on the work piece b) or by pointing it at a marked fixed point on the work piece. The range of the beam is approximately 65 cm, depending on the ambient lighting. The laser marking aid is switched on/off as required using the On/Off switch (1). Dust extractor The vacuum connection (11) enables you to extract the dust using a vacuum cleaner. Breathing in dust is dangerous, and you should therefore always work with the vacuum system activated. If necessary, use the supplied adapter (18) to connect a standard extraction hose. 10 Maintenance and environmental protection Before carrying out any work on the power tool, pull the plug from the power socket. Keep the power tool and the ventilation slots clean in order to work well and safely. The pendulum protective cover must always be able to move freely and close independently. For this reason, keep the area around the pendulum protective cover clean at all times. Remove dust and shavings by blowing out with compressed air or a brush Handkreissaege_man.indd :28
52 Undamaged saw blades may be protected using a thin layer of acid-free oil to prevent the formation of corrosion. Remove the oil before sawing, otherwise the wood may become stained. Resin or glue residue on the saw blade will affect the cutting quality. For this reason, clean saw blades immediately after use. CAUTION! Electrical and battery operated units that no longer work should not be disposed of in the household waste! They are to be collected separately, in accordance with the 2012/19/EU directive for the disposal of electrical and electronic waste, and sent for proper and environmentallyfriendly recycling. Please discard power tools no longer usable at a local collection point. Collection and disposal of packaging materials separately by types complying with local rules and regulations. For details, please contact your municipal authority concerned. 11 Service instructions Store the machine, operating instructions and where necessary the accessories in the original packaging. In this way you will always have all the information and parts ready to hand. Meister devices are to a large extent maintenancefree, a damp cloth being sufficient to clean the casing. Do not drop electrical machines in water. Meister devices are subject to stringent quality control. If however a functional fault shoult occur, send the device to our servicing address. The repairs will be carried out in a short time. A brief description of the defect speeds up the faulttracing and repair time. If within the guarantee period, please enclose the guarantee document and the proof of purchase. In so far as a repair under guarantee is not concerned, we will charge the repair costs to your account. PLEASE NOTE! Opening of the device invalidates the guarantee claim! IMPORTANT! We point out expressly that in accordance with the Product Liability Act we do not take responsibility for any damage caused by our appliances, in so much that said damage is caused by improper repair, or original parts or parts released by us not being used when parts are changed, or repairs not being conducted by Meister Werk zeuge GmbH, Customer Service or an authorised specialist! The same applies analogously to the accessories used. Pack the device well or use the original packaging in order to avoid transit damage. Even after the expiry of the guarantee period, we would like to help you and carry out any repairs at a favourable price. 52 Please note additional hints given in the operating instructions Handkreissaege_man.indd :28
53 NL Gebruiksaanwijzing & veiligheidstips Inhoud Lees ter voorkoming van het risico van verwondingen de gebruiksaanwijzing vóór het in gebruik nemen door en geef deze mee als u de machine aan iemand anders geeft. Bewaar de gebruiksaanwijzing in de buurt van de machine. Pagina 1 Omvang van de levering 53 2 Technische informatie 53 3 Onderdelen 54 4 Bedoeld gebruik 54 5 Algemene veiligheidstips 56 6 Speciale veiligheidstips voor dit apparaat 61 1 Omvang van de levering 1 Handcirkelzaag 1 Parallelle aanslag 1 Zaagblad 1 Inbussleutel 1 Adapter voor externe stofafzuiging Gebruiksaanwijzing Garantiebewijs 2 Technische informatie Technische gegevens Netspanning V~/50 Hz Opgenomen vermogen 1500 W Onbelast toerental n 0 = 4700 min -1 Snijdiepte bij mm Snijdiepte bij mm Snijhoek 0/90 45 Zaagblad Ø 190 x 30 mm Aansluitsnoer 3 m Pagina 7 Montage en instelwerkzaamheden 62 8 Gebruik 63 9 Werkwijze Onderhoud en milieubescherming Servicetips 64 Laser-markeerhulp Laserklasse 2 Golflengte 650 nm Uitgangsvermogen < 1mW Technische wijzigingen voorbehouden. is een geregistreerd handelsmerk van de firma Conmetall Meister GmbH, Wuppertal/Germany Geluidsemissie/trilling Geluidsemissie L pa : 91,5 db(a), L WA : 102,5 db(a) Meetonzekerheid: K pa : 3,0 db(a), K WA : 3,0 db(a) Hand-/armtrillingen Zagen van hout: - Handgreep: a h : 5,6 m/s 2 - Extra handgreep: a h : 5,3 m/s 2 ; Meetonzekerheid K: 1,5 m/s Handkreissaege_man.indd :28
54 54 Lawaai-/trillingsinformatie Meetwaardes bepaald overeenkomstig EN De aangegeven trillingsemissiewaarde werd volgens een genormaliseerde testmethode gemeten en kan voor de vergelijking van het ene stuk met het andere stuk elektrisch gereedschap worden. De vermelde trillingsemissiewaarde kan ook voor een inleidende inschatting van de nadelige invloed gebruikt worden. OPGELET! De trillingsemissiewaarde kan tijdens het gebruik van het elektrogereedschap van de vermelde waarde verschillen, in functie van de manier waarop het elektrogereedschap gebruikt wordt. Probeer de belasting door trillingen zo gering mogelijk te houden. Tot voorbeeld dienende maatregelen ter vermindering van de belasting door trillingen zijn het dragen van handschoenen bij het gebruik van het gereedschap en de beperking van de arbeidstijd. Daarbij moet met alle fasen van de bedrijfscyclus rekening gehouden worden (bijvoorbeeld tijdspannen, tijdens welke het elektrische gereedschap uitgeschakeld is en tijdspannen, tijdens welke het weliswaar ingeschakeld is, maar zonder belasting in werking is). OPGELET! Een zekere geluidshinder door dit apparaat is onvermijdbaar. Plan daarom lawaai-intensieve werkzaamheden op toegestane en daarvoor geschikte tijdstippen. Houd u desnoods aan rusttijden en beperk de arbeidsduur tot het noodzakelijkste. OPGELET! De inwerking van lawaai kan gehoorschade veroorzaken. Werk daarom uitsluitend met passende gehoorbescherming. Personen die zich in de omgeving bevinden, moeten daarom eveneens passende gehoorbescherming dragen. 3 Onderdelen 1 Schakelaar Aan/uit Lasermarkeerhulp 2 Handgreep 2a Extra handgreep 3 Laser-markeerhulp 4 Schaal met aanduiding van de snijhoek 5 Snijhoekinstelling 6 Borgschroef Parallelle aanslag 7 Zaagschoen 8 Zaagbladbeschermkap 9 Inbusschroef 10 Hendel van de zaagbladbeschermkap 11 Aansluiting voor stofafzuiging 12 Schakelaar Aan/uit 13 Schaal met aanduiding van de snijdiepte 14 Snijdiepte-instelling 15 LED-bedrijfsindicator 16 Spilvergrendeling (afb. 5a) 17 Parallelle aanslag 18 Adapter voor externe stofafzuiging 19 Inbussleutel 4 Bedoeld gebruik Deze handcirkelzaag mag uitsluitend handmatig in het huishouden gebruikt worden. Ze is met het bijgeleverde zaagblad geschikt voor rechte sneden in hout en houten materialen en dit in overeenstemming met de in deze gebruiksaanwijzing vermelde gegevens. Dit apparaat is uitsluitend bestemd voor het gebruik in het huishouden Handkreissaege_man.indd :28
55 Dit apparaat is er niet voor bestemd om gebruikt te worden door personen (met inbegrip van kinderen) die beperkte fysieke, zintuiglijke of mentale capaciteiten of een gebrek aan ervaring en/of kennis vertonen. Kinderen dienen onder toezicht te staan om te vrijwaren dat ze niet met het apparaat spelen. LET OP! Door een ondoelmatig gebruik, wijzigingen aan het apparaat en het gebruik van onderdelen die niet door de fabrikant gekeurd en vrijgegeven zijn, kunnen er niet te voorziene beschadigingen ontstaan. Niet-reglementair voorgeschreven gebruik Alle toepassingen met het apparaat, die niet in het hoofdstuk Bedoeld gebruik vermeld zijn, gelden als een niet-reglementair voorgeschreven gebruik. Dit elektrisch gereedschap is niet geschikt voor het vellen van bomen. Toepassingen, waarvoor het elektrische gereedschap niet voorzien is, kunnen gevaren en verwondingen veroorzaken. Gebruik geen toebehoren, die niet speciaal voor dit elektrische gereedschap voorzien zijn. Alleen maar omdat u de toebehoren aan uw elektrisch gereedschap kunt bevestigen, garandeert dat geen veilig gebruik. Het toegestane toerental van het inzetgereedschap moet minstens zo hoog zijn als het op het elektrische gereedschap aangegeven, hoogste getal. Toebehoren, die sneller dan toegelaten draaien, kunnen stukbreken en rondvliegen. Buitendiameter en dikte van het inzetgereedschap moeten met de opgegeven maten van uw elektrisch gereedschap overeenstemmen. Verkeerd opgemeten inzetgereedschap kan niet voldoende afgeschermd of gecontroleerd worden. Er bestaat gevaar voor verwondingen. Voor alle daaruit voortvloeiende materiële beschadigingen evenals lichamelijke letsels, die omwille van een verkeerde toepassing ontstaan zijn, is de gebruiker van het apparaat aansprakelijk. Bij gebruikmaking van andere c.q. niet-originele componenten aan de machine valt vanuit het oogpunt van de fabrikant de garantie weg. Restrisico s: De gebruiksaanwijzing bij dit elektrisch gereedschap bevat uitgebreide informatie over het veilig werken met elektrisch gereedschap. Desondanks brengt elk elektrisch gereedschap bepaalde restrisico s met zich mee, die zelfs door de aanwezige veiligheidsvoorzieningen niet geheel kunnen worden uitgesloten. Bedien elektrisch gereedschap daarom altijd met de nodige voorzichtigheid. Restrisico s kunnen bijvoorbeeld zijn: Aanraken van bewegende onderdelen of gebruikt gereedschap. Letsel als gevolg van rondvliegende werkstukken of delen van werkstukken. Brandgevaar door onvoldoende ventilatie van de motor. Gehoorbeschadiging bij werkzaamheden zonder gebruik van gehoorbescherming Handkreissaege_man.indd :28
56 56 Een veilige werking wordt ook bepaald door de mate waarin het bedieningspersoneel vertrouwd is met het betreffende elektrisch gereedschap! Voldoende machinekennis en een zorgvuldige omgang met de machine helpen om restrisico s tot een minimum te beperken. Waarschuwing! Het elektrisch gereedschap genereert tijdens het gebruik een elektromagnetisch veld. Dit veld kan onder bepaalde omstandigheden actief of passief van invloed zijn op medische implantaten. Om het risico van ernstig of zelfs dodelijk letsel te verminderen, raden wij personen met medische implantaten aan om hun arts en de fabrikant van het medische implantaat te raadplegen alvorens het elektrisch gereedschap te gebruiken. 5 Algemene veiligheidstips voor de omgang met elektrisch gereedschap LET OP! Lees alle veiligheidsvoorschriften en aanwijzingen. Wanneer de volgende voorschriften niet in acht worden genomen, kan dit een elektrische schok, brand of ernstig letsel tot gevolg hebben. Bewaar deze veiligheidsvoorschriften en aanwijzingen goed voor later gebruik. Het in de waarschuwingen gebruikte begrip elektrisch gereedschap heeft betrekking op elektrische gereedschappen voor gebruik op het stroomnet (met netsnoer) en op elektrische gereedschappen voor gebruik met een accu (zondernetsnoer). 1 Werkomgeving a Houd uw werkomgeving schoon en opgeruimd. Een rommelige of onverlichte werkomgeving kan tot ongevallen leiden. b Werk met het gereedschap niet in een omgeving met explosiegevaar waarin zich brandbare vloeistoffen, brandbare gassen of brandbaar stof bevinden. Elektrische gereedschappen veroorzaken vonken die het stof of de dampen tot ontsteking kunnen brengen. c Houd kinderen en andere personen tijdens het gebruik van het elektrische gereedschap uit de buurt. Wanneer u wordt afgeleid, kunt u de controle over het gereedschap verliezen. 2 Elektrische veiligheid a De aansluitstekker van het gereedschap moet in het stopcontact passen. De stekker mag in geen geval worden veranderd. Gebruik geen adapterstekkers in combinatie met geaarde gereedschappen. Onveranderde stekkers en passende stopcontacten beperken het risico van een elektrische schok. b Voorkom aanraking van het lichaam met geaarde oppervlakken, bijvoorbeeld van buizen, verwarmingen, fornuizen en koelkasten. Er bestaat een verhoogd risico door een elektrische schok wanneer uw lichaam geaard is. c Houd het gereedschap uit de buurt van regen en vocht. Het binnendringen van water in het elektrische gereedschap vergroot het risico van een elektrische schok Handkreissaege_man.indd :28
57 d Gebruik de kabel niet voor een verkeerd doel, om het gereedschap te dragen of op te hangen of om de stekker uit het stopcontact te trekken. Houd de kabel uit de buurt van hitte, olie, scherpe randen en bewegende gereedschapdelen. Beschadigde of in de war geraakte kabels vergroten het risico van een elektrische schok. e Wanneer u buitenshuis met elektrisch gereedschap werkt, dient u alleen verlengkabels te gebruiken die voor gebruik buitenshuis zijn goedgekeurd. Het gebruik van een voor gebruik buitenshuis geschikte verlengkabel beperkt het risico van een elektrische schok. 3 Veiligheid van personen a Wees alert, let goed op wat u doet en ga met verstand te werk bij het gebruik van het elektrische gereedschap. Gebruik het gereedschap niet wanneer u moe bent of onder invloed staat van drugs, alcohol of medicijnen. Een moment van onoplettendheid bij het gebruik van het gereedschap kan tot ernstige verwondingen leiden. b Draag persoonlijke beschermende uitrusting en altijd een veiligheidsbril. Het gebruik van beschermende uitrusting, zoals een stofmasker, slipvaste schoenen, een veiligheids helm of gehoorbescherming, afhankelijk van de werkomgeving, vermindert het verwondingsgevaar. c Voorkom per ongeluk inschakelen. Controleer dat het elektrische gereedschap uitgeschakeld is voordat u het op de stroom voorziening of de accu aansluit en voordat u het oppakt of draagt. Als u bij het dragen van het gereedschap uw vinger aan de schakelaar hebt of als u het gereedschap ingeschakeld op de stroomvoorziening aansluit, kan dit tot ongevallen leiden. d Verwijder instelgereedschappen of schroefsleutels voordat u het gereedschap inschakelt. Een instelgereedschap of sleutel in een draaiend deel van het gereedschap kan tot verwondingen leiden. e Overschat uzelf niet. Zorg ervoor dat u stevig staat en steeds in evenwicht blijft. Daardoor kunt u het gereedschap in onverwachte situaties beter onder controle houden. f Draag geschikte kleding. Draag geen loshangende kleding of sieraden. Houd haren, kleding en handschoenen uit de buurt van bewegende delen. Loshangende kleding, lange haren en sieraden kunnen door bewegende delen worden meegenomen. g Wanneer stofafzuigings- of stofopvangvoorzieningen kunnen worden gemonteerd, dient u zich ervan te verzekeren dat deze zijn aangesloten en juist worden gebruikt. Het gebruik van deze voorzieningen beperkt het gevaar door stof. h Laat u niet in slaap sussen door een vals gevoel van veiligheid en negeer niet klakkeloos de veiligheidsregels voor elektrisch gereedschap, ook al bent u nog zo vertrouwd met het elektrisch gereedschap en heeft u er al vele malen mee gewerkt. Onachtzaam heid kan in een fractie van een seconde tot ernstig letsel leiden Handkreissaege_man.indd :28
58 58 4 Zorgvuldige omgang met en zorgvuldig gebruik van elektrische gereedschappen a Overbelast het gereedschap niet. Gebruik voor uw werkzaamheden het daarvoor bestemde elektrische gereedschap. Met het passende elektrische gereedschap werkt u beter en veiliger binnen het aangegeven capaciteitsbereik. b Gebruik geen elektrisch gereedschap waarvan de schakelaar defect is. Elektrisch gereedschap dat niet meer kan worden in- of uitgeschakeld, is gevaarlijk en moet worden gerepareerd. c Trek de stekker uit het stopcontact voordat u het gereedschap instelt, toebehoren wisselt of het gereedschap weglegt. Deze voorzorgsmaatregel voorkomt onbedoeld starten van het gereedschap. d Bewaar niet-gebruikte elektrische gereedschappen buiten bereik van kinderen. Laat het gereedschap niet gebruiken door personen die er niet mee vertrouwd zijn en deze aanwijzingen niet hebben gelezen. Elektrische gereedschappen zijn gevaarlijk wanneer deze door onervaren personen worden gebruikt. e Onderhoud elektrisch gereedschap en boren/beitels met zorg. Controleer of bewegende delen van het gereedschap correct functioneren en niet vastklemmen en of onderdelen zodanig gebroken of beschadigd zijn dat de werking van het gereedschap nadelig wordt beïnvloed. Laat beschadigde onderdelen repareren voordat u het elektrisch gereedschap gebruikt. Veel ongevallen hebben hun oorzaak in slecht onderhouden elektrische gereedschappen. f Houd snijdende inzetgereedschappen scherp en schoon. Zorgvuldig onderhouden snijdende inzetgereedschappen met scherpe snijkanten klemmen minder snel vast en zijn gemakkelijker te geleiden. g Gebruik elektrisch gereedschap, toebehoren, inzetgereedschappen en dergelijke volgens deze aanwijzingen en zoals voor dit speciale gereedschapstype voorgeschreven. Let daarbij op de arbeidsomstandigheden en de uit te voeren werkzaamheden. Het gebruik van elektrische gereed- schappen voor andere dan de voorziene toepassingen kan tot gevaarlijke situaties leiden. h Houd de handgrepen en greepvlakken droog, schoon en vrij van olie en vet. Glibberige handgrepen en greepvlakken belemmeren een veilige en gecontroleerde bediening van het elektrisch gereedschap in onverwachte situaties. 5 Service a Laat het gereedschap alleen repareren door gekwalificeerd en vakkundig personeel en alleen met originele vervangingsonderdelen. Daarmee wordt gewaarborgd dat de veiligheid van het gereedschap in stand blijft. b Als het netsnoer beschadigd wordt, moet het om gevaren te vermijden door de fabrikant of zijn agent van de klantenservice vervangen worden Handkreissaege_man.indd :28
59 6 Veiligheidsinstructies voor alle zagen/zaagproces a GEVAAR: Kom met uw handen niet in het zaagbereik en aan het zaagblad. Houd met uw tweede hand de extra handgreep of het motorhuis vast. Wanneer beide handen de zaag vasthouden, kunnen deze door het zaagblad niet verwond worden. b Grijp niet onder het werkstuk. De beschermkap kan u onder het werkstuk niet beschermen tegen het zaagblad. c Pas de snijdiepte aan de dikte van het werkstuk aan. Het dient minder dan één volledige tandhoogte onder het werkstuk zichtbaar te zijn. d Houd het te zagen werkstuk nooit in de hand of boven het been vast. Beveilig het werkstuk aan een stabiele opname. Het is belangrijk, het werkstuk goed te bevestigen om het gevaar voor lichamelijk contact, het klemmen van het zaagblad of controleverlies tot een minimum te herleiden. e Houd het elektrisch gereedschap vast aan de geïsoleerde handgrepen, wanneer u werkzaamheden moet uitvoeren waarbij de boor/ beitel verborgen stroomleidingen of de eigen voedingskabel kan raken. Contact met een spanningvoerende kabel heeft ook tot gevolg dat de metalen onderdelen van het elektrisch gereedschap onder spanning komen te staan en daardoor een elektrische schok veroorzaken. f Gebruik bij het langssnijden altijd een aanslag of een rechte kantgeleider. Dit verbetert de snijnauwkeurigheid en verkleint de mogelijkheid dat het zaagblad klemt. g Gebruik altijd zaagbladen van het juiste formaat en met een passende opnameboring (bv. stervormig of rond). Zaagbladen die niet bij de montageonderdelen van de zaag passen, lopen onrond en leiden tot het verlies van de controle. h Gebruik nooit beschadigde of verkeerde zaagbladonderleg plaatjes of - schroeven. De zaagbladonderlegplaa tjes en schroeven werden speciaal voor uw zaag geconstrueerd, voor een optimaal vermogen en voor bedrijfszekerheid. 7 Bijkomende veiligheidsinstructies voor alle zagen Terugslag oorzaken en dienovereenkomstige veiligheidsinstructies: Bij een terugslag gaat het om de plotse reactie ten gevolge van een vasthakend, klemmend of verkeerd uitgelijnd zaagblad die ertoe leidt dat een ongecontroleerde zaag loskomt en uit het werkstuk in de richting van de bedieningspersoon beweegt; Wanneer het zaagblad in de zich sluitende zaagspleet vast blijft zitten of klem gaat zitten, blokkeert het en slaat de motorkracht de zaag in de richting van de bedieningspersoon achteruit; Indien het zaagblad in de zaagsnede verdraaid of verkeerd uitgelijnd wordt, kunnen de tanden van de achterste zaagbladkant in het oppervlak van het werkstuk vast blijven zitten, waardoor het zaagblad uit de zaagspleet beweegt en de zaag in de richting van de bedieningspersoon achteruit springt Handkreissaege_man.indd :28
60 60 Een terugslag is het resultaat van een verkeerd en/of onjuist gebruik van de zaag. Hij kan door geschikte voorzorgsmaatregelen, zoals hierna beschreven, verhinderd worden. a Houd de zaag met beide handen vast en breng uw armen in een positie, in welke u de terugslagkrachten kunt opvangen. Stel u altijd zijdelings van het zaagblad op, nooit het zaagblad in één lijn met uw lichaam brengen. Bij een terugslag kan de cirkelzaag achteruit springen, maar kan de bedieningspersoon door passende voorzorgsmaatregelen de terugslagkrachten beheersen. b Indien het zaagblad klem gaat zitten of u het werk onderbreekt, schakelt u de zaag uit en houdt u ze rustig in het werkstuk totdat het zaagblad tot stilstand gekomen is. Tracht nooit de zaag uit het werkstuk te verwijderen of ze achteruit te trekken zolang het zaagblad in beweging is. In het andere geval kan er een terugslag volgen. De oorzaak voor het gekneld zitten van het zaagblad opsporen en verhelpen. c Wanneer u een zaag, die in het werkstuk steekt, weer wenst te starten, centreert u het zaagblad in de zaagspleet en gaat u na, of de zaagtanden niet in het werkstuk zijn blijven steken. Indien het zaagblad klemt, kan het uit het werkstuk bewegen of een terugslag veroorzaken wanneer de zaag opnieuw gestart wordt. d Ondersteun grote platen om het risico van een terugslag door een klemmend zaagblad te verminderen. Grote platen kunnen onder uw eigen gewicht doorbuigen. Platen moeten aan beide zijden, zowel in de nabijheid van de zaagspleet als aan de kant, ondersteund worden. e Gebruik geen stompe of beschadigde zaagbladen. Zaagbladen met stompe of verkeerd gepositioneerde tanden veroorzaken door een te nauwe zaagspleet meer wrijving, klemmen van het zaagblad en een terugslag. f Trek vóór het zagen de snijdiepteen snijhoekinstellingen vast. Indien tijdens het zagen de instellingen veranderen, kan het zaagblad klem gaan zitten en kan er zich een terugslag voordoen. g Wees altijd heel bij het zagen in bestaande muren of andere materialen waarvan u niet weet wat eronder, boven of erachter zit. Het zaagblad kan bij het zagen in verborgen voorwerpen blokkeren en een terugslag veroorzaken. 8 Veiligheidsinstructies voor handcirkelzagen Werking van de onderste beschermkap a Controleer telkens vóór gebruik, of de onderste beschermkap correct sluit. Gebruik de zaag niet wanneer de onderste beschermkap niet vrij beweeglijk is en niet onmiddellijk sluit. Klem of bind de onderste beschermkap nooit in de geopende positie vast. Indien de zaag ongewild op de grond valt, kan de onderste beschermkap kromgebogen worden. Open de beschermkap met de terugtrekhendel en vergewis u ervan dat ze vrij beweegt en bij alle snijhoeken en dieptes noch zaagblad noch andere onderdelen raakt Handkreissaege_man.indd :28
61 b Controleer de werking van de veer voor de onderste beschermkap. Laat de zaag vóór het gebruik wachten wanneer onderste beschermkap en veer niet correct werken. Beschadigde onderdelen, kleverige aanslag of ophopingen van spaan laten de onderste bescherm kap met vertraging werken. c Open de onderste beschermkap met de hand uitsluitend bij speciale sneden, zoals duik- en schuine sneden. Open de onderste beschermkap met de terugtrek hendel en laat deze los zodra het zaagblad in het werkstuk grijpt. Bij alle andere zaagwerkzaamheden dient de onderste beschermkap automatisch te werken. d Leg de zaag niet neer op de werkbank of de vloer, zonder dat de onderste beschermkap het zaagblad bedekt. Een onbeschermd, nalopend zaagblad beweegt de zaag tegen de snijrichting in en zaagt wat haar in de weg staat. Neem daarbij de nalooptijd van de zaag in acht. 6 Speciale veiligheidstips voor dit apparaat Zaagbladen van hooggelegeerd sneldraaistaal (HSS-staal) mogen niet gebruikt worden. Er mogen uitsluitend zaagbladen conform EN met deze zaag gebruikt worden. Zaagbladen die niet met de in deze gebruiksaanwijzing aangegeven karakteristieke gegevens overeenstemmen, mogen niet gebruikt worden. Men dient er zich van te vergewissen dat alle beweeglijke onderdelen van de zaagbladbescherming zonder te klemmen functioneren. Uitsluitend scherpe zaagbladen en geschikte toebehoren gebruiken. Nooit slijpschijven in de zaag gebruiken. Kleine houten onderdelen vóór de bewerking vast inspannen. Nooit met de hand vasthouden. Gebruik geen flenzen/flensmoeren, waarvan de boring groter of kleiner is dan die van het zaagblad. Het zaagblad mag niet met de hand afgeremd worden. De machine niet stationair gebruiken. Bij het zagen ademhalingsbeschermings masker aandoen en veiligheidsbril opzetten. Gebruik uitsluitend zaagbladen met een diameter in overeenstemming met het opschrift op de zaag. Gebruik uitsluitend aanbevolen zaagbladen. Veiligheidsinstructies voor de laser-markeerhulp Opgepast! Als er andere dan in de gebruiksaanwijzing beschreven bedienings- en afstelinrichtingen gebruikt of andere methoden toepast worden, kan dit tot een gevaarlijke invloed van straling leiden. Het elektrische gereedschap wordt afgeleverd met waarschuwings borden. Voor de plaatsing daarvan verwijzen wij naar afbeelding 1 op pagina Handkreissaege_man.indd :28
62 62 Niet in de laserstraal kijken. Het kijken naar de laseruitgang met optische instrumenten (bijvoorbeeld vergrootglazen en microscopen) kan binnen een afstand van 100 mm met een gevaar voor de ogen gepaard gaan. Laserlichtstraal niet op mens of dier richten. Laserlichtstraal niet op sterk reflecterende materialen gebruiken. Gevaar door reflecterend licht. Reparaties aan de laser-markeerhulp uitsluitend door vaklui laten uitvoeren. Geen harde voorwerpen in de laseroptiek (3) introduceren. Laseroptiek met een zachte, droge kwast reinigen. Betekenis van de veiligheidssymbolen Gebruiksaanwijzing lezen! Vrijwillig kwaliteitslabel Geteste veiligheid Behuizing is voorzien van een dubbele isolatie Apparaat voldoet aan geldende EU-richtlijnen Belangrijk! Veiligheidsbril dragen! Belangrijk! Gehoorbescherming dragen! Belangrijk! Ademhalingsbeschermingsmasker dragen! Draag geschikte veiligheidshandschoenen. Let op! Laserstralen. Niet in de straal kijken (Laserklasse 2) Waarschuwingsaanwijzing overeenkomstig EN Niet samen met het huisvuil afvoeren! n 0 : 4700 min -1 Onbelast toerental Ø: 190 mm Toelaatbaar zaagblad diameter Bijkomende symbolen en toelichting daarbij in de tekst van deze handleiding. BJ SN: Bouwjaar Serienummer SN: XXXXX De eerste beide onderstreepte cijfers geven de productiemaand aan 7 Montage en instelwerk zaamheden LET OP! Vóór alle montage- en instelwerkzaamheden stilstand van het gereedschap afwachten en de netstekker uit het stopcontact trekken. Parallelle snede (afb. 2) 1. Borgschroef (6) losdraaien 2. Parallelle aanslag (17) volgens schaal einstellen, op zaagbladbreedte letten 3. Borgschroef (6) weer vast aandraaien. LET OP! Proefsnede met een afvalhoutje doorvoeren Handkreissaege_man.indd :28
63 Kerf A verticale snede 90 Kerf B schuine snede 45 Snijdiepte instellen (afb. 3) 1. Vastzethefboom van de snijdiepte-instelling (14) lossen. 2. Zaagschoen (7) naar beneden zwenken. 3. Snijdiepte volgens schaal (13) instellen. Tandpunt moet ca. 2 mm uit het hout steken. 4. Vastzethefboom (14) weer vast aantrekken. Zaagschoen verstellen (schuine snede) (afb. 4) 1. De borgschroef van de snijhoekinstelling (5) losdraaien. 2. Zaagschoen op de schaal (4) met de aanduiding van de snijhoek op gewenst aantal graden instellen 0/ Borgschroef vast aandraaien. Zaagblad wisselen (afb. 5a + b) 1. Snijdiepte op de laagste waarde instellen. 2. Zaagbladbeschermkap (8) met behulp van de hendel (10) tot aan de aanslag omhoog schuiven, vasthouden en gelijktijdig de zaagspilvergrendeling (16) indrukken en vasthouden. 3. Met de inbussleutel (19) de inbusschroef (9) tegen de richting van de wijzers van de klok in losdraaien en de flens afnemen. 4. Zaagblad langs onder afnemen en vervangen. De vertanding moet in zaagrichting wijzen! Afmetingen in acht nemen! LET OP! De pijlmarkeringen op zaagblad en zaagbladafdekking moeten overeenstemmen! 5. Zaagblad met flens en inbusschroef bevestigen. 8 Werking (afb ) De LED-bedrijfsindicator (15) is groen verlicht zodra de machine met de netspanning gekoppeld is. De machine is operationeel. In-/uitschakelen De machine beschikt over een veiligheidsschakeling met twee knoppen: de machine kan slechts in gebruik genomen worden als de handgreep vast omsloten is en beide knoppen ingedrukt worden. Bij het loslaten van de handgreep schakelt de machine automatisch uit, zodat een onopzettelijke werking niet mogelijk is. LET OP! Machine vóór het contact met het werkstuk inschakelen! 9 Werkwijze De zaagbladbeschermkap wordt door het werkstuk automatisch achteruit geschoven. Met de cirkelzaag lichtjes en gelijkmatig voorwaarts bewegen. Het neervallende werkstuk dient zich aan de rechterzijde van de cirkelzaag te bevinden opdat het brede gedeelte van de machinetafel op het gehele oppervlak ligt Handkreissaege_man.indd :28
64 64 Laser-markeerhulp (3) De lichtstraal van de laser-markeerhulp vergemakkelijkt de uitvoering van rechte sneden a) langs een voorgetekende snijlijn op het werkstuk b) door het peilen van een gemarkeerd vast punt op het werkstuk. Afhankelijk van het omgevingslicht bedraagt de reikwijdte van de laserstraal ca. 65 cm. De laser-markeerhulp wordt met de schakelaar Aan/uit (1) desgewenst inen uitgeschakeld. Stofafzuiging Via de stofzuigeraansluiting (11) is de stofafzuiging door middel van een stofzuiger mogelijk. Het inademen van slijpstof is schadelijk voor de gezondheid, daarom in principe met ingeschakelde stofafzuiging werken. Eventueel de bijgeleverde adapter (18) gebruiken om een in de handel verkrijgbare zuigslang aan te sluiten. 10 Onderhoud en milieu bescherming Trek vóór alle werkzaamheden aan het elektrische gereedschap de netstekker uit het stopcontact. Houd het elektrische gereedschap en de ventilatiesleuven schoon om goed en veilig te werken. De tegen slingering beschermende kap moet altijd vrij kunnen bewegen en moet automatisch kunnen sluiten. Houd daarom het bereik rond de tegen slingering beschermende kap steeds schoon. Verwijder stof en spanen door met perslucht uit te blazen of met een kwast. Niet-gecoate zaagbladen kunnen door een dunne laag zuurvrije olie tegen corrosieaanslag beschermd worden. Verwijder vóór het zagen de olie weer omdat het hout anders vlekkerig kan worden. Hars- of lijmresten op het zaagblad beïnvloeden de snijkwaliteit in negatieve zin. Reinig zaagbladen daarom onmiddellijk na het gebruik. OPGELET! Niet meer bruikbare elektro- en accuapparaten horen niet thuis bij het huishoudelijk afval! Ze moeten overeenkomstig richtlijn 2012/19/EU voor afgedankte elektro- en elektronische apparatuur afzonderlijk verzameld en naar een milieuvriendelijk en vakkundig recyclingcentrum gebracht worden. Breng niet meer bruikbare elektrische apparatuur naar een plaatselijk inzamelpunt. Verpakkingsmaterialen naar soort gescheiden inzamelen en conform de plaatselijke bepalingen afvoeren. Vraag voor details bij uw gemeente na. 11 Servicetips Bewaar de machine, de handleiding en eventuele hulpstukken in de originele verpakking. Op die manier heeft u zowel alle informatie als alle onderdelen steeds bij de hand. Meister-gereedschappen behoeven nauwelijks enig onderhoud. Voor het schoonmaken van het machinehuis Handkreissaege_man.indd :28
65 is een vochtige doek voldoende. Elektromachines nooit in het water houden. Verdere aan wij zingen treft u in de handleiding aan. Meister-artikelen worden aan strenge kwaliteitscontroles onderworpen. Mocht er desondanks toch nog een defect m.b.t. het functioneren optreden, dan verzoeken wij u de machine aan ons service-adres toe te zenden. De reparatietijd zal maximaal ca. 2 weken duren. Een korte beschrijving van het defect verkort zowel de tijd die nodig is om de fout op te sporen, als de reparatietijd zelf. Zolang de garantie geldig is, gelieve u de te repareren machine met het garantie-certificaat en de kassabon op te sturen. Als de reparatie niet (meer) onder de garantie valt, dan zullen wij de reparatiekosten helaas in rekening moeten brengen. BELANGRIJK! Wij wijzen er uitdrukkelijk op, dat wij volgens de wet op de productaansprakelijk heid niet voor door onze apparaten veroorzaakte schade op hoeven te komen, voor zover deze door ondeskundige reparatie veroorzaakt of bij een vervangen van onderdelen niet onze originele onderdelen of door ons goedgekeurde onderdelen gebruikt werden en de reparatie niet door de klantenservice van Meister Werk zeuge GmbH of een geautoriseerde vakman uitgevoerd werd! Dit geldt ook voor de gebruikte accessoires. Ter voorkoming van transportschade verzoeken wij u de machine deugdelijk te verpakken, respectievelijk de originele verpakking te gebruiken. Ook na het verstrijken van de garantietermijn kunt u op ons blijven rekenen, omdat eventuele reparaties aan Meister-artikelen dan tegen lage kosten door ons worden uitgevoerd. ATTENTIE! indien het apparaat door u wordt opengemaakt, dan vervallen al uw aanspraken op garantie! Handkreissaege_man.indd :28
66 PL Instrukcja obsługi i wskazówki dot. bezpieczeństwa Prosimy dokładnie przeczytać przed pierwszym uruchomieniem i starannie przechować wraz z elektronarzędziem! Spis treści Strona 1 Zakres dostawy 66 2 Informacje techniczne 66 3 Elementy urządzenia 67 4 Zastosowanie zgodne z przeznaczeniem 67 5 Ogólne wskazówki bezpieczeństwa 69 6 Wskazówki bezpieczeństwa specyficzne dla urządzenia 74 Strona 7 Montaż i czynności 75 8 Użytkowanie urządzenia 76 9 Sposób pracy Konserwacja i ochrona środowiska Wskazówki dotyczące serwisu Zakres dostawy 1 pilarka tarczowa ręczna 1 prowadnica równoległa 1 tarcza pilarska 1 klucz imbusowy 1 adapter do odpylacza zewnętrznego Instrukcja eksploatacji Karta gwarancyjna 2 Informacje techniczne Dane techniczne Napięcie sieciowe V~/50 Hz Pobór mocy 1500 W Prędkość obrotowa biegu jałowego n 0 = 4700 min -1 Głębokość cięcia dla mm Głębokość cięcia dla mm Kąt cięcia 0/90 45 Tarcza pilarska Ø 190 x 30 mm Kabel zasilający 3 m Laserowe urządzenie pomocnicze klasa lasera 2 długość fali 650 nm moc wyjściowa < 1mW Zastrzega się możliwość dokonywania zmian technicznych. to zarejestrowany znak towarowy firmy Conmetall Meister GmbH, Wuppertal/Niemcy Emisja hałasu/wibracje Emisja hałasu L pa : 91,5 db(a), L WA : 102,5 db(a) Niepewność pomiarowa K pa : 3,0 db(a), K WA : 3,0 db(a) Wibracje przenoszone na ręce/ramiona Cięcie drewna: - uchwyt: a h : 5,6 m/s 2 - dodatkowy uchwyt: a h : 5,3 m/s 2 ; Niepewność pomiarowa K = 1,5 m/s Handkreissaege_man.indd :28
67 Informacje na temat hałasu i drgań Wartości pomiarowe określono zgodnie z EN Podaną wartość emisji drgań zmierzono na podstawie znormalizowanej procedury badawczej i można ją wykorzystywać do wzajemnego porównywania elektronarzędzi. Można jej także użyć do wstępnego oszacowania szkodliwości pracy z narzędziem. UWAGA! Wartość emi sji drgań pod czas eksploatacji elektronarzę dzia może odbie gać od wartości podanej, za leżnie od sposobu je go eksploatacji. Obciążenie wibracjami należy utrzymywać na możliwie najniższym poziomie. Przykładowe działania zmniejszające obciążenie wibracjami to zakładanie rękawic ochronnych podczas pracy z narzędziem oraz ograniczanie czasu pracy. Należy przy tym uwzględnić wszystkie elementy składowe cyklu eksploatacji (na przykład czas, w którym narzędzie jest wyłączone lub pozostaje włączone, ale pracuje bez obciążenia). UWAGA! Podczas pracy z urządzeniem nie sposób uniknąć hałasu. Dlatego prace powodujące duży hałas należy wykonywać w dozwolonym czasie. Przestrzegać godzin, w których obowią zuje cisza i ograniczyć czas pracy do niezbędnego minimum. UWAGA! Hałas może powodować uszkodzenie słuchu. Dlatego podczas pracy należy używać odpowiednich środków ochrony słuchu. Powinny ich używać również osoby przebywające w pobliżu. 3 Elementy urządzenia 1 Włącznik/wyłącznik laserowego urządzenia pomocniczego 2 Uchwyt 2a Dodatkowy uchwyt 3 Laserowe urządzenie pomocnicze 4 Skala kąta cięcia 5 Regulacja kąta cięcia 6 Śruba ustalająca prowadnicy równoległej 7 Stół pilarki 8 Ruchoma osłona tarczy 9 Śruba z łbem okrągłym o gnieździe sześciokątnym 10 Dźwignia ruchomej osłony tarczy 11 Przyłącze odpylacza 12 Włącznik/wyłącznik 13 Skala głębokości cięcia 14 Regulacja głębokości cięcia 15 Wskaźnik pracy LED 16 Blokada wrzeciona (rys. 5a) 17 Prowadnica równoległa 18 Adapter do odpylacza zewnętrznego 19 Klucz imbusowy 4 Zastosowanie zgodne z przeznaczeniem Pilarka tarczowa jest przeznaczona wyłącznie do pracy w trybie ręcznym w warunkach domowych. Wraz z wchodzącą w skład dostawy tarczą pilarską nadaje się ona do wykonywania prostych cięć w drewnie i tworzywach drewnopochodnych zgodnie z informacjami podanymi w niniejszej instrukcji obsługi. Urządzenie jest przeznaczone wyłącznie do stosowania w gospodarstwie domowym. Urządzenia nie mogą używać osoby (w tym dzieci) o ograniczonej sprawności fizycznej, sensorycznej lub umysłowej ani osoby niemające wystarczającego doświadczenia lub wiedzy. Należy Handkreissaege_man.indd :28
68 68 dopilnować, aby dzieci nie bawiły się urządzeniem. UWAGA! Użytkowanie niezgodne z przeznaczeniem, modyfikacje w obrębie urządzenia i używanie części, które nie zostały sprawdzone i dopuszczone przez producenta, mogą spowodować nieprzewidziane szkody. Użytkowanie niezgodne z przeznaczeniem Wszystkie przypadki użycia urządzenia, których nie wymieniono w rozdziale Zastosowanie zgodne z przeznaczeniem, uważa się za użycie niezgodne z przeznaczeniem. Niniejsze elektronarzędzie nie nadaje się do ścinki drzew. Stosowanie elektronarzędzia do prac, do których nie jest przeznaczone, może być przyczyną zagrożeń i obrażeń. Nie stosować wyposażenia, które nie jest specjalnie przeznaczone do tego elektronarzędzia. Sama możliwość zamocowania wyposażenia do elektronarzędzia nie stanowi gwarancji bezpiecznej pracy. Dopuszczalna prędkość obrotowa narzędzia wymiennego musi być co najmniej tak wysoka, jak podana na elektronarzędziu prędkość maksymalna. Osprzęt obracający się z prędkością większą od dopuszczalnej może pęknąć, a jego części odprysnąć. Istnieje niebezpieczeństwo odniesienia obrażeń. Za wszelkie szkody materialne i osobowe, których przyczyną jest niewłaściwe użycie, odpowiedzialność cywilną ponosi użytkownik urządzenia. W przypadku stosowania innych lub nieoryginalnych elementów konstrukcyjnych wygasa gwarancja producenta. Ryzyko resztkowe: Instrukcja eksploatacji dla tego elektronarzędzia zawiera obszerne wskazówki dotyczące bezpiecznej pracy z elektronarzędziami. Pomimo tego każde elektronarzędzie jest źródłem pewnego ryzyka resztkowego, którego nie mogą całkowicie wykluczyć zastosowane mechanizmy ochronne. Dlatego też elektronarzędzia należy użytkować zawsze z zachowaniem niezbędnej ostrożności. Przykłady ryzyka resztkowego to: Dotknięcie wirujących części lub narzędzi wymiennych. Możliwość zranienia przez wyrzucane elementy lub ich części. Zagrożenie pożarem w przypadku niedostatecznego wietrzenia silnika. Uszkodzenie słuchu w przypadku pracy bez środków ochrony słuchu. Bezpieczna praca zależy również od zapoznania personelu obsługi z zasadami posługiwania się danym elektronarzędziem! Odpowiednia znajomość maszyny oraz rozważne zachowanie podczas pracy pomagają zminimalizować istniejące ryzyko resztkowe. Ostrzeżenie! Opisane tu narzędzie wytwarza podczas eksploatacji pole elektromagnetyczne. Pole to w określonych okolicznościach może wywierać negatywny wpływ na działanie aktywnych i biernych implantów medycznych. Aby uniknąć niebezpie Handkreissaege_man.indd :28
69 czeństwa poważnych lub śmiertelnych obrażeń, przed rozpoczęciem pracy z elektronarzędziem radzimy osobom z wszczepionymi medycznymi implantami skonsultowanie się z lekarzem lub producentem implantu. 5 Ogólne wskazówki bezpieczeństwa dotyczące obchodzenia się z elektronarzędziami OSTRZEŻENIE! Należy przeczytać wszystkie wskazówki bezpieczeństwa i instrukcje. Nieprzestrzeganie wskazówek bezpieczeństwa i zaleceń może być przyczyną porażenia prądem elektrycznym, pożaru i/lub ciężkich obrażeń ciała. Wszystkie wskazówki bezpieczeństwa i instrukcje należy zachować na przyszłość. Używane we wskazówkach bezpieczeństwa pojęcie elektronarzędzie dotyczy elektrycznych narzędzi zasilanych z sieci elektrycznej (z kablem sieciowym) lub akumulatorów (bez kabla sieciowego). 1 Bezpieczeństwo w miejscu pracy a Należy utrzymywać czystość na stanowisku pracy i zapewnić jego odpowiednie oświetlenie. Nieporządek i brak właściwego oświetlenia miejsca pracy grozi wypadkiem. b Nie wolno używać elektronarzędzi w środowisku zagrożonym wybuchem, w którym znajdują się ciecze, gazy lub pyły o właściwościach palnych. Elektronarzędzia wytwarzają iskry, które mogą zapalić pyły lub opary. c Podczas pracy z elektronarzędziem należy upewnić się, że dzieci i inne osoby postronne zachowują odpowiednią odległość. Odwrócenie uwagi może spowodować utratę kontroli nad urządzeniem. 2 Bezpieczeństwo elektryczne a Wtyczka elektronarzędzia powinna pasować do gniazda wtykowego. Zabrania się wprowadzania jakichkolwiek modyfikacji w konstrukcji wtyczki. W przypadku elektronarzędzia z uziemieniem ochronnym nie wolno stosować adapterów do wtyczek. Oryginalne wtyczki i dopasowane gniazda wtykowe zmniejszają ryzyko porażenia prądem elektrycznym. b Nie wolno dotykać uziemionych powierzchni, np. rur, urządzeń grzewczych, pieców i chłodziarek. Ryzyko porażenia prądem zwiększa się, jeśli ciało człowieka jest uziemione. c Urządzenie należy chronić przed deszczem i wilgocią. Wniknięcie wody do wnętrza elektronarzędzia zwiększa ryzyko porażenia prądem. d Nie wolno używać kabla w sposób niezgodny z przeznaczeniem, tzn. do przenoszenia lub zawieszania urządzenia. Nie należy wyciągać wtyczki z gniazda przez pociąganie za kabel. Kabel należy chronić przed wysoką temperaturą, olejem, ostrymi krawędziami i ruchomymi elementami urządzenia. Uszkodzenie lub splątanie kabla zwiększa ryzyko porażenia prądem elektrycznym. e Podczas użytkowania elektronarzędzia na świeżym powietrzu należy korzystać wyłącznie z przedłużaczy Handkreissaege_man.indd :28
70 70 dopuszczonych do stosowania na zewnątrz. Stosowanie przedłużaczy przeznaczonych do pracy na zewnątrz zmniejsza ryzyko porażenia prądem elektrycznym. f Jeśli nie da się uniknąć eksploatacji elektronarzędzia w wilgotnym środowisku, należy zastosować wyłącznik różnicowoprądowy. Wyłączniki różnicowoprądowe zmniejszają ryzyko porażenia prądem elektrycznym. 3 Bezpieczeństwo ludzi a Podczas pracy z elektronarzędziem należy zachować szczególną ostrożność i postępować w przemyślany i rozważny sposób. Nie wolno używać elektronarzędzi pod wpływem środków odurzających, alkoholu lub leków ani pod wpływem zmęczenia. Chwilowa nieuwaga podczas pracy z elektronarzędziem może przyczynić się do poważnych obrażeń. b Zawsze należy stosować środki ochrony indywidualnej i nosić okulary ochronne. Korzystanie ze środków ochrony indywidualnej, np. maski przeciwpyłowej, antypoślizgowego obuwia ochronnego kasku ochronnego lub środków ochrony słuchu, pozwala, w zależności od rodzaju oraz sposobu zastosowania elektronarzędzia, ograniczyć ryzyko odniesienia obrażeń. c Należy unikać niezamierzonego uruchomienia urządzenia. Przed podłączeniem elektronarzędzia do zasilania sieciowego i/lub akumulatora oraz przed jego podniesieniem bądź przeniesieniem należy się upewnić, że jest ono wyłączone. Jeżeli w trakcie przenoszenia urządzenia palec użytkownika znajdzie się na włączniku lub włączone urządzenie zostanie podłączone do źródła zasilania, może dojść do wypadku. d Przed włączeniem urządzenia należy usunąć narzędzia użyte do regulacji lub klucze do śrub. Narzędzia lub klucze znajdujące się w wirującym elemencie urządzenia mogą spowodować obrażenia. e Należy unikać pracy w nienaturalnej pozycji. Należy przyjąć stabilną postawę i przez cały czas utrzymywać równowagę. Pozwala to na lepsze zapanowanie nad elektronarzędziem w przypadku nieoczekiwanych sytuacji. f Należy nosić odpowiednią odzież. Nie wolno zakładać luźnej odzieży ani biżuterii. Nie wolno zbliżać włosów, odzieży ani rękawic do ruchomych elementów urządzenia. Luźne ubranie, biżuteria i długie włosy mogą zostać wciągnięte przez poruszające się podzespoły. g W przypadku możliwości montażu urządzeń do odsysania i wychwytywania pyłów należy upewnić się, że są one podłączone i funkcjonują prawidłowo. Zastosowanie urządzenia do odsysania pozwala ograniczyć zagrożenia powodowane przez pył. h Nie wolno pod wpływem fałszywego poczucia bezpieczeństwa pomijać zasad bezpieczeństwa obowiązujących dla elektronarzędzi, nawet w przypadku wynikającej z wielokrotnego użytkowania znajomości tego elektronarzędzia. Nieuważne postępowanie może w ułamku sekundy spowodować poważne obrażenia Handkreissaege_man.indd :28
71 4 Eksploatacja i obchodzenie się z elektronarzędziem a Nie należy przeciążać urządzenia. Należy używać elektronarzędzia wyłącznie do prac, do których jest przeznaczone. Dobór właściwego elektronarzędzia zapewnia wydajniejszą i bezpieczniejszą pracę w podanym zakresie mocy. b Nie wolno korzystać z elektronarzędzi, których włączniki są uszkodzone. Elektronarzędzie, którego nie można włączyć/wyłączyć, jest niebezpieczne i należy je oddać do naprawy. c Przed zmianą ustawień, wymianą osprzętu lub odłożeniem urządzenia należy wyciągnąć wtyczkę z gniazda i/lub wyjąć akumulator. Ta czynność zapobiegawcza zapobiega przypadkowemu uruchomieniu urządzenia. d Chwilowo nieużywane elektronarzędzia należy przechowywać poza zasięgiem dzieci. Nie wolno zezwalać na używanie urządzenia osobom, które go nie znają lub nie zapoznały się z niniejszą instrukcją. Elektronarzędzia używane przez niedoświadczone osoby mogą stanowić zagrożenie. e Elektronarzędzia i narzędzia robocze konserwować z należytą starannością. Należy sprawdzać, czy części ruchome działają prawidłowo i nie zakleszczają się oraz czy nie są pęknięte lub uszkodzone w stopniu zakłócającym działanie elektronarzędzia. Przed użyciem elektronarzędzia zlecić naprawę uszkodzonych części. Niewłaściwa konserwacja elektronarzędzia jest częstą przyczyną wypadków. f Narzędzia skrawające powinny być ostre i czyste. Prawidłowo konserwowane narzędzia tnące o ostrych krawędziach rzadziej się zacinają i dają się łatwiej prowadzić. g Elektronarzędzie, osprzęt, narzędzia obróbkowe itp. należy użytkować zgodnie z niniejszą instrukcją obsługi. Należy przy tym uwzględnić warunki pracy i rodzaj wykonywanej czynności. Używanie elektronarzędzia do celów niezgodnych z ich przeznaczeniem może spowodować zagrożenie. h Należy dopilnować, aby uchwyty były suche, czyste oraz wolne od olejów i smarów. Śliskie uchwyty i powierzchnie chwytne uniemożliwiają bezpieczną obsługę i kontrolę elektronarzędzia w nieprzewidzianych sytuacjach. 5 Serwis a Naprawę urządzenia powierzać wyłącznie wykwalifikowanym specjalistom, używającym tylko oryginalnych części zamiennych. Stanowi to gwarancję zachowania bezpieczeństwa urządzenia. b Aby uniknąć zagrożenia, uszkodzony kabel sieciowy musi zostać wymieniony przez producenta lub przedstawiciela serwisu. 6 Wskazówki bezpieczeństwa podczas cięcia/piłowania a NIEBEZPIECZEŃSTWO: Nie zbliżać rąk do obszaru cięcia ani do tarczy pilarskiej. Drugą ręką należy trzymać za dodatkowy uchwyt lub obudowę silnika. Kiedy obie ręce trzymają pilarkę, nie ma ryzyka obrażeń dłoni przez tarczę pilarską Handkreissaege_man.indd :28
72 72 b Nigdy nie chwytać obrabianego detalu od dołu. Osłona nie chroni przed tarczą pilarską od spodu obrabianego elementu. c Głębokość cięcia należy dopasować do grubości obrabianego elementu. Powinna być pod nim widoczna niepełna wysokość zęba. d Nigdy nie przytrzymywać obrabianego elementu ręką ani nie opierać na nodze. Obrabiany element należy zabezpieczyć w stabilnym uchwycie. Solidne zamocowanie obrabianego elementu jest ważne, aby zmniejszyć ryzyko kontaktu z ciałem, zakleszczenia tarczy pilarskiej lub utraty kontroli nad narzędziem. e Podczas wykonywania prac, podczas których narzędzie robocze może natrafić na ukryte przewody elektryczne lub własny przewód przyłączeniowy, trzymać elektronarzędzie wyłącznie za izolowane uchwyty. Kontakt z przewodem pod napięciem powoduje przewodzenie napięcia na metalowe elementy elektronarzędzia i prowadzi do porażenia prądem elektrycznym. f Podczas cięcia wzdłużnego zawsze należy używać docisku lub prostej prowadnicy krawędziowej. Poprawia to dokładność cięcia i zmniejsza tendencję tarczy pilarskiej do zakleszczania. g Zawsze używać tarcz pilarskich o odpowiedniej wielkości i z otworem pasującym do mocowania (np. gwiazdowym lub okrągłym). Tarcze pilarskie, które nie pasują do elementów mocujących pilarki, obracają się niestabilnie i prowadzą do utraty kontroli nad narzędziem. h Nigdy nie stosować uszkodzonych ani nieodpowiednich podkładek lub śrub do mocowania tarcz pilarskich. Podkładki i śruby do mocowania tarczy pilarskiej zostały skonstruowane specjalnie do tej pilarki, aby zapewnić optymalną moc i bezpieczeństwo eksploatacyjne. 7 Dalsze wskazówki bezpieczeństwa podczas cięcia Odbicie przyczyny i odpowiednie uwagi dotyczące bezpieczeństwa: Odrzut to nagła reakcja spowodowana przez zakleszczenie, zablokowanie, lub nieprawidłowe ustawienie tarczy pilarskiej, prowadzące do tego, że pilarka w sposób niekontrolowany odskakuje od obrabianego przedmiotu i porusza się w kierunku jej operatora. Jeżeli tarcza pilarska zahaczy lub zakleszczy się w zamykającym się rzazie, zostaje zablokowana, a siła silnika odrzuca pilarkę w kierunku jej operatora. Jeżeli tarcza pilarska w rzazie skrzywi się lub źle ustawi, zęby tylnej krawędzi tarczy pilarskiej mogą zahaczyć o powierzchnię obrabianego elementu, w wyniku czego tarcza pilarska zostaje wyrzucona z rzazu, a pilarka odskakuje w kierunku operatora. Odrzut jest wynikiem niewłaściwego oraz/lub nieprawidłowego zastosowania pilarki. Można temu zapobiec, stosując odpowiednie, opisane poniżej środki ostrożności. a Pilarkę należy mocno trzymać obiema rękoma, a ramiona ułożyć w taki sposób, aby stawić opór sile odrzutu. Stać zawsze z boku tarczy pilarskiej. Tarcza pilarska nigdy nie Handkreissaege_man.indd :28
73 może znajdować się w jednej linii z ciałem operatora. W przypadku odrzutu pilarka może odskoczyć do tyłu, jednak obsługująca ją osoba opanuje siłę odrzutu, jeżeli podjęte zostaną odpowiednie środki ostrożności. b Jeżeli tarcza pilarska zakleszczy się lub praca zostanie przerwana, to pilarkę należy wyłączyć i trzymać spokojnie w obrabianym materiale, aż tarcza się zatrzyma. Nigdy nie wyciągać pilarki z obrabianego elementu dopóki tarcza pilarska wiruje, ponieważ istnieje zagrożenie odrzutu. Znaleźć i usunąć przyczynę zakleszczenia tarczy pilarskiej. c Włączając ponownie pilarkę tkwiącą w obrabianym elemencie, należy wycentrować tarczę pilarską w rzazie i sprawdzić, czy zęby tnące nie są wczepione w obrabiany element. Jeżeli tarcza pilarska się zakleszczy, przy próbie ponownego włączenia może wyskoczyć z obrabianego elementu lub spowodować odrzut. d Duże płyty należy podpierać, aby zmniejszyć ryzyko odrzutu na skutek zakleszczenia tarczy pilarskiej. Płyty takie mogą się wyginać pod własnym ciężarem. Płyty należy podeprzeć z obu stron, zarówno w pobliżu rzazu jak i przy krawędzi. e Nie używać tępych ani uszkodzonych tarcz pilarskich. Tarcze pilarskie ze stępionymi lub nieprawidłowo ustawionymi zębami powodują w wyniku zbyt ciasnego rzazu zwiększone tarcie, zakleszczanie się tarczy pilarskiej i odrzut. f Przed rozpoczęciem piłowania należy dokręcić elementy regulujące głębokość i kąt cięcia. Jeżeli podczas piłowania ustawienia te się zmienią, tarcza pilarska może się zakleszczyć i spowodować odrzut. g Zachować ostrożność podczas cięcia w istniejących ścianach i innych niewidocznych miejscach. Zagłębiająca się w materiale piła tarczowa może się zaklinować w niewidocznych obiektach i spowodować odrzut. 8 Wskazówki dotyczące bezpieczeństwa dla pilarek tarczowych ręcznych Funkcja osłony dolnej a Przed każdym użyciem należy sprawdzić, czy dolna osłona poprawnie się zamyka. Nie wolno używać pilarki, jeżeli osłona ta nie porusza się swobodnie i natychmiast się nie zamyka. Nigdy nie blokować ani nie podwiązywać dolnej osłony w pozycji otwartej. Jeżeli pilarka upadnie przypadkiem na podłogę, dolna osłona może się skrzywić. Otworzyć osłonę przewidzianą do tego dźwignią i upewnić się, czy osłona swobodnie się porusza oraz czy pod każdym kątem i głębokością piłowania nie dotyka tarczy pilarskiej ani innych części. b Sprawdzić działanie sprężyny dolnej osłony. Jeżeli osłona dolna i sprężyna nie działają bez zarzutu, to przed użyciem pilarki należy przekazać ją do konserwacji. Uszkodzone części, lepkie osady i nagromadzone wióry spowalniają działanie tej osłony. c Dolną osłonę wolno otwierać ręcznie tylko przy wykonywaniu cięć specjalnych, na przykład przy piłowaniu wgłębnym lub wykonywanym pod kątem. Otworzyć osłonę Handkreissaege_man.indd :28
74 74 przeznaczoną do tego dźwignią i natychmiast zwolnić, gdy tarcza pilarska zagłębi się w obrabianym elemencie. Podczas wszelkich innych prac pilarskich dolna osłona powinna funkcjonować automatycznie. d Nie odkładać pilarki na stole warsztatowym ani na podłodze, jeżeli dolna osłona nie zakrywa tarczy pilarskiej. Nieosłonięta, wirująca jeszcze tarcza pilarska porusza pilarkę w kierunku przeciwnym do kierunku cięcia i piłuje wszystko, co napotka na swej drodze. Należy przestrzegać czasu dobiegu pilarki. 6 Wskazówki bezpieczeństwa związane z urządzeniem Nie wolno stosować tarcz pilarskich wykonanych ze stali szybkotnących o podwyższonej wydajności skrawania. W tej pilarce stosowane mogą być wyłącznie tarcze pilarskie zgodne z EN Nie wolno używać tarcz pilarskich, które nie spełniają parametrów podanych w niniejszej instrukcji użytkowania. Należy się upewnić, że wszystkie ruchome części osłony tarczy pilarskiej działają prawidłowo i nie zakleszczają się. Stosować tylko ostre tarcze pilarskie i właściwy osprzęt. Nigdy nie stosować tarcz szlifierskich w pilarce. Małe drewniane detale należy przed obróbką dokładnie zamocować. Nigdy nie trzymać ich ręką. Nie wolno stosować kołnierzy/nakrętek kołnierzowych, których otwór jest większy lub mniejszy od otworu tarczy pilarskiej. Tarczy pilarskiej nie wolno hamować ręką. Nie używać maszyny w trybie stacjonarnym. Podczas cięcia należy nosić maskę przeciwpyłową i okulary ochronne. Należy stosować wyłącznie tarcze pilarskie o średnicy zgodnej z oznaczeniami na pilarce. Stosować wyłącznie zalecane tarcze pilarskie. Wskazówki bezpieczeństwa dotyczące pomocniczego urządzenia laserowego Uwaga! W razie stosowania mechanizmów obsługi i justowania innych, niż opisane w instrukcji eksploatacji, lub innych sposobów pracy, może wystąpić zagrożenie spowodowane przez promieniowanie. Elektronarzędzie jest dostarczane z tabliczkami ostrzegawczymi, ich rozmieszczenie pokazano na rys. 1 na stronie 2. Nie spoglądać w promień lasera. Oglądanie wylotu promienia lasera za pomocą instrumentów optycznych (np. lupy lub mikroskopu) z odległości mniejszej niż 100 mm może być niebezpieczne dla oczu Handkreissaege_man.indd :28
75 Nie kierować promienia lasera na ludzi ani na zwierzęta. Nie kierować promienia lasera na materiały intensywnie odbijające światło. Zagrożenie przez światło odbite. Naprawę laserowego urządzenia pomocniczego zlecać tylko fachowcom. Nie wprowadzać twardych przedmiotów do układu optycznego lasera (3). Układ optyczny lasera czyścić miękkim, suchym pędzelkiem. Znaczenie symboli bezpieczeństwa Przeczytać instrukcję eksploatacji! Dobrowolny certyfikat jakości Geprüfte Sicherheit (sprawdzone bezpieczeństwo) Obudowa jest wyposażona w podwójną izolację ochronną Urządzenie spełnia obowiązujące dyrektywy UE Ważne! Stosować okulary ochronne! Ważne! Stosować środki ochrony słuchu! Ważne! Stosować maskę przeciwpyłową! Zakładać odpowiednie rękawice ochronne. Uwaga promieniowanie lasera. Nie spoglądać w promień lasera (klasa lasera 2) Ostrzeżenie wg EN Nie usuwać z odpadami domowymi! n 0 : 4700 min-1 Obrotowa prędkość jałowa na minutę bez obciążenia Ø: 190 mm Dozwolona średnica tarczy pilarskiej Dalsze symbole i ich objaśnienie w tekście niniejszej instrukcji. BJ SN: Rok produkcji Numer seryjny SN: XXXXX Dwie początkowe podkreślone cyfry wskazują miesiąc produkcji. 7 Montaż i czynności regulacyjne UWAGA! Przed rozpoczęciem wszelkich prac montażowych i regulacyjnych odczekać do zatrzymania się urządzenia i wyciągnąć wtyczkę z gniazdka. Cięcie równoległe (rys. 2) 1. Poluzować śrubę ustalającą (6). 2. Prowadnicę równoległą (17) ustawić zgodnie ze skalą, uwzględniając szerokość tarczy pilarskiej. 3. Ponownie mocno dokręcić śrubę ustalającą (6). UWAGA! Wykonać najpierw próbne cięcie na drewnianym odpadzie. Karb A cięcie pionowe 90 Karb B cięcie ukośne Handkreissaege_man.indd :28
76 76 Ustawienie głębokości cięcia (rys. 3) 1. Poluzować dźwignię ustalającą do ustawiania głębokości cięcia (14). 2. Przesunąć stopę pilarki (7) w dół. 3. Ustawić głębokość cięcia na skali (13). Wierzchołki zębów muszą wystawać z drewna na ok. 2 mm. 4. Ponownie mocno dociągnąć dźwignię ustalającą (14). Zmiana ustawienia stopy pilarki (do cięcia pod kątem) (rys. 4) 1. Poluzować śrubę ustalającą do regulacji kąta cięcia (5). 2. Ustawić stopę pilarki na skali kąta cięcia (4) pod żądanym kątem 0/ Dokręcić śrubę ustalającą. Wymiana tarczy pilarskiej (rys. 5a + b) 1. Ustawić głębokość cięcia na najmniejszą wartość. 2. Unieść ruchomą osłonę tarczy (8) do oporu za pomocą dźwigni (10) i przytrzymać, jednocześnie wcisnąć i przytrzymać blokadę wrzeciona pilarki (16). 3. Odkręcić śrubę z łbem okrągłym o gnieździe sześciokątnym (9) za pomocą klucza imbusowego (19) w kierunku przeciwnym do ruchu wskazówek zegara i zdjąć kołnierz. 4. Zdjąć tarczę pilarską do dołu i wymienić. Uzębienie musi być skierowane w kierunku piłowania! Należy przestrzegać wymiarów! UWAGA! Oznaczenia strzałek na tarczy pilarskiej i osłonie tarczy muszą być zgodne! 5. Przymocować tarczę pilarską za pomocą kołnierza i śruby z łbem sześciokątnym. 8 Eksploatacja (rys ) Wskaźnik pracy LED (15) świeci na zielono, jeśli maszyna jest podłączona do zasilania. Maszyna jest gotowa do pracy. Włączanie i wyłączanie Maszyna jest wyposażona w bezpieczny, dwuprzyciskowy mechanizm włączania i wyłączania: Urządzenie można uruchomić tylko wtedy, gdy operator mocno trzyma rękojeść i wciśnięte są obydwa przyciski. W momencie puszczenia rękojeści maszyna automatycznie się wyłącza, co uniemożliwia jej przypadkową pracę. UWAGA! Włączyć maszynę przed kontaktem z przedmiotem obrabianym! 9 Sposób pracy Obrabiany element automatycznie odsuwa ruchomą osłonę tarczy. Posuwać pilarkę lekko i równomiernie do przodu. Spadający przedmiot obrabiany powinien znajdować się z prawej strony pilarki, aby szersza część stołu opierała się na swojej całej szerokości Handkreissaege_man.indd :28
77 Laserowe urządzenie pomocnicze (3) Promień światła laserowego urządzenia pomocniczego ułatwia wykonywanie cięć po linii prostej a) wzdłuż linii cięcia narysowanej na obrabianym detalu b) przez kierowanie się na stały punkt zaznaczony na obrabianym detalu. W zależności od warunków świetlnych otoczenia zasięg promienia laserowego wynosi ok. 65 cm. Laserowe urządzenie pomocnicze można włączać i wyłączać przyciskiem (1) stosownie do potrzeb. Odsysanie pyłu Przyłącze odkurzacza (11) pozwala na podłączenie do urządzenia odkurzacza, który odsysa i zbiera pył. Wdychanie pyłów powstających podczas szlifowania jest szkodliwe dla zdrowia, dlatego też zawsze należy pracować z włączonym systemem odsysania pyłu. Ewentualnie należy zastosować dołączony adapter (18) do podłączenia standardowego węża ssącego. 10 Konserwacja i ochrona środowiska Przed rozpoczęciem jakichkolwiek prac przy elektronarzędziu należy wyciągnąć wtyczkę z gniazdka. W celu zapewnienia bezpiecznej pracy należy utrzymywać elektronarzędzie i szczeliny wentylacyjne w czystości. Ruchoma osłona tarczy musi zawsze poruszać się swobodnie i samodzielnie się zamykać. Dlatego obszar wokół ruchomej osłony należy zawsze utrzymywać w czystości. Należy usuwać pył i wióry przez przedmuchiwanie sprężonym powietrzem lub za pomocą pędzla. Niepowlekane tarcze pilarskie można zabezpieczyć przed korozją cienką warstwą oleju wolnego od kwasu. Przed rozpoczęciem piłowania należy usunąć olej, ponieważ może on zabarwić obrabiane drewno. Znajdujące się na tarczy pozostałości żywicy i kleju mogą negatywnie wpłynąć na jakość cięcia. Dlatego należy oczyścić tarczę od razu po użyciu. UWAGA! Zużytych urządzeń elektrycznych i akumulatorowych nie można usuwać razem z odpadami z gospodarstwa domowego! Zgodnie z Dyrektywą 2012/19/UE w sprawie zużytego sprzętu elektrycznego i elektronicznego należy gromadzić je osobno i przekazywać do ponownego przetworzenia w przyjazny dla środowiska i fachowy sposób. Nienadające się już do użytku urządzenia elektryczne należy przekazać do lokalnego punktu zbiórki. Materiały opakowaniowe należy segregować według rodzaju i utylizować zgodnie z lokalnymi przepisami. Szczegółowe informacje można uzyskać w urzędzie lokalnej administracji. 11 Wskazówki dotyczące serwisu Urządzenie, instrukcję obsługi i ewentualny osprzęt należy przechowywać w oryginalnym opakowaniu. Dzięki Handkreissaege_man.indd :28
78 temu wszystkie informacje i części będą zawsze pod ręką. Zasadniczo urządzenia Meister nie wymagają konserwacji, a do czyszczenia obudowy wystarcza wilgotna ściereczka. Dodatkowe wskazówki podano w instrukcji eksploatacji. Urządzenia Meister są poddawane ścisłej kontroli jakości. Jeżeli pomimo tego wystąpią usterki, należy przesłać urządzenie na adres naszego serwisu. Niezwłocznie wykonamy naprawę. Krótki opis uszkodzenia pozwoli skrócić lokalizację usterki i czas naprawy. W okresie obowiązywania gwarancji należy dołączyć do urządzenia kartę gwarancyjną i dowód zakupu. Jeżeli naprawa nie będzie podlegać gwarancji, jej koszty ponosi użytkownik. WAŻNE! Otwarcie urządzenia powoduje utratę uprawnień gwarancyjnych! WAŻNE! Pragniemy podkreślić, że w myśl ustawy o odpowiedzialności cywilnej za szkody powstałe w związku z wadliwością produktu nie odpowiadamy za szkody spowodowane na skutek używania naszych urządzeń, o ile powstały one w wyniku niefachowej naprawy lub wymiany części na nieoryginalne części zamienne lub na części, których nie dopuściliśmy do stosowania, lub też gdy naprawy nie przeprowadził serwis klienta firmy Meister Werkzeuge GmbH ani inny autoryzowany serwis! Ta sama regulacja obowiązuje dla używanych elementów osprzętu. Aby uniknąć szkód transportowych, należy odpowiednio zapakować urządzenie lub skorzystać z oryginalnego opakowania. Także po upływie okresu gwarancyjnego jesteśmy do Państwa dyspozycji i oferujemy naprawę urządzeń Meister w atrakcyjnych cenach Handkreissaege_man.indd :28

79 TR Kullanım talimat ve güvenlik uyarıları UYARI! Yaralanma riskinin azalt lmas bak m ndan, ilk kullan mdan önce lütfen dikkatle okuyun ve makineyle birlikte muhafaza edin! Bu makineyi diπer bir kullan c ya vermeniz durumunda, bu kullanma talimatlar n da yan nda teslim ediniz. çindekiler sayfa 1 Teslimat kapsam 79 2 Teknik bilgiler 79 3 Yap parçalar 80 4 Öngörülen amac na uygun kullan m biçimi 80 5 Genel güvenlik uyar lar 82 6 Cihaza özgü güvenlik uyar lar 86 1 Teslimat kapsam 1 Dairesel el testeresi 1 Paralel dayanak 1 Testere bıçağı 1 Allen anahtarı 1 Harici toz emme tertibatı için adaptör İşletim kılavuzu Garanti belgesi 2 Teknik bilgiler Teknik veriler Şebeke gerilimi V~/50 Hz Güç sarfiyatı 1500 W Rölanti devir sayısı n 0 = 4700 dak de kesme derinliği 65 mm 45 de kesme derinliği 44 mm Kesim açısı 0/90 45 Testere bıçağı Ø 190 x 30 mm Bağlantı kablosu 3 m sayfa 7 Montaj ve ayar iµlemleri 87 8 µletim 88 9 Çal µma tarz Bak m ve çevrenin korunmas Servis aç klamalar 89 Lazer iµaret yard m Lazer sınıfı 2 Dalga uzunluğu 650 nm Çıkış gücü < 1mW Teknik deπiµiklikler yap lmas durumu sakl tutulmaktad r. Conmetall Meister GmbH µirketinin tescilli markas d r Wuppertal/ Germany Gürültü emisyonu/titreµim Gürültü emisyonu L pa : 91,5 db(a), L WA : 102,5 db(a) Ölçüm belirsizliπi: K pa : 3,0 db(a), K WA : 3,0 db(a) El/kol titreµimleri Tahta kesme: - Sap: a h : 5,6 m/s 2 - İlave sap: a h : 5,3 m/s 2 ; Ölçüm belirsizliπi K: 1,5 m/s Handkreissaege_man.indd :28
Art.Nr AusgabeNr Rev.Nr. 12/07/2017 HL850 DE GB CZ SK HU Holzspalter Originalbetriebsanleitung Log splitter Translation from t
 Art.Nr. 5905306903 AusgabeNr. 5905306850 Rev.Nr. 12/07/2017 HL850 DE GB CZ SK HU Holzspalter Originalbetriebsanleitung Log splitter Translation from the original instruction manual Štípačka na dřevo Překlad
/2 10/2018 EL 340 EL 380 EL 420 IT BG BS CS DA DE EL EN ES ET FI FR HR HU LT LV MK NL NO Tosaerba elettrico con conducente a piedi MANUALE DI
 171506130/2 10/2018 EL 340 EL 380 EL 420 IT BG BS CS DA DE EL EN ES ET FI FR HR HU LT LV MK NL NO Tosaerba elettrico con conducente a piedi MANUALE DI ISTRUZIONI ATTENZIONE: prima di usare la macchina,
Art.Nr Art.Nr. AusgabeNr AusgabeNr. Rev.Nr /04/2015 Rev.Nr. 28/06/2017 HG34 DE Doppelschleifer Origin
 Art.Nr. 5906103924 Art.Nr. AusgabeNr. 5903106901 5906103851 AusgabeNr. Rev.Nr. 5903106851 16/04/2015 Rev.Nr. 28/06/2017 HG34 DE Doppelschleifer Originalbetriebsanleitung 8-16 NO Benkslipemaskin Oversettelse
/1 10/2018 EL 340 Li 48 EL 380 Li 48 IT BG BS CS DA DE EL EN ES ET FI FR HR HU LT LV MK NL NO Tosaerba a batteria con conducente a piedi MANU
 171506131/1 10/2018 EL 340 Li 48 EL 380 Li 48 IT BG BS CS DA DE EL EN ES ET FI FR HR HU LT LV MK NL NO Tosaerba a batteria con conducente a piedi MANUALE DI ISTRUZIONI ATTENZIONE: prima di usare la macchina,
/6 04/2019 S 400 B IT BG CS DA DE EL EN ES ET FI FR HR HU LT LV MK NL Aeratori e scarificatori condotti a piedi MANUALE DI ISTRUZIONI ATTENZI
 171501197/6 04/2019 S 400 B IT BG CS DA DE EL EN ES ET FI FR HR HU LT LV MK NL Aeratori e scarificatori condotti a piedi MANUALE DI ISTRUZIONI ATTENZIONE: prima di usare la macchina, leggere attentamente
100 COMBI 3 Type 100C E ASSIEME DEL DISPOSITIVO DI TAGLIO MANUALE DI ISTRUZIONI... IT РЕЖЕЩ ДИСК УПЪТВАНЕ ЗА УПОТРЕБА... BG REZNI TANJIR PRIRUČNIK S U
 100 COMBI 3 Type 100C E ASSIEME DEL DISPOSITIVO DI TAGLIO MANUALE DI ISTRUZIONI... IT РЕЖЕЩ ДИСК УПЪТВАНЕ ЗА УПОТРЕБА... BG REZNI TANJIR PRIRUČNIK S UPUTAMA... BS SKŘÍŇ SEKAČKY NÁVOD K POUŽITÍ A ÚDRŽBĚ...
HD18AG indd
 HD18 AG115 HD18 AG125 Original instructions Originalbetriebsanleitung Notice originale Istruzioni originali Manual original Oorspronkelijke gebruiksaanwijzing Original brugsanvisning Original bruksanvisning
ST 4851 AE ST 8051 AE Type ST 515 Li ST 615 Li BATTERY SNOW THROWER INSTRUCTION MANUAL... EN СНЕГОРИН УПЪТВАНЕ ЗА УПОТРЕБА... BG ČISTAČ SNIJEGA PRIRUČ
 ST 4851 AE ST 8051 AE Type ST 515 Li ST 615 Li BATTERY SNOW THROWER INSTRUCTION MANUAL... EN СНЕГОРИН УПЪТВАНЕ ЗА УПОТРЕБА... BG ČISTAČ SNIJEGA PRIRUČNIK S UPUTAMA... BS SNĚHOVÁ FRÉZA INSTRUKTIONSMANUAL...
Model 1 The Future of Lawn Mowing /2 10/2018 MCS 500 AK Li 80 IT BG BS CS DA DE EL EN ES Tosaerba a batteria con conducente a piedi MANUALE D
 Model 1 The Future of Lawn Mowing 171506208/2 10/2018 MCS 500 AK Li 80 IT BG BS CS DA DE EL EN ES Tosaerba a batteria con conducente a piedi MANUALE DI ISTRUZIONI ATTENZIONE: prima di usare la macchina,
BA_ROSCOPE_i2000_Umschlag_0818.indd
 ROSCOPE i2000 ROSCOPE i2000 DE Bedienungsanleitung EN Instructions for use FR Instruction d utilisation ES Instrucciones de uso IT Istruzioni d uso NL Gebruiksaanwijzing PT Instruções de serviço DA Brugsanvisning
85 COMBI 95 COMBI 105 COMBI Type 85C Type 95CV, 95CV E Type 95CP, 95CP E Type 105C E ASSIEME DEL DISPOSITIVO DI TAGLIO MANUALE DI ISTRUZIONI... IT РЕЖ
 85 COMBI 95 COMBI 105 COMBI Type 85C Type 95CV, 95CV E Type 95CP, 95CP E Type 105C E SSIEME DEL DISPOSITIVO DI TGLIO MNULE DI ISTRUZIONI... IT РЕЖЕЩ ДИСК УПЪТВАНЕ ЗА УПОТРЕБА... BG REZNI TNJIR PRIRUČNIK
4PDE book
 INSTALLATIONSANLEITUNG R410A Split-Serie Installation manual R410A Split series Modelle ERWQ02AAV3 English Installationsanleitung Split-Baureihe R410A Deutsch Manuel d installation Série split R410A Français
/2 rev1 06/2017 SBL 327 V IT BG BS CS DA DE EL EN ES ET FI FR HR HU LT LV MK NL Soffiatore portatile da giardino / Aspiratore portatile da gi
 171501298/2 rev1 06/2017 SBL 327 V IT BG BS CS DA DE EL EN ES ET FI FR HR HU LT LV MK NL Soffiatore portatile da giardino / Aspiratore portatile da giardino MANUALE DI ISTRUZIONI ATTENZIONE: prima di usare
INSTALLATIONS- ANLEITUNG R32 Split Series Installation manual R410A Split series English Installationsanleitung Split-Baureihe R410A Deutsch Modelle R
 INSTALLATIONS- ANLEITUNG R32 Split Series Installation manual R410A Split series English Installationsanleitung Split-Baureihe R410A Deutsch Modelle RXM42LV1B RXM50LV1B RXJ50LV1B Manuel d installation
E COVER.indd
 FLOORTEC R 360 B Instructions for use Návod k použití Használati útmutató Инструкции по использованию Pokyny pre použitie Navodila za uporabo Kullanma tali matlari 03/2005 Revised 03/2016 (3) 146 2596
Art.Nr AusgabeNr Rev.Nr. 13/10/2015 SG6500 D CZ SK EST LV Stromgenerator Original-Anleitung Elektrocentrála Překlad z originál
 Art.Nr. 5906203901 AusgabeNr. 5906203850 Rev.Nr. 13/10/2015 SG6500 D CZ SK EST LV Stromgenerator Original-Anleitung Elektrocentrála Překlad z originálního návodu Generátor Prevod iz originalnih navodil
BA 551 / 551D / 551CD / 611D Instructions for use Bedienungshandbuch Instructions d utilisation Instructions for use Gebruiksaanwijzing 07/ Revi
 BA 551 / 551D / 551CD / 611D Instructions for use Bedienungshandbuch Instructions d utilisation Instructions for use Gebruiksaanwijzing 07/2006 - Revised 03/2010 (3) 909 6752 000 Deutsch Français English
3 drawer bedside / D FR Montageanleitung Instructions d' assemblage GB I Assembly instructions Instruzioni
 drawer bedside 00 700 / 96 00-08-07 596 00 00 D FR Montageanleitung Instructions d' assemblage GB I Assembly instructions Instruzioni di montaggio NL Handleiding voor de montage PL Instrukcja montażu CZ
Chest with 3 drawers / D FR Montageanleitung Instructions d' assemblage GB I Assembly instructions Instruzi
 Chest with drawers 040 7004 / 004-0-07 74 400 0 D FR Montageanleitung Instructions d' assemblage GB I Assembly instructions Instruzioni di montaggio NL Handleiding voor de montage PL Instrukcja montażu
Art.Nr / AusgabeNr Rev.Nr. 22/11/2017 HP1100S / HP1300S D GB FR IT Rüttelplatte Original-Anleitung Vibratory Plates
 Art.Nr. 5804603984 / 5804604984 AusgabeNr. 5804602851 Rev.Nr. 22/11/2017 HP1100S / HP1300S D GB FR IT Rüttelplatte Original-Anleitung Vibratory Plates Translation from the original instruction manual Plaque
Problem Your smartwatch doesn t turn on Your smartwatch isn t detected by a smartphone Your smartwatch is detected by a smartphone, but fails to conne
 Problem Your smartwatch doesn t turn on Your smartwatch isn t detected by a smartphone Your smartwatch is detected by a smartphone, but fails to connect Solution Connect to charging USB cable and wait
/2 rev1 06/2017 SBL 327 V IT BG BS CS DA DE EL EN ES ET FI FR HR HU LT LV MK NL Soffiatore portatile da giardino / Aspiratore portatile da gi
 171501298/2 rev1 06/2017 SBL 327 V IT BG BS CS DA DE EL EN ES ET FI FR HR HU LT LV MK NL Soffiatore portatile da giardino / Aspiratore portatile da giardino MANUALE DI ISTRUZIONI ATTENZIONE: prima di usare
State Revenue Services of the Republic Latvia Talejas iela 1, Riga LV-1978 Latvia Ihr Vor- und Zuname Ihre Straße und Hausnummer Ihre Postleitzahl Ihr
 State Revenue Services of the Republic Latvia Talejas iela 1, Riga LV-1978 Latvia Ihr Vor- und Zuname Ihre Straße und Hausnummer Ihre Postleitzahl Ihr Wohnort aktuelles Datum Ihre ZINSPILOT-Kundennummer
C instructions Kit 754 Rapid System 480R Rapid Traverse (North America) 480 Traverse (North America) ISO E 1522 CHEVROLET S
 480 Traverse (North America) ISO E 1522 CHEVROLET S") C.20110509. 503-1522-02instructions Kit 754 Rapid System 480R Rapid Traverse 480 Traverse ISO 11154-E 1522 CHEVROLET Silverado / Silverado Classic, 2-dr Standard Cab, 99-07 CHEVROLET Silverado / Silverado
C.20110509. 503-1522-02instructions Kit 754 Rapid System 480R Rapid Traverse 480 Traverse ISO 11154-E 1522 CHEVROLET Silverado / Silverado Classic, 2-dr Standard Cab, 99-07 CHEVROLET Silverado / Silverado
Art.Nr /2014 SG4500 D GB FR Stromgenerator Original-Betriebsanleitung Electric generator Original Operating Instru
 Art.Nr. 5906207901 5906207903 5906207850 11/2014 SG4500 D GB FR Stromgenerator Original-Betriebsanleitung Electric generator Original Operating Instructions Groupe électrogène Traduction de la notice originale
OM, Flymo, Sabre Cut, , , Garden Accessories, EN, DE, FR, NL, NO, FI, SE, DK, ES, PT, IT, HU, PL, CZ, SK, SI, HR, LT, RU, EE, LV, RO,
 Sabre Cut Original Instructions GB Original Instructions DE Originalanleitung FR Instructions d origine NL Oorspronkelijke instructies NO Originalinstrukser FI Alkuperäiset ohjeet SE Originalinstruktioner
BA 451 / 451D / 531 / 531D Instructions for use Bedienungshandbuch Instructions d utilisation Instructions for use Gebruiksaanwijzing 06/ Revise
 BA 451 / 451D / 531 / 531D Instructions for use Bedienungshandbuch Instructions d utilisation Instructions for use Gebruiksaanwijzing 06/2006 - Revised 03/2010 (4) 909 6748 000 Deutsch Français English
79251_instr.indd
 79251 PL DE RUS UA LT LV CZ SK HU RO E PILARKA DO DREWNA SÄGEMASCHINE ZU HOLZ ЭЛЕКТРОПИЛА ПО ДЕРЕВУ ЕЛЕКТРОПИЛКА ДО ДЕРЕВИНИ MEDIENOS PJŪKLAS KOKA GRIEŠANAS IERĪCE PILKA DO DŘEVA PÍLKA NA PÍLENIE DREVA