CS 55. Algupärane kasutusjuhend Оригинальное руководство по эксплуатации Оригинално ръководство за експлоатация Instrucţiuni de folosire originale
|
|
|
- Gunārs Pērkons
- pirms 2 gadiem
- Skatījumi:
Transkripts
1 Original instructions Originalbetriebsanleitung Notice originale Istruzioni originali Manual original Oorspronkelijke gebruiksaanwijzing Original brugsanvisning Original bruksanvisning Bruksanvisning i original Alkuperäiset ohjeet Πρωτότυπο οδηγιών χρήσης Orijinal işletme talimatı Původním návodem k používání Pôvodný návod na použitie Instrukcją oryginalną Eredeti használati utasítás Izvirna navodila Originalne pogonske upute Instrukcijām oriģinālvalodā Originali instrukcija Algupärane kasutusjuhend Оригинальное руководство по эксплуатации Оригинално ръководство за експлоатация Instrucţiuni de folosire originale Оригинален прирачник за работа Оригінал інструкції з експлуатації التعلیمات الا صلیة
2 ENGLISH DEUTSCH FRANÇAIS ITALIANO ESPAÑOL Picture section with operating description and functional description Bildteil mit Anwendungs- und Funktionsbeschreibungen Partie imagée avec description des applications et des fonctions Sezione illustrata con descrizione dell'applicazione e delle funzioni Sección de ilustraciones con descripción de aplicación y descripción funcional Text section with Technical Data, important Safety and Working Hints and description of Symbols Textteil mit Technischen Daten, wichtigen Sicherheits- und Arbeitshinweisen und Erklärung der Symbole. Partie textuelle avec les données techniques, les consignes importantes de sécurité et de travail ainsi que l explication des pictogrammes. Sezione testo con dati tecnici, importanti informazioni sulla sicurezza e sull utilizzo, spiegazione dei simboli. Sección de texto con datos técnicos, indicaciones importantes de seguridad y trabajo y explicación de los símbolos Parte com imagens PORTUGUES explicativas contendo descrição operacional e funcional Beeldgedeelte NEDERLANDS met toepassings- en functiebeschrijvingen Billeddel Tekstdel med tekniske data, vigtige sikkerheds- og arbejdsanvisninger DANSK med anvendelses- og funktionsbeskrivelser 4 og symbolforklaring Bildedel Tekstdel med tekniske data, viktige sikkerhets- og arbeidsinstruksjoner NORSK med bruks- og funksjonsbeskrivelse 4 og forklaring av symbolene Bilddel Textdel med tekniska informationer, viktiga säkerhets- och användningsinstruktioner SVENSKA med användnings- och funktionsbeskrivning 4 samt symbolförklaringar Kuvasivut Tekstisivut: tekniset tiedot, tärkeät turvallisuus- ja työskentelyohjeet SUOMI käyttö- ja toimintakuvaukset 4 sekä merkkien selitykset Τμήμα εικόνων Τμήμα κειμένου με τεχνικά χαρακτηριστικά, σημαντικές υποδείξεις ασφαλείας ΕΛΛΗΝΙΚΑ με περιγραφές χρήσης και λειτουργίας 4 και εργασίας και εξήγηση των συμβόλων TÜRKÇE Resim bölümü Uygulama ve fonksiyon açıklamaları ile birlikte Obrazová část Textová část s technickými daty, důležitými bezpečnostními a pracovními pokyny ČESKY s popisem aplikací a funkcí 4 a s vysvětlivkami symbolů SLOVENSKY Obrazová časťs popisom aplikácií a funkcií 4 Textová časť s technickými dátami, dôležitými bezpečnostnými a pracovnými pokynmi a s vysvetlivkami symbolov POLSKI 4 MAGYAR 4 SLOVENSKO HRVATSKI Dio sa slikamasa opisima primjene i funkcija 4 Dio štiva sa tehničkim podacima, važnim sigurnosnim i radnim uputama i objašnjenjem simbola LATVISKI Attēla daļa ar lietošanas un funkciju aprakstiem 4 Teksta daļa ar tehniskajiem parametriem, svarīgiem drošības un darbības norādījumiem, simbolu atšifrējumiem LIETUVIŠKAI Paveikslėlio dalissu vartojimo instrukcija ir funkcijų aprašymais 4 Teksto dalis su techniniais duomenimis, svarbiomis saugumo ir darbo instrukcijomis bei simbolių paaiškinimais EESTI Pildiosa kasutusjuhendi ja funktsioonide kirjeldusega 4 Tekstiosa tehniliste näitajate, oluliste ohutus- ja tööjuhenditega ning sümbolite kirjeldustega. РУССКИЙ Част със снимки с описания за приложение и функции Част с текст с технически данни, важни указания за безопасност и работа БЪЛГАРСКИ 4 и разяснение на символите ROMÂNIA Secvenţa de imagine cu descrierea utilizării şi a funcţionării 4 Porţiune de text cu date tehnice, indicaţii importante privind siguranţa şi modul de lucru şi descrierea simbolurilor. МАКЕДОНСКИ Дел со сликисо описи за употреба и функционирање Текстуален дел со Технички карактеристики, важни безбедносни и работни упатства 4 и објаснување на симболите. УКРАЇНСЬКА 4 і поясненням символів عربي قسم الصور یوجد بھ الوصف التشغیلي والوظیفي 4 القسم النصي المزود بالبیانات الفنیة والنصاي ح الھامة للسلامة والعمل ووصف الرموز Parte com texto explicativo contendo Especifi cações técnicas, Avisos de segurança e de operação e a Descrição dos símbolos. Tekstgedeelte met technische gegevens, belangrijke veiligheids- en arbeidsinstructies en verklaring van de symbolen. Teknik bilgileri, önemli güvenlik ve çalışma açıklamalarını ve de sembollerin açıklamalarını içeren metin bölümü Część rysunkowa z opisami zastosowania i działania Część opisowa z danymi technicznymi, ważnymi wskazówkami dotyczącymi bezpieczeństwa i pracy oraz objaśnieniami symboli Képes részalkalmazási- és működési leírásokkal Szöveges rész műszaki adatokkal, fontos biztonsági- és munkavégzési útmutatásokkal, valamint a szimbólumok magyarázata Del slikez opisom uporabe in funkcij Del besedila s tehničnimi podatki, pomembnimi varnostnimi opozorili in delovnimi navodili in pojasnili simbolov Раздел иллюстрацийс описанием эксплуатации и функций Текстовый раздел, включающий технические данные, важные рекомендации по безопасности и эксплуатации, а также описание используемых символов Частина з зображеннями з описом робіт та функцій Текстова частина з технічними даними, важливими вказівками з техніки безпеки та експлуатації


3 START STOP


4 EN


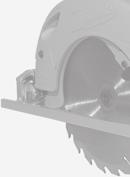
5 < mm


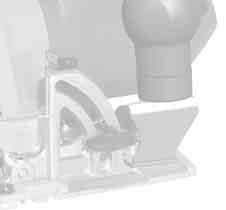

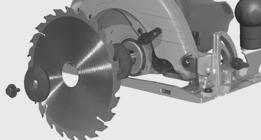
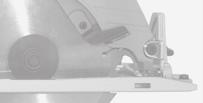
6 ø 35 mm 10 11


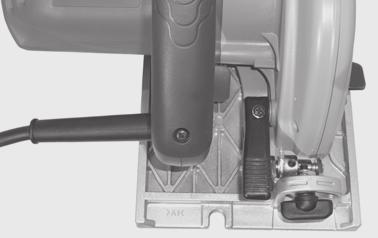
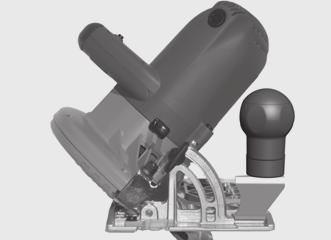
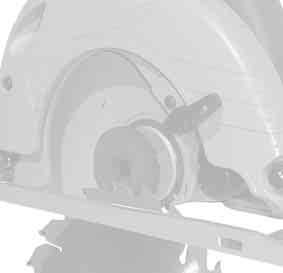
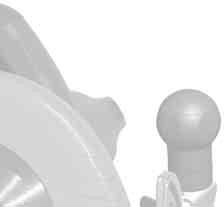
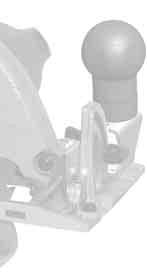
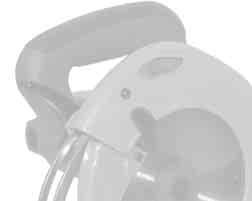
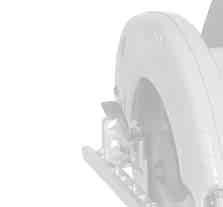
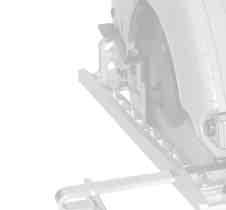
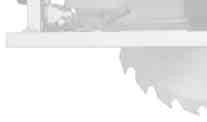
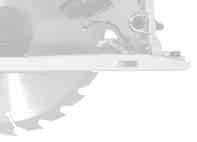
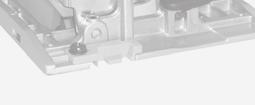
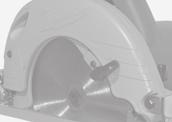
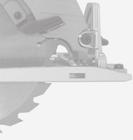
7 START STOP Insulated gripping surface Isolierte Grifffl äche Surface de prise isolée Superfi cie di presa isolata Superfi cie de agarre con aislamiento Superfície de pega isolada Geïsoleerd Isolerede gribefl ader Isolert gripefl ate Isolerad greppyta Eristetty tarttumapinta Μονωμένη επιφάνεια λαβής Izolasyonlu tutma yüzeyi Izolovaná uchopovací plocha Izolovaná úchopná plocha Izolowaną powierzchnią Szigetelt fogófelület Izolirana prijemalna površina Izolirana površina za držanje Izolēta satveršanas virsma Izoliuotas rankenos paviršius Isoleeritud pideme piirkond Изолированная поверхность ручки Изолирана повърхност за хващане Suprafaţă de prindere izolată Изолирана површина Ізольована поверхня ручки مساحة المقبض معزولة START STOP 2 1 The motor brake prevents the disk from running on after being switched off. Die Motorbremse verhindert ein Nachlaufen des Sägeblattes nach dem Ausschalten. Le frein moteur empêche que la lame de scie poursuive sa course après la déconnexion. Il freno motore impedisce che la lama della sega continui a girare dopo la disattivazione. El freno del motor evita la marcha posterior de la hoja de sierra después de la desconexión. O travão do motor evita a marcha por inércia da folha de serra após o desligamento. De motorrem voorkomt dat het zaagblad na het uitschakelen nog doorloopt. Motorbremsen forhindrer, at savklingen roterer videre efter slukning. Motorsagen forhindrer at sagbladet beveger seg etter at maskinen er slått av. Motorbromsen förhindrar att sågbladet fortsätter att gå efter det att sågen har stängts av. Moottorijarru estää sahanterän jälkikäynnin koneen sammuttamisen jälkeen. Η πέδη του κινητήρα εμποδίζει την περαιτέρω κίνηση της λάμας του πριονιού μετά την απενεργοποίηση Motorlu fren, testere kapatıldıktan sonra sonradan dönmesini engeller. Motorová brzda zabraňuje doběh pilového listu po vypnutí. Motorová brzda zabraňuje dobehu pílového listu po vypnutí. Hamulec silnikowy zapobiega dalszemu obracaniu się piły po jej wyłączeniu. A motorfék megakadályozza a fűrészlap utánjárását a leállítás után. Zavora motorja preprečuje prosti tek žaginega lista po izklopu. Kočnica motora spriječava naknadni slobodan rad lista pile poslije isključivanja. Pēc ierīces izslēgšanas, motorizētā bremze pilnībā aptur asmens griešanos. Išjungus prietaisą variklinis stabdis visiškai sustabdo ašmens sukimąsi. Mootori pidur takistab saelehe edasi liikumist pärast väljalülitamist. Тормоз двигателя предотвращает выбег пильного диска после выключения. Спирачката на двигателя предотвратява въртене на режещия лист след изключването. Frâna de motor împiedică ca pânza de circular să continue să meargă după oprire. Гальмо двигуна запобігає руху пилкового диску по інерції після вимикання. فاقيإ دعب نارودلا يف ةناوطسالا رارمتسا نود روتوملا حبكم لوح ي.ليغشتلا 12 13
")
")
")
")
 Correcção")
 Parallelcorrectie")

")
")
")
")
")
")
")
")
 Paralelna korektura")


")
 Параллельная")
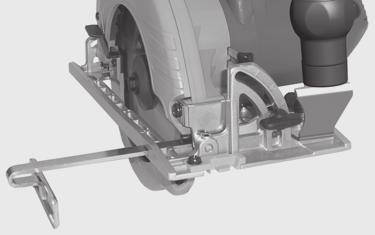
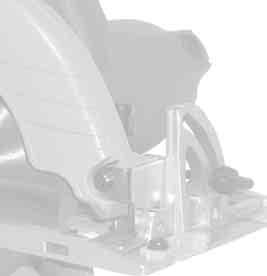
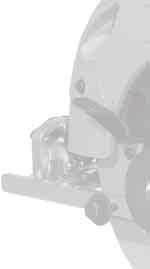
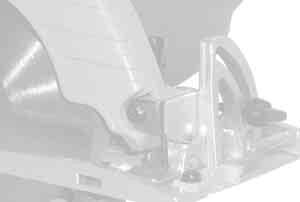
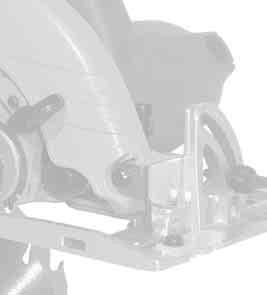
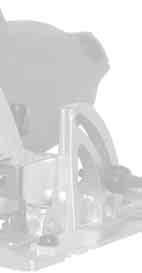
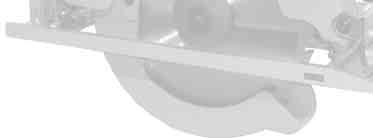
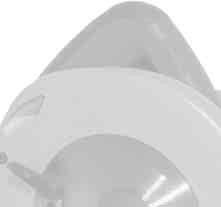
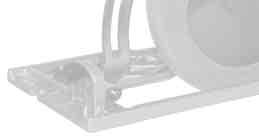
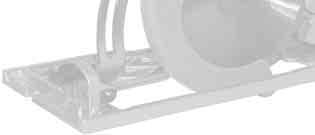
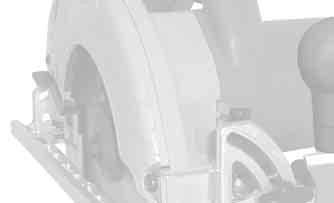
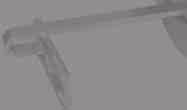
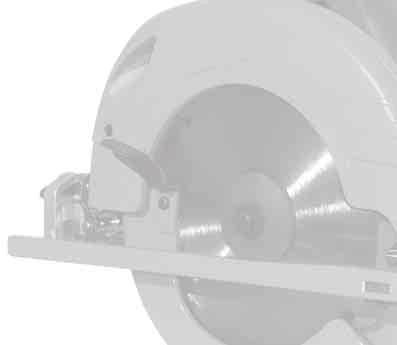
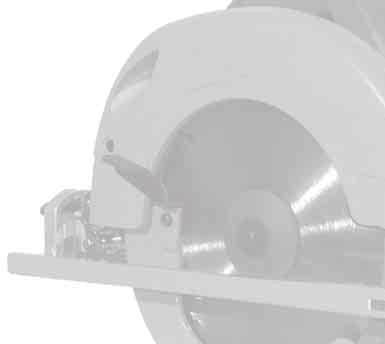
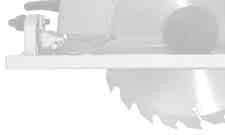
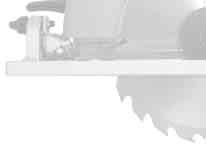
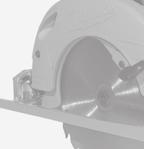
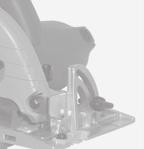
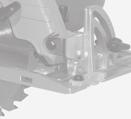
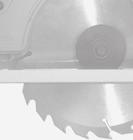
8 Parallel correction (saw blade / guide plate edge) Parallelkorrektur (Sägeblatt/Führungsplattenkante) Correction parallèle (lame de scie / bord de la plaque de guidage) Correzione parallela (lama di sega/bordo lastra di guida) Corrección paralela (segueta / canto placa guía) Correcção paralela (folha de serra/bordo da placa de guia) Parallelcorrectie (zaagblad/ geleideplaatkant) Parallelkorrektion (savklinge/ styrepladekant) Parallellkorrektur (sagblad/styreplatekant) Parallellkorrigering (sågblad/styrplattans kant) Rinnastettavissa oikaisuun (sahanterä / ohjainlevyn reuna) ÐáñÜëëçëç äéüñèùóç (ðñéïíïëüìá/áêìþ ðëüêáò ïäþãçóçò) Paralel düzeltme (Testere bıçağı/kılavuz levha kenarı) Nastavení rovnoběžnosti (Pilový plátek / hrana vodicí desky) Korektúra rovnobežnosti (pílový list/hrana vodiacej platne) Korekcja równoległa (brzeszczot / krawędź płytki prowadzącej) Párhuzamos korrekció (fűrészlap / vezetőlap éle) Paralelna korektura (žagin list/rob vodilne plošče) Paralelna korektura (list pile/rub vodeće ploče) Paralēlā korekcija (zāģa ripa / atbalsta plāksnes kante) Lygiagretumo pataisa (pjūklas/kreipiamosios kraštas) Paralleelne parandus (saeleht / juhtplaadi kant) Параллельная коррекция (лезвие пилы / направляющая шина) Паралелна корекция (режещ диск/кант на водещите плочи) Corecţie paralelă (lamă ferăstrau / muchie placă de ghidare) Паралелно корегирање (сечило на пила/ ивица на водечка површина) Паралельна корекція (пилковий диск / кромка напрямної пластини) التصحیح المتوازي (شفرة المنشار / حافة لوحة التوجیھ) A = B A B 2 1 2,5 mm 2,5 mm


9 1 2 START STOP

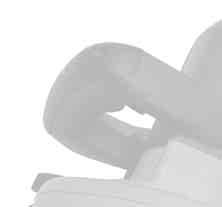
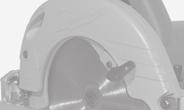
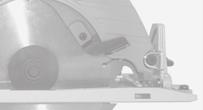
10 x Carry out a test cut Probeschnitt durchführen Effectuer une coupe d essai Effettuare un taglio di prova Efectuar corte de prueba Efectuar experiências de corte Proefsnede maken Foretages et prøvesnit Foreta prøvekutt Gör ett provsnitt! ÐñáãìáôïðïéÞóôå ìßá äïêéìáóôéêþ ôïìþ Deneme kesmesi yapın Proveďte zkušební řez. Vykonať skušobný rez. Wykonac próbę cięcia Végezzen teszvágást Opravite preizkusni rez! Izvesti probno rezanje Jāveic izmēģinājuma griezums! Atlikite bandomąjį pjūvį! Teha proovilõige! Выполните пробный проход Направете пробно рязане! Efectuaţi un test de tăiere Да се направи пробно сечење Виконати пробне різання عطقلا رابتخا ءارجإ x 18 19
11 TECHNICAL DATA CIRCULAR SAW Production code Rated input W No-load speed min -1 Saw blade dia. x hole dia x 30 mm Cutting depth at mm Cutting depth at mm Weight according EPTA-Procedure 01/ ,7 kg Recommended ambient operating temperature C Noise/vibration information Measured values determined according to EN Typically, the A-weighted noise levels of the tool are: Sound pressure level (Uncertainty K=3dB(A))... Sound power level (Uncertainty K=3dB(A))... Wear ear protectors! Total vibration values (vector sum in the three axes) determined according to EN Sawing of wood Vibration emission value a h,w... Uncertainty K... Sawing of metal Vibration emission value a h,m... Uncertainty K... WARNING Read all safety warnings, instructions, illustrations and specifications provided with this power tool. Failure to follow all instructions listed below may result in electric shock, fi re and/or serious injury. Save all warnings and instructions for future reference. CIRCULAR SAW SAFETY WARNINGS Cutting procedures Danger: Keep hands away from cutting area and the blade. Keep your second hand on auxiliary handle, or motor housing. If both hands are holding the saw, they cannot be cut by the blade. Do not reach underneath the workpiece. The guard cannot protect you from the blade below the workpiece. Adjust the cutting depth to the thickness of the workpiece. Less than a full tooth of the blade teeth should be visible below the workpiece. Never hold the workpiece in your hands or across your leg while cutting. Secure the workpiece to a stable platform. It is important to support the work properly to minimize body exposure, blade binding, or loss of control. Hold the power tool by insulated gripping surfaces, when performing an operation where the cutting tool may contact hidden wiring or its own cord. Contact with a live wire will also make exposed metal parts of the power tool live and could give the operator an electric shock. When ripping always use a rip fence or straight edge guide. This improves the accuracy of cut and reduces the chance of blade binding. Always use blades with correct size and shape (diamond versus round) of arbour holes. Blades that do...95 db(a) db(a)...5,3 m/s 2...3,9 m/s 2 WARNING The vibration emission level given in this information sheet has been measured in accordance with a standardised test given in EN and may be used to compare one tool with another. It may be used for a preliminary assessment of exposure. The declared vibration emission level represents the main applications of the tool. However if the tool is used for different applications, with different accessories or poorly maintained, the vibration emission may differ. This may signifi cantly increase the exposure level over the total working period. An estimation of the level of exposure to vibration should also take into account the times when the tool is switched off or when it is running but not actually doing the job. This may signifi cantly reduce the exposure level over the total working period. Identify additional safety measures to protect the operator from the effects of vibration such as: maintain the tool and the accessories, keep the hands warm, organisation of work patterns. not match the mounting hardware of the saw will run off-centre, causing loss of control. Never use damaged or incorrect blade washers or bolt. The blade washers and bolt were specially designed for your saw, for optimum performance and safety of operation. Kickback causes and related warnings: - kickback is a sudden reaction to a pinched, jammed or misaligned saw blade, causing an uncontrolled saw to lift up and out of the workpiece toward the operator; - when the blade is pinched or jammed tightly by the kerf closing down, the blade stalls and the motor reaction drives the unit rapidly back toward the operator; - if the blade becomes twisted or misaligned in the cut, the teeth at the back edge of the blade can dig into the top surface of the wood causing the blade to climb out of the kerf and jump back toward the operator. Kickback is the result of saw misuse and/or incorrect operating procedures or conditions and can be avoided by taking proper precautions as given below. Maintain a firm grip with both hands on the saw and position your arms to resist kickback forces. Position your body to either side of the blade, but not in line with the blade. Kickback could cause the saw to jump backwards, but kickback forces can be controlled by the operator, if proper precautions are taken. When blade is binding, or when interrupting a cut for any reason, release the trigger and hold the saw motionless in the material until the blade comes to a complete stop. Never attempt to remove the saw from the work or pull the saw backward while the blade is in motion or kickback may occur. Investigate and take corrective actions to eliminate the cause of blade binding. When restarting a saw in the workpiece, centre the saw blade in the kerf so that saw teeth are not engaged into the material. If a saw blade binds, it may walk up or kickback from the workpiece as the saw is restarted. Support large panels to minimise the risk of blade pinching and kickback. Large panels tend to sag under their own weight. Supports must be placed under the panel on both sides, near the line of cut and near the edge of the panel. Do not use dull or damaged blades. Unsharpened or improperly set blades produce narrow kerf causing excessive friction, blade binding and kickback. Blade depth and bevel adjusting locking levers must be tight and secure before making cut. If blade adjustment shifts while cutting, it may cause binding and kickback. Use extra caution when sawing into existing walls or other blind areas. The protruding blade may cut objects that can cause kickback. Lower guard function Check the lower guard for proper closing before each use. Do not operate the saw if the lower guard does not move freely and close instantly. Never clamp or tie the lower guard into the open position. If saw is accidentally dropped, lower guard may be bent. Raise the lower guard with the retracting handle and make sure it moves freely and does not touch the blade or any other part, in all angles and depths of cut. Check the operation of the lower guard spring. If the guard and the spring are not operating properly, they must be serviced before use. Lower guard may operate sluggishly due to damaged parts, gummy deposits, or a build-up of debris. The lower guard may be retracted manually only for special cuts such as "plunge cuts and "compound cuts. Raise the lower guard by retracting handle and as soon as blade enters the material, the lower guard must be released. For all other sawing, the lower guard should operate automatically. Always observe that the lower guard is covering the blade before placing saw down on bench or floor. An unprotected, coasting blade will cause the saw to walk backwards, cutting whatever is in its path. Be aware of the time it takes for the blade to stop after switch is released. ADDITIONAL SAFETY AND WORKING INSTRUCTIONS Wear ear protectors. Exposure to noise can cause hearing loss. Use protective equipment. Always wear safety glasses when working with the machine. The use of protective clothing is recommended, such as dust mask, protective gloves, sturdy non-slip footwear, helmet and ear defenders. The dust produced when using this tool may be harmful to health. Do not inhale the dust. Use a dust absorption system and wear a suitable dust protection mask. Remove deposited dust thoroughly, e.g. with a vacuum cleaner. Do not use saw blades not corresponding to the key data given in these instructions for use. It is necessary to select a saw blade which is suitable for the material being cut. Use only woodworking blades specifi ed in this manual, which comply with EN The rated speed of the accessory must be at least equal to the maximum speed marked on the power tool. Accessories running faster than their rated speed can break and fl y apart. Do not use abrasion disks in this machine! Do not fi x the on/off switch in the on position when using the saw hand-held. WORKING INSTRUCTIONS Adapt the feed speed to avoid overheating the blade tips and to avoid melting plastic materials during cutting. SPECIFIED CONDITIONS OF USE This electronic circular saw can cut lengthways and mitre accurately in wood, plastic, and aluminium. Do not use this product in any other way as stated for normal use. EC-DECLARATION OF CONFORMITY We declare as the manufacturer under our sole responsibility that the product described under Technical Data fulfills all the relevant regulations and the directives 2011/65/EU (RoHS), 2014/30/EU, 2006/42/EC, and the following harmonized standards have been used: Authorized to compile the technical fi le. GB-DECLARATION OF CONFORMITY We declare as the manufacturer under our sole responsibility that the product described under Technical Data fulfills all the relevant provisions of the following Regulations S.I. 2008/1597 (as amended), S.I. 2016/1091 (as amended), S.I. 2012/3032 (as amended) and that the following designated standards have been used: BS BS BS BS BS BS BS Authorized to compile the technical file. 20 ENGLISH ENGLISH 21
12 MAINS CONNECTION Connect only to single-phase AC system voltage as indicated on the rating plate. It is also possible to connect to sockets without an earthing contact as the design conforms to safety class II. Appliances used at many different locations including wet room and open air must be connected via a residual current device (FI, RCD, PRCD) of 30mA or less. Only plug-in when machine is switched off. Do not let any metal parts reach the airing slots - danger of short circuit! Keep mains lead clear from working range of the machine. Always lead the cable away behind you. Before use check machine, cable, safety harness and plug for any damages or material fatigue. Repairs should only be carried out by authorised Service Agents. A power spike causes voltage fl uctuations and may affect other electrical products in the same power line. Connect the product to a power supply with an impedance equal to 0.3 Ω to minimize voltage fl uctuations. Contact your electric power supplier for further clarifi cation. MAINTENANCE Always disconnect the plug from the socket before carrying out any work on the machine. Be sure to disconnect the tool from the power supply before attaching or removing the saw blade. Clean tool and guarding system with dry cloth. Certain cleaning agents and solvents are harmful to plastics and other insulated parts. The ventilation slots of the machine must be kept clear at all times. Remove dust regularly. Remove the sawdust which has accummulated inside the saw in order to avoid the risk of fi re. Keep the apparatus handle clean, dry and free of spilt oil or grease. Check the function of guards. Regular maintenance and cleaning provide for a long service life and safe handling. If the replacement of the supply cord is necessary, this has to be done by the manufacturer or his agent in order to avoid a safety hazard. Use only Milwaukee accessories and Milwaukee spare parts. Should components need to be replaced which have not been described, please contact one of our Milwaukee service agents (see our list of guarantee/service addresses). If needed, an exploded view of the tool can be ordered. Please state the machine type printed as well as the six-digit No. on the label and order the drawing at your local service agents or directly at:,,,. Always wear goggles when using the machine. Wear ear protectors! Wear a suitable dust protection mask. Wear gloves! Always disconnect the plug from the socket before carrying out any work on the machine. Accessory - Not included in standard equipment, available as an accessory. TECHNISCHE DATEN KREISSÄGE Produktionsnummer... Nennaufnahmeleistung... Leerlaufdrehzahl... Sägeblatt-ø x Bohrungs-ø... Schnittiefe bei Schnittiefe bei Gewicht nach EPTA-Prozedur 01/ Empfohlene Umgebungstemperatur beim Arbeiten... Geräusch/Vibrationsinformation Messwerte ermittelt entsprechend EN Der A-bewertete Geräuschpegel des Gerätes beträgt typischerweise: Schalldruckpegel (Unsicherheit K=3dB(A))... Schallleistungspegel (Unsicherheit K=3dB(A))... Gehörschutz tragen! Schwingungsgesamtwerte (Vektorsumme dreier Richtungen) ermittelt entsprechend EN Sägen von Holz: Schwingungsemissionswert a h,w... Unsicherheit K =... Sägen von Metall: Schwingungsemissionswert a h,m... Unsicherheit K = W min x 30 mm...56 mm...37 mm...3,7 kg C...88 db(a)...99 db(a)...5,3 m/s 2...3,9 m/s 2 SYMBOLS CAUTION! WARNING! DANGER! Please read the instructions carefully before starting the machine. V Do not dispose of electric tools together with household waste material. Electric tools and electronic equipment that have reached the end of their life must be collected separately and returned to an environmentally compatible recycling facility. Check with your local authority or retailer for recycling advice and collection point. Class II tool. Tool in which protection against electric shock does not rely on basic insulation only, but in which additional safety precautions, such as double insulation or reinforced insulation, are provided. There being no provision for protective earthing or reliance upon installation conditions. No-load speed Volts AC Current European Conformity Mark British Confomity Mark Ukraine Conformity Mark EurAsian Conformity Mark WARNUNG Der in diesen Anweisungen angegebene Schwingungspegel ist entsprechend einem in EN genormten Messverfahren gemessen worden und kann für den Vergleich von Elektrowerkzeugen miteinander verwendet werden. Er eignet sich auch für eine vorläufi ge Einschätzung der Schwingungsbelastung. Der angegebene Schwingungspegel repräsentiert die hauptsächlichen Anwendungen des Elektrowerkzeugs. Wenn allerdings das Elektrowerkzeug für andere Anwendungen, mit abweichenden Einsatzwerkzeugen oder ungenügender Wartung eingesetzt wird, kann der Schwingungspegel abweichen. Dies kann die Schwingungsbelastung über den gesamten Arbeitszeitraum deutlich erhöhen. Für eine genaue Abschätzung der Schwingungsbelastung sollten auch die Zeiten berücksichtigt werden, in denen das Gerät abgeschaltet ist oder zwar läuft, aber nicht tatsächlich im Einsatz ist. Dies kann die Schwingungsbelastung über den gesamten Arbeitszeitraum deutlich reduzieren. Legen Sie zusätzliche Sicherheitsmaßnahmen zum Schutz des Bedieners vor der Wirkung von Schwingungen fest wie zum Beispiel: Wartung von Elektrowerkzeug und Einsatzwerkzeugen, Warmhalten der Hände, Organisation der Arbeitsabläufe. WARNUNG! Lesen Sie alle Sicherheitshinweise, Anweisungen, Darstellungen und Spezifikationen für dieses Elektrowerkzeug. Versäumnisse bei der Einhaltung der nachstehenden Anweisungen können elektrischen Schlag, Brand und/oder schwere Verletzungen verursachen. Bewahren Sie alle Sicherheitshinweise und Anweisungen für die Zukunft auf. SICHERHEITSHINWEISE FÜR KREISSÄGEN Gefahr: Kommen Sie mit Ihren Händen nicht in den Sägebereich und an das Sägeblatt. Halten Sie mit Ihrer zweiten Hand den Zusatzgriff oder das Motorgehäuse. Wenn beide Hände die Kreissäge halten, kann das Sägeblatt diese nicht verletzen. Greifen Sie nicht unter das Werkstück. Die Schutzhaube kann Sie unter dem Werkstück nicht vor dem Sägeblatt schützen. Passen Sie die Schnitttiefe an die Dicke des Werkstücks an. Es sollte weniger als eine volle Zahnhöhe unter dem Werkstück sichtbar sein. Halten Sie das zu sägende Werkstück niemals in der Hand oder über dem Bein fest. Sichern Sie das Werkstück an einer stabilen Unterlage. Es ist wichtig, das Werkstück gut zu befestigen, um die Gefahr von Körperkontakt, Klemmen des Sägeblattes oder Verlust der Kontrolle zu minimieren. Halten Sie das Gerät nur an den isolierten Griffflächen, wenn Sie Arbeiten ausführen, bei denen das Schneidwerkzeug verborgene Stromleitungen oder das eigene Gerätekabel treffen könnte. Der Kontakt mit einer spannungsführenden Leitung setzt auch die metallenen Geräteteile unter Spannung und führt zu einem elektrischen Schlag. Verwenden Sie beim Längsschneiden immer einen Anschlag oder eine gerade Kantenführung. Dies verbessert die Schnittgenauigkeit und verringert die Möglichkeit, dass das Sägeblatt klemmt. Verwenden Sie immer Sägeblätter in der richtigen Größe und mit passender Aufnahmebohrung (z.b. sternförmig oder rund). Sägeblätter, die nicht zu den Montageteilen der Säge passen, laufen unrund und führen zum Verlust der Kontrolle. Verwenden Sie niemals beschädigte oder falsche Sägeblatt- Unterlegscheiben oder -schrauben. Die Sägeblatt- Unterlegscheiben und -schrauben wurden speziell für Ihre Säge konstruiert, für optimale Leistung und Betriebssicherheit. Ursachen und Vermeidung eines Rückschlags: ein Rückschlag ist die plötzliche Reaktion infolge eines hakenden, klemmenden oder falsch ausgerichteten Sägeblattes, die dazu führt, dass eine unkontrollierte Säge abhebt und sich aus dem Werkstück heraus in Richtung der Bedienperson bewegt; wenn sich das Sägeblatt in dem sich schließenden Sägespalt verhakt oder verklemmt, blockiert es, und die Motorkraft schlägt das Gerät in Richtung der Bedienperson zurück; wird das Sägeblatt im Sägeschnitt verdreht oder falsch ausgerichtet, können sich die Zähne der hinteren Sägeblattkante in der Oberfläche des Werkstücks verhaken, wodurch sich das Sägeblatt aus dem Sägespalt herausbewegt und die Säge in Richtung der Bedienperson zurückspringt. Ein Rückschlag ist die Folge eines falschen oder fehlerhaften Gebrauchs der Säge. Er kann durch geeignete Vorsichtsmaßnahmen, wie nachfolgend beschrieben, verhindert werden. 22 ENGLISH DEUTSCH 23
13 Halten Sie die Säge mit beiden Händen fest und bringen Sie Ihre Arme in eine Stellung, in der Sie den Rückschlagkräften standhalten können. Halten Sie sich immer seitlich des Sägeblattes, nie das Sägeblatt in eine Linie mit Ihrem Körper bringen. Bei einem Rückschlag kann die Kreissäge rückwärts springen, jedoch kann die Bedienperson die Rückschlagkräfte beherrschen, wenn geeignete Maßnahmen getroffen wurden. Falls das Sägeblatt klemmt oder das Sägen aus einem anderen Grund unterbrochen wird, lassen Sie den Ein-Aus- Schalter los und halten Sie die Säge im Werkstoff ruhig, bis das Sägeblatt vollständig stillsteht. Versuchen Sie niemals, die Säge aus dem Werkstück zu entfernen oder sie rückwärts zu ziehen, solange das Sägeblatt sich bewegt oder sich ein Rückschlag ereignen könnte. Finden Sie die Ursache für das Klemmen des Sägeblattes und beseitigen Sie diese durch geeignete Maßnahmen. Wenn Sie eine Säge, die im Werkstück steckt, wieder starten wollen, zentrieren Sie das Sägeblatt im Sägespalt und überprüfen Sie, ob die Sägezähne nicht im Werkstück verhakt sind. Klemmt das Sägeblatt, kann es sich aus dem Werkstück heraus bewegen oder einen Rückschlag verursachen, wenn die Säge erneut gestartet wird. Stützen Sie große Platten ab, um das Risiko eines Rückschlags durch ein klemmendes Sägeblatt zu vermindern. Große Platten können sich unter ihrem Eigengewicht durchbiegen. Platten müssen auf beiden Seiten, sowohl in Nähe des Sägespalts als auch am Rand, abgestützt werden. Verwenden Sie keine stumpfen oder beschädigten Sägeblätter. Sägeblätter mit stumpfen oder falsch ausgerichteten Zähnen verursachen durch einen zu engen Sägespalt eine erhöhte Reibung, Klemmen des Sägeblattes und Rückschlag. Ziehen Sie vor dem Sägen die Schnitttiefen- und Schnittwinkeleinstellungen fest. Wenn sich während des Sägens die Einstellungen verändern, kann sich das Sägeblatt verklemmen und ein Rück schlag auftreten. Seien Sie besonders vorsichtig, wenn Sie einen "Tauchschnitt" in einen verborgenen Bereich, z. B. eine bestehende Wand, ausführen. Das eintauchende Sägeblatt kann beim Sägen in verborgene Objekte blockieren und einen Rückschlag verursachen. Überprüfen Sie die Funktion der Feder für die untere Schutzhaube. Lassen Sie das Gerät vor dem Gebrauch warten, wenn untere Schutzhaube und Feder nicht einwandfrei arbeiten. Beschädigte Teile, klebrige Ablagerungen oder Anhäufungen von Spänen lassen die untere Schutzhaube verzögert arbeiten. Öffnen Sie die untere Schutzhaube von Hand nur bei besonderen Schnitten, wie "Tauch - und Winkelschnitten". Öffnen Sie die untere Schutzhaube mit dem Rückziehhebel und lassen Sie diesen los, sobald das Sägeblatt in das Werkstück eingedrungen ist. Bei allen anderen Säge arbeiten muss die untere Schutzhaube automatisch arbeiten. Legen Sie die Säge nicht auf der Werkbank oder dem Boden ab, ohne dass die untere Schutz haube das Sägeblatt bedeckt. Ein ungeschütztes, nachlaufendes Sägeblatt bewegt die Säge entgegen der Schnittrichtung und sägt, was ihm im Weg ist. Beachten Sie dabei die Nachlaufzeit der Säge. WEITERE SICHERHEITS- UND ARBEITSHINWEISE Tragen Sie Gehörschutz. Die Einwirkung von Lärm kann Gehörverlust bewirken. Schutzausrüstung verwenden. Beim Arbeiten mit der Maschine stets Schutzbrille tragen. Schutzkleidung wie Staubschutzmaske, Schutzhandschuhe, festes und rutschsicheres Schuhwerk, Helm und Gehörschutz werden empfohlen. Beim Arbeiten entstehender Staub ist oft gesundheitsschädlich und sollte nicht in den Körper gelangen. Staubabsaugung verwenden und zusätzlich geeignete Staubschutzmaske tragen. Abgelagerten Staub gründlich entfernen, z.b. Aufsaugen. Sägeblätter, die nicht den Kenndaten in dieser Gebrauchsanweisung entsprechen, dürfen nicht verwendet werden. Ein für den zu schneidenden Werkstoff geeignetes Sägeblatt auswählen. Verwenden Sie nur für die Holzbearbeitung vorgesehene Sägeblätter, die den Kenndaten in dieser Gebrauchsanleitung und der Norm EN entsprechen. Die zulässige Drehzahl des Einsatzwerkzeugs muss mindestens so hoch sein wie die auf dem Elektrowerkzeug angegebene Höchstdrehzahl. Zubehör, das sich schneller als zulässig dreht, kann zerbrechen und umherfl iegen. Keine Schleifscheiben einsetzen! Ein-/Ausschalter im handgeführten Betrieb nicht festklemmen. ARBEITSHINWEISE Vermeiden Sie durch eine angepasste Vorschubgeschwindigkeit die Überhitzung der Sägeblattzähne, und beim Schneiden von Kunststoffen das Schmelzen des Materials. BESTIMMUNGSGEMÄSSE VERWENDUNG Die Handkreissäge ist einsetzbar zum Sägen von geradlinigen Schnitten in Holz, Kunststoff und Aluminium. Dieses Gerät darf nur wie angegeben bestimmungsgemäß verwendet werden. CE-KONFORMITÄTSERKLÄRUNG Wir erklären als Hersteller in alleiniger Verantwortung, dass das unter Technische Daten beschriebene Produkt mit allen relevanten Vorschriften der Richtlinien 2011/65/EU (RoHS), 2014/30/EU, 2006/42/EG und den folgenden harmonisierten normativen Dokumenten übereinstimmt: Bevollmächtigt die technischen Unterlagen zusammenzustellen NETZANSCHLUSS Nur an Einphasen-Wechselstrom und nur an die auf dem Leistungsschild angegebene Netzspannung anschließen. Anschluss ist auch an Steckdosen ohne Schutzkontakt möglich, da ein Aufbau der Schutzklasse II vorliegt. Steckdosen in Feuchträumen und Außenbereichen müssen mit Fehlerstrom-Schutzschaltern (FI, RCD, PRCD) ausgerüstet sein. Das verlangt die Installationsvorschrift für Ihre Elektroanlage. Bitte beachten Sie das bei der Verwendung unseres Gerätes. Maschine nur ausgeschaltet an die Steckdose anschließen. Wegen Kurzschlussgefahr dürfen Metallteile nicht in die Lüftungsschlitze gelangen. Anschlusskabel stets vom Wirkungsbereich der Maschine fernhalten. Kabel immer nach hinten von der Maschine wegführen. Vor jedem Gebrauch Gerät, Anschlusskabel, Verlängerungskabel, Sicherheitsgurt und Stecker auf Beschädigung und Alterung kontrollieren. Beschädigte Teile nur von einem Fachmann reparieren lassen. Kurzzeitige Spannungsspitzen verursachen Spannungsschwankungen und können andere elektrische Produkte in der gleichen Stromleitung beeinflussen. Schließen Sie das Gerät an eine Stromversorgung mit einer Impedanz vo,3 Ω um Spannungsschwankungen zu minimieren. Kontaktieren Sie Ihren Energieversorger für weitere Informationen. WARTUNG Vor allen Arbeiten an der Maschine den Stecker aus der Steckdose ziehen. Stellen Sie sicher, dass das Gerät von der Stromversorgung getrennt ist, bevor Sie das Sägeblatt anbringen oder abnehmen. Reinigen Sie Gerät und Schutzeinrichtung mit einem trockenen Tuch. Manche Reinigungsmittel beschädigen Kunststoff oder andere isolierte Teile. Stets die Lüftungsschlitze der Maschine sauber halten. Entfernen Sie regelmäßig den Staub. Entfernen Sie die im Inneren der Säge angehäuften Sägespäne, um Brandrisiken zu vermeiden. Das Gerät sauber und trocken sowie frei von ausgetretenem Öl und Fett halten. Überprüfen Sie die Funktion der Schutzhauben. Regelmäßige Wartung und Reinigung sorgen für eine lange Lebensdauer und sichere Handhabung. Um Sicherheitsrisiken zu vermeiden, ist der Austausch der Netzanschlussleitung vom Hersteller oder einem seiner Vertreter durchzuführen. Nur Milwaukee Zubehör und Milwaukee Ersatzteile verwenden. Bauteile, deren Austausch nicht beschrieben wurde, bei einer Milwaukee Kundendienststelle auswechseln lassen (Broschüre Garantie/Kundendienstadressen beachten). Bei Bedarf kann eine Explosionszeichnung des Gerätes unter Angabe der Maschinen Type und der sechsstelligen Nummer auf dem Leistungsschild bei Ihrer Kundendienststelle oder direkt bei, Max Eyth Straße 10,, angefordert werden. SYMBOLE ACHTUNG! WARNUNG! GEFAHR! Bitte lesen Sie die Gebrauchsanweisung vor Inbetriebnahme sorgfältig durch. Beim Arbeiten mit der Maschine stets Schutzbrille tragen. Gehörschutz tragen! Geeignete Staubschutzmaske tragen. Schutzhandschuhe tragen! V Vor allen Arbeiten an der Maschine den Stecker aus der Steckdose ziehen. Zubehör - Im Lieferumfang nicht enthalten, empfohlene Ergänzung aus dem Zubehörprogramm. "Elektrogeräte dürfen nicht zusammen mit dem Hausmüll entsorgt werden. Elektrische und elektronische Geräte sind getrennt zu sammeln und zur umweltgerechten Entsorgung bei einem Verwertungsbetrieb abzugeben. Erkundigen Sie sich bei den örtlichen Behörden oder bei Ihrem Fachhändler nach Recyclinghöfen und Sammelstellen." "Elektrowerkzeug der Schutzklasse II. Elektrowerkzeug, bei dem der Schutz vor einem elektrischen Schlag nicht nur von der Basisisolierung abhängt, sondern auch davon, dass zusätzliche Schutzmaßnahmen, wie doppelte Isolierung oder verstärkte Isolierung, angewendet werden. Es gibt keine Vorrichtung zum Anschluss eines Schutzleiters." Leerlaufdrehzahl Spannung Wechselstrom Europäisches Konformitätszeichen Britisches Konformitätszeichen Ukrainisches Konformitätszeichen Euroasiatisches Konformitätszeichen 24 DEUTSCH DEUTSCH 25
14 CARACTÉRISTIQUES TECHNIQUES 26 FRANÇAIS SCIE CIRCULAIRE Numéro de série... Puissance nominale de réception... Vitesse de rotation à vide... ø de la lame de scie et de son alésage... Profondeur de coupe à Profondeur de coupe à Poids suivant EPTA-Procedure 01/ Température conseillée lors du travail... Informations sur le bruit et les vibrations Valeurs de mesure obtenues conformément à la EN Les mesures réelles (A) des niveaux acoustiques de l appareil sont : Niveau de pression acoustique (Incertitude K=3dB(A))... Niveau d'intensité acoustique (Incertitude K=3dB(A))... Toujours porter une protection acoustique! Valeurs totales des vibrations (somme vectorielle de trois sens) établies conformément à EN Sciage du bois Valeur d émission vibratoire a h,w... Incertitude K... Sciage des métaux Valeur d émission vibratoire a h,m... Incertitude K... AVERTISSEMENT! Lire tous les avertissements de sécurité, les instructions opérationnelles, les illustrations et les spécifications fournies avec cet outil électrique. La non observance des instructions mentionnées ci-dessous peut causer des chocs électriques, des incendies ou de graves blessures. Conserver tous les avertissements et toutes les instructions pour pouvoir s y reporter ultérieurement. CONSIGNES DE SÉCURITÉ CONCERNANT LES SCIES CIRCULAIRES DANGER: Bien garder les mains à distance de la zone de sciage et de la lame de scie. Tenir la poignée supplémentaire ou le carter du moteur de l autre main. Si vous tenez la scie circulaire des deux mains, celles-ci ne peuvent pas être blessées par la lame de scie. Ne pas passer les mains sous la pièce à travailler. Sous la pièce à travailler, le capot de protection ne peut pas vous protéger de la lame de scie. Adapter la profondeur de coupe à l épaisseur de la pièce. Moins d une dent complète devrait apparaître sous la pièce. Ne jamais tenir la pièce à scier dans la main ou par-dessus la jambe. Fixer la pièce sur un support stable. Il est important de bien fi xer la pièce, afin de réduire au minimum les dangers causés par le contact physique, quand la lame de scie se coince ou lorsqu on perd le contrôle. Tenir l appareil seulement par les surfaces isolées des poignées lors des travaux pendant lesquels la lame risque de toucher des câbles électriques cachés ou son propre câble. Le contact avec un câble sous tension met les parties métalliques de l appareil sous tension et provoque une décharge électrique. Toujours utiliser une butée ou un guidage droit de bords pour des coupes longitudinales. Ceci améliore la précision de la coupe et réduit le danger de voir la lame de scie se coincer W min x 30 mm...56 mm...37 mm...3,7 kg C...95 db(a) db(a)...5,3 m/s 2...3,9 m/s 2 AVERTISSEMENT Le niveau vibratoire indiqué dans ces instructions a été mesuré selon un procédé de mesure normalisé dans la norme EN et peut être utilisé pour comparer des outils électriques entre eux. Il convient aussi à une estimation provisoire de la sollicitation par les vibrations. Le niveau vibratoire indiqué représente les applications principales de l outil électrique. Toutefois, si l outil électrique est utilisé pour d autres applications, avec des outils rapportés qui diffèrent ou une maintenance insuffi sante, il se peut que le niveau vibratoire diverge. Cela peut augmenter nettement la sollicitation par les vibrations sur tout l intervalle de temps du travail. Pour une estimation précise de la sollicitation par les vibrations, on devrait également tenir compte des temps pendant lesquels l appareil n est pas en marche ou tourne sans être réellement en service. Cela peut réduire nettement la sollicitation par les vibrations sur tout l intervalle de temps du travail. Défi nissez des mesures de sécurité supplémentaires pour protéger l utilisateur contre l infl uence des vibrations, comme par exemple : la maintenance de l outil électrique et des outils rapportés, le maintien au chaud des mains, l organisation des déroulements de travail. Toujours utiliser des lames de scie de la bonne taille qui ont une forme appropriée à l alésage de fixation (par ex. en étoile ou rond). Les lames de scie qui ne conviennent pas aux parties montées de la scie sont comme voilées et entraînent une perte de contrôle. Ne jamais utiliser de rondelles ou de vis endommagées ou qui ne conviennent pas à la lame de scie. Les rondelles et vis pour la lame de scie ont spécialement été construites pour votre scie, pour une performance et une sécurité de fonctionnement optimales. Causes de contrecoups et comment les éviter: - un contrecoup est une réaction soudaine d'une lame de scie qui est restée accrochée, qui s est coincée ou qui est mal orientée qui fait que la scie incontrôlée sort de la pièce à travailler et se dirige vers la personne travaillant avec l'appareil; -si la lame de scie reste accrochée ou se coince dans la fente sciée qui se ferme, elle se bloque et la force du moteur entraîne l appareil vers la personne travaillant avec l appareil; -si la lame de scie est tordue ou mal orientée dans le tracé de la coupe, les dents du bord arrière de la lame de scie risquent de se coincer dans la surface de la pièce, ce qui fait que la lame de scie saute brusquement de la fente et qu elle est propulsée vers l arrière où se trouve la personne travaillant avec l appareil. Un contrecoup est la suite d'une mauvaise utilisation ou une utilisation incorrecte de la scie. Il peut être évité en prenant les mesures de précaution comme elles sont décrites ci-dessous. Bien tenir la scie des deux mains et mettre vos bras dans une position vous permettant de résister à des forces de contrecoup. Toujours positionner votre corps latéralement à la lame de scie, ne jamais positionner la lame de scie de façon qu elle fasse une ligne avec votre corps. Lors d un contrecoup, la scie circulaire risque d être propulsée vers l arrière, la personne travaillant avec l appareil peut cependant contrôler les forces de contrecoup, quand des mesures appropriées ont été prises au préalable. Si la lame de scie se coince ou que l opération de sciage est interrompue pour une raison quelconque, lâcher l interrupteur Marche/ Arrêt et tenir la scie dans la pièce sans bouger, jusqu à ce que la lame de scie se soit complètement arrêtée. Ne jamais essayer de sortir la scie de la pièce ou de la tirer vers l arrière tant que la lame de scie bouge ou qu un contrecoup pourrait se produire. Déterminer la cause pour laquelle la scie s est coincée et en remédier au problème. Si une scie qui s est bloquée dans une pièce, doit être remise en marche, centrer la lame de scie dans la fente et contrôler que les dents de la scie ne soient pas restées accrochées dans la pièce. Si la lame de scie est coincée, elle peut sortir de la pièce ou causer un contrecoup quand la scie est remise en marche. Soutenir des grands panneaux afin d'éliminer le risque d un contrecoup causé par une lame de scie coincée. Les grand panneaux risquent de s arquer sous leur propre poids. Les panneaux doivent être soutenus des deux côtés par des supports, près de la fente de scie ainsi qu'aux bords des panneaux. Ne pas utiliser de lames de scie émoussées ou endommagées. Les lames de scie dont les dents sont émoussées ou mal orientées entrainent une fente trop étroite et par conséquent une friction élevée, un coinçage de la lame de scie et un contrecoup. Resserrer les réglages de la profondeur de coupe ainsi que de l angle de coupe avant le sciage. La lame de scie risque de se coincer et un contrecoup de se produire si les réglages se modifi ent lors de l opération de sciage. Faire preuve d une prudence particulière lorsqu une "coupe en plongée" est effectuée dans un endroit caché, par ex. un mur. Lors du sciage, la lame de scie plongeante risque de scier des objets cachés et de causer un contrecoup. Contrôler le bon fonctionnement du ressort du capot inférieur de protection. Faire effectuer un entretien de l appareil avant de l utiliser, si le capot inférieur de protection et le ressort ne travaillent pas impeccablement. Les parties endommagées, des restes de colle ou des accumulations de copeaux font que le capot inférieur de protection travaille plus lentement. N'ouvrir le capot inférieur de protection manuellement que pour des coupes spéciales telles que les "coupes en plongée et coupes angulaires". Ouvrir le capot inférieur de protection à l aide du levier et le lâcher dès que la lame de scie soit entrée dans la pièce. Pour toutes les autres opérations de sciage, le capot inférieur de protection doit travailler automatiquement. Ne pas placer la scie sur l établi ou le sol sans que le capot inférieur de protection couvre la lame des scie. Une lame de scie non protégée et qui n est pas encore à l arrêt total fait bouger la scie dans le sens contraire à la direction de coupe et scie tout ce qui est sur son chemin. Tenir compte du temps de ralentissement de la scie. Ajuster le coin à refendre approprié à la lame de scie montée. Le coin à refendre doit être plus large que l épaisseur de la lame, mais plus fi n que la largeur de la dent de la lame de scie. Régler le coin à refendre conformément à la description se trouvant dans les instructions d utilisation. Une mauvaise largeur, une mauvaise position et une mauvaise direction peuvent être la raison pour laquelle le coin à refendre n empêche pas de façon effective un contrecoup. Toujours utiliser le coin à refendre, sauf pour les sciages en plongée. Après avoir effectué le sciage en plongée, remonter le coin à refendre. Le coin à refendre gêne lors des sciages en plongée et risque de générer un contrecoup. Le coin à refendre doit être positionné dans la fente pour qu il puisse être effectif. Pour les coupes courtes le coin à refendre ne peut pas empêcher un contrecoup. Ne pas travailler avec la scie quand le coin à refendre est déformé. La moindre déformation peut causer un ralentissement de la fermeture du capot de protection. AVIS COMPLÉMENTAIRES DE SÉCURITÉ ET DE TRAVAIL Portez une protection acoustique. L influence du bruit peut provoquer la surdité. Utiliser l équipement de protection. Toujours porter des lunettes de protection pendant le travail avec la machine. Il est recommandé de porter des articles de protection, tels que masque antipoussière, gants de protection, chaussures tenant bien aux pieds et antidérapantes, casque et protection acoustique. Les poussières dégagées lors du travail sont souvent nocives et ne devraient pas pénétrer dans le corps. Utiliser un dispositif d aspiration de poussières et porter en plus un masque de protection approprié. Eliminer soigneusement les dépôts de poussières, p. ex. en les aspirant au moyen d un système d aspiration de copeaux. Ne pas utiliser de lames de scie qui ne correspondent pas aux caractéristiques indiquées dans ces instructions d utilisation. Choisir une lame de scie qui convient au matériau à couper. N utilisez exclusivement que les lames pour le travail du bois spécifi ées dans ce manuel, conformes à la norme EN La vitesse assignée de l accessoire doit être au moins égale à la vitesse maximale indiquée sur l outil électrique. Les accessoires fonctionnant plus vite que leur vitesse assignée peuvent se rompre et voler en éclat. Ne pas utiliser de disques de meulage! Ne pas bloquer le commutateur de marche/arrêt lorsque la scie se trouve en guidage manuel. CONSIGNES DE TRAVAIL Conformer la vitesse d avancement afin d éviter la surchauffe des dents de la lame et la fusion du matériau pendant la coupe de matériau synthétique. UTILISATION CONFORME AUX PRESCRIPTIONS La scie circulaire réalise des coupes longitudinales dans le bois les matières synthétiques et l'aluminium. Comme déjà indiqué, cette machine n est conçue que pour être utilisée conformément aux prescriptions. DECLARATION CE DE CONFORMITÉ Nous déclarons, en tant que fabricant et sous notre seule responsabilité, que le produit décrit dans «Données techniques» est conforme à toutes les dispositions pertinentes des directives 2011/65/UE (RoHS), 2014/30/UE, 2006/42/CE et des documents normatifs harmonisés suivants : Autorisé à compiler la documentation technique. FRANÇAIS 27
series_155
 RAILING SERIES 155 RIPO fabrika SIA Hanzas Street 2, Pinki, Babite district, LV 2107, Latvia 155 Alumīnija margu sērija Aluminum railing series AL.01 AL.02 AL.03 AL.04 AL.05 AL.06 AL.07 AL.08 AL.09 155
K 5 ( )
") Detaļu saraksts (1.180-633.0) K 5 27.01.2016 www.kaercher.com LV Lapa 2 / 66 Lapa 3 / 66 Lapa 4 / 66 Satura rādītājs Pasūtīšanas norādījumi K 5 (1.180-633.0) Short spare parts list 201 Spare parts list
Detaļu saraksts (1.180-633.0) K 5 27.01.2016 www.kaercher.com LV Lapa 2 / 66 Lapa 3 / 66 Lapa 4 / 66 Satura rādītājs Pasūtīšanas norādījumi K 5 (1.180-633.0) Short spare parts list 201 Spare parts list
HD18AG indd
 HD18 AG115 HD18 AG125 Original instructions Originalbetriebsanleitung Notice originale Istruzioni originali Manual original Oorspronkelijke gebruiksaanwijzing Original brugsanvisning Original bruksanvisning
K1000S.indd
 K 1000 S Original instructions Originalbetriebsanleitung Notice originale Istruzioni originali Manual original Oorspronkelijke gebruiksaanwijzing Original brugsanvisning Original bruksanvisning Bruksanvisning
Art.Nr Art.Nr. AusgabeNr AusgabeNr. Rev.Nr /04/2015 Rev.Nr. 28/06/2017 HG34 DE Doppelschleifer Origin
 Art.Nr. 5906103924 Art.Nr. AusgabeNr. 5903106901 5906103851 AusgabeNr. Rev.Nr. 5903106851 16/04/2015 Rev.Nr. 28/06/2017 HG34 DE Doppelschleifer Originalbetriebsanleitung 8-16 NO Benkslipemaskin Oversettelse
/8 10/2018 EL 340 EL 380 EL 420 IT BG BS CS DA DE EL EN ES ET FI FR HR HU LT LV MK NL NO Tosaerba elettrico con conducente a piedi MANUALE DI
 171505669/8 10/2018 EL 340 EL 380 EL 420 IT BG BS CS DA DE EL EN ES ET FI FR HR HU LT LV MK NL NO Tosaerba elettrico con conducente a piedi MANUALE DI ISTRUZIONI ATTENZIONE: prima di usare la macchina,
State Revenue Services of the Republic Latvia Talejas iela 1, Riga LV-1978 Latvia Ihr Vor- und Zuname Ihre Straße und Hausnummer Ihre Postleitzahl Ihr
 State Revenue Services of the Republic Latvia Talejas iela 1, Riga LV-1978 Latvia Ihr Vor- und Zuname Ihre Straße und Hausnummer Ihre Postleitzahl Ihr Wohnort aktuelles Datum Ihre ZINSPILOT-Kundennummer
7. Tēma: Polinomi ar veseliem koeficientiem Uzdevums 7.1 (IMO1982.4): Prove that if n is a positive integer such that the equation x 3 3xy 2 + y 3 = n
: Prove that if n is a positive integer such that the equation x 3 3xy 2 + y 3 = n") 7. Tēma: Polinomi ar veseliem koeficientiem Uzdevums 7.1 (IMO1982.): Prove that if n is a positive integer such that the equation x xy 2 + y = n has a solution in integers x, y, then it has at least three
7. Tēma: Polinomi ar veseliem koeficientiem Uzdevums 7.1 (IMO1982.): Prove that if n is a positive integer such that the equation x xy 2 + y = n has a solution in integers x, y, then it has at least three
SNP3000_UM_LV_2.2.indd
 Register your product and get support at www.philips.com/welcome Philips Presenter SNP3000 LV Lietotāja rokasgrāmata 1 a b c d e g f h 2 3 4 LASER LIGHT DO NOT STARE INTO BEAM CLASS 2 LASER PRODUCT Wavelength
/8 10/2018 EL 340 EL 380 EL 420 IT BG BS CS DA DE EL EN ES ET FI FR HR HU LT LV MK NL NO Tosaerba elettrico con conducente a piedi MANUALE DI
 171505669/8 10/2018 EL 340 EL 380 EL 420 IT BG BS CS DA DE EL EN ES ET FI FR HR HU LT LV MK NL NO Tosaerba elettrico con conducente a piedi MANUALE DI ISTRUZIONI ATTENZIONE: prima di usare la macchina,
Mēbeļu piedāvājums / Office furniture offer
 Mēbeļu piedāvājums / Office furniture offer Ovāls pārrunu galds 1 - kļava, 1 - tumši pelēks Uz divām mono-kājām (nerūs.tērauds) 200cm virsmas garums, 90cm virsmas platums, 75cm augstums Skaits - 2 Cena
/5 02/2019 E300 E320 E380 IT BG BS CS DA DE EL EN ES ET FI FR HR HU LT LV MK NL NO Tosaerba elettrico con conducente a piedi MANUALE DI ISTRU
 171505829/5 02/2019 E300 E320 E380 IT BG BS CS DA DE EL EN ES ET FI FR HR HU LT LV MK NL NO Tosaerba elettrico con conducente a piedi MANUALE DI ISTRUZIONI ATTENZIONE: prima di usare la macchina, leggere
Mounting_Instruction_Owl_Class_II_High_Bay_
 VIZULO OWL LED high bay Mounting instruction Montāžas instrukcija Mонтажная инструкция IEC EN 60598 IP66 min 40 C max + 50 C (+45 C)* 198-264 V AC * Depends on configuration. Check label or technical specification.
KURSA KODS
 Lappuse 1 no 5 KURSA KODS STUDIJU KURSA PROGRAMMAS STRUKTŪRA Kursa nosaukums latviski Kursa nosaukums angliski Kursa nosaukums otrā svešvalodā Studiju /-as, kurai/-ām tiek piedāvāts studiju kurss Statuss
WA 3D Dobele Nolikums 1. Mērķis un uzdevumi Noskaidrot WA 3D Dobele gada uzvarētājus atbilstošās loka klasēs, uzlabot personīgos rezultātus un r
 WA 3D Dobele Nolikums 1. Mērķis un uzdevumi Noskaidrot WA 3D Dobele 2018. gada uzvarētājus atbilstošās loka klasēs, uzlabot personīgos rezultātus un rekordrezultātus un popularizēt loka šaušanas sporta
FVO 204 INSTALLATION ET MISE EN SERVICE FRANÇAIS INSTALLATION AND STARTING INSTRUCTIONS ENGLISH INSTALLAZIONE E MESSA IN SERVIZIO ITALIANO INSTALACIÓN
 FVO 204 INSTALLATION ET MISE EN SERVICE FRANÇAIS INSTALLATION AND STARTING INSTRUCTIONS ENGLISH INSTALLAZIONE E MESSA IN SERVIZIO ITALIANO INSTALACIÓN Y INSTRUCCIONES DE PUESTA EN MARCHA ESPAÑOL N.M.S.
Art.Nr / AusgabeNr Rev.Nr. 22/11/2017 HP1100S / HP1300S D GB FR IT Rüttelplatte Original-Anleitung Vibratory Plates
 Art.Nr. 5804603984 / 5804604984 AusgabeNr. 5804602851 Rev.Nr. 22/11/2017 HP1100S / HP1300S D GB FR IT Rüttelplatte Original-Anleitung Vibratory Plates Translation from the original instruction manual Plaque
Microsoft Word - AT2018_sakums_MAKETS_ docx
 Latvijas Republikas Senāta spriedumi un lēmumi 2018. Rīga: Tiesu namu aģentūra, 2019. 1037 lpp. (VII, A 401, C 351, K 275) Krājumu sagatavoja: Latvijas Republikas Senāta Administratīvo lietu departamenta
book
 ZERO TURN MOWER series Type 991313 RIDING ROTARY LAWN MOWER SAMOJÍZDNÁ SEKAČKA AUFSITZ-SICHELMÄHER HAVETRAKTOR MED ROTERENDE KNIVE TRACTOR CORTACÉSPED GIRATORIO KETASNIIDUKIGA MURUTRAKTOR PUUTARHATRAKTORI
85 COMBI 95 COMBI 105 COMBI Type 85C Type 95CV, 95CV E Type 95CP, 95CP E Type 105C E ASSIEME DEL DISPOSITIVO DI TAGLIO MANUALE DI ISTRUZIONI... IT РЕЖ
 85 COMBI 95 COMBI 105 COMBI Type 85C Type 95CV, 95CV E Type 95CP, 95CP E Type 105C E SSIEME DEL DISPOSITIVO DI TGLIO MNULE DI ISTRUZIONI... IT РЕЖЕЩ ДИСК УПЪТВАНЕ ЗА УПОТРЕБА... BG REZNI TNJIR PRIRUČNIK
Art.Nr /2014 SG4500 D GB FR Stromgenerator Original-Betriebsanleitung Electric generator Original Operating Instru
 Art.Nr. 5906207901 5906207903 5906207850 11/2014 SG4500 D GB FR Stromgenerator Original-Betriebsanleitung Electric generator Original Operating Instructions Groupe électrogène Traduction de la notice originale
1. pielikums Papildu pakalpojumi Appendix 1 Additional Services 1. Pārvadātājs sniedz Papildu pakalpojumus, kas papildina vai paplašina Transporta pak
 1. pielikums Papildu pakalpojumi Appendix 1 Additional Services 1. Pārvadātājs sniedz Papildu pakalpojumus, kas papildina vai paplašina Transporta pakalpojumu nosacījumus. Papildu pakalpojumi attiecas