Deeper Smart Sonar START Technical Specifications Weight: 2.1oz / 60g Size: 60 x 65 x 65-mm / 2.3 x 2.5 x 2.5in Sonar Type: Single beam Frequency (Bea
|
|
|
- Visvaldis Skuja
- pirms 4 gadiem
- Skatījumi:
Transkripts
: 120 khz, 40 Depth Range Max/Min: Max 165ft / 50m, Min 1.6ft / 0.")
1 Deeper Smart Sonar START Technical Specifications Weight: 2.1oz / 60g Size: 60 x 65 x 65-mm / 2.3 x 2.5 x 2.5in Sonar Type: Single beam Frequency (Beam cone): 120 khz, 40 Depth Range Max/Min: Max 165ft / 50m, Min 1.6ft / 0.5m Sonar Scan rate: 10 scans per second Operating Temperature: 0 C to 40 C / 32 F to 104 F Internal Battery: Lithium Polymer, 3.7V Rechargeable, 850mAh Power Supply input (for charging battery): 5V DC, 650mA max Power Adapter (not included in the box, recommended): Input AC 110V/240V. Output Micro USB A, 5V 450mA Wireless connection type:
2 Wi-Fi Casting Range: Up to 165ft / 50m. Range depends on the OS and smartphone model Battery Life: Up to 6 hours Charging Time: 2.5 hours How sonars work Before you start using your Deeper device, it is important to understand some basic points about how sonars work. 1. Sonars scan in cones. This means when you mark a fish or feature, it is somewhere within the cone sent down by your sonar (not necessarily directly below your sonar). It also means that the deeper you scan, the wider the area you cover, because the sonar cone gets bigger as it goes down. 2. Sonar displays constantly scroll

3 When your Deeper is in the water, the sonar will be scanning constantly. This means the display continually scrolls from right to left, even if the sonar itself isn t moving. Read our page on how sonars work for a detailed explanation of these points, plus lots more useful information that will ensure you understand your device correctly. Installing the Deeper App
4 1. Open App Store or Google Play on your smartphone or tablet, and search for Fish Deeper. 2. Download and Install the Fish Deeper app. FishDeeper app works on a wide range of devices that use ios or Android operating systems. To check if the Deeper App will work on your device please go to Compatibility Standard mode. Basic imaging (all models) In Standard mode set to basic imaging, you will be shown the bottom and Fish Icons. In this mode, your Deeper sends much less information to your phone. So, this mode can be useful for preserving battery life, improving the connection range, and also for inexperienced anglers who just need to know bottom depth and where the fish are. Logging in To login to Lakebook, go to maps.deepersonar.com. You can login using Facebook, Google or your My Deeper username and password. It is the same user name and password you use for the Deeper App. Sveikt!
.")
5 Pamata principi makšķerējot no krasta ar Deeper Pirms to iemet ūdenī Pievienošanas punkti: krasta makšķerēšanai pārliecinieties, ka esat piestiprinājis savu auklu pie 3 stiprinājuma punkta apakšējā piestiprināšanas punkta, kas atrodas uz jūsu Deeper (tas neattiecas uz Deeper START, kuram ir tikai viens piestiprināšanas punkts). Izmantojot vienu no citiem piestiprināšanas punktiem, hidrolokatoru atradīsies ūdenī nepareizā leņķī. Aukla: Visu mūsu hidrolokatoru pārbaude ir pārbaudīta, izmantojot auklu no 6 mārciņām / 2,7 kg testa monofīlā līdz 20 mārciņam/ 9 kg testa pītā aukla. Pirms sonāra izmešanas vienmēr pārliecinieties, ka jūsu monofīlā vai pītā aukla ir labā stāvoklī - nav sabojāta vai nodilusi. Makšķeres: Deeper sonāri ir piemēroti lietošanai ar cietākas un vidējas darbības makšķerēm. Ar cietākas darbības
6 makšķerēm jūs varat iemest Deeper metot pāri galvai. Izmantojot vidējas darbības makšķeres, iemetiet savu Deeper, izmantojot sānu mešanas tehniku. Ievelkot to Kad Jūs velkat atpakaļ savu Deeper sonāru, pati svarīgāka lieta, ko atcerēties ir tas, ka tas ir jādara lēnām un vienmērīgi. Lūk kāpēc: Lēnām tiniet iekšā: Pārlieku ātra spoles tīšana var izraisīt Deeper šūpošanos no vienas puses uz otru. Ja tas notiek, sonāra rādījumi būs mazāk ticami. Piemēram, ja sonāru paliec uz vienu pusi, sonāra signālam būs jāceļo tālāk, pirms tas sasniedz grunti. Tā rezultātā dziļums tiks parādīts daudz dziļāks, nekā patiesībā ir. Vienmērīgi ietiniet auklu: ir svarīgi arī iegūt ierīci vienmērīgā, nepārtrauktā ātrumā. Atcerieties, ka jūsu sonārs patstāvīgi skenē. Tas nozīmē, ja jūsu ierīce ir nekustīga, ekrāna apakšdaļa parādīsies plakana, jo sonārs atkārtoti sūta vienu un to pašu dziļuma nolasījumu. Ja sākat tīt auklu un uz displeja grunts paliek plakana, tad jūs zināt, ka tā tiešām ir plakana grunts. Mainoties dziļumam, piemēram, ja jūs ēkrāna redziet strauju kritumu uz grunts, ir svarīgi saglabāt vienmērīgu ātrumu. Ja palēnināsiet spoles tīšanas ātrumu, displejā slīpums parādīsies pakāpeniskāk. Paātriniet ātrumu, un tas parādīsies stāvāks. Uzturot vienmērīgu ātrumu, jūs iegūsit precīzu norādi par to, cik straujas patiesībā ir dziļuma izmaiņas. Charging and connecting First unscrew the top cover to open the device please always ensure the device is dry before opening it. Now connect your Deeper Sonar to a USB power source using the cable included. For charging, please use a standard smartphone or tablet charger, or connect the cable to your personal computer, your car s power outlet, or the USB outlet of another device.
7 When you connect your Deeper CHIRP+ to a power source, it automatically turns on. An orange light will flash in intervals to show the device is charging. The number of flashes indicates the status of the battery. One flash means charging just started and the battery is still empty. Two flashes mean 25% charged Three flashes mean 50% charged Four flashes mean 75% charged A green light means the battery is fully charged. A blue light indicates that the temperature is too cold for charging. The lithium-ion battery cannot be charged at temperatures below 3 C / 37.4 F. Please take your Deeper Sonar to room temperature conditions and resume charging. A red light means there is a problem with charging. In this case, first please try a different charger and cable. Next, please leave the device charging for a longer period (over 1 hour). If the light is still red, please contact Support. Once your device is charged, screw the top cover back on, ensuring it is closed tightly so that the words Water and Proof align perfectly.
8 Never put your Deeper in water when it is connected to the charger cable. This could damage the device and any damage will not be covered by the warranty. Always ensure the top cover is firmly closed and the Water Proof marks are perfectly aligned before putting your Deeper Sonar in water. Please note you can only connect to one Deeper Sonar at a time from your phone or tablet. And your Deeper Sonar can only connect to one phone or tablet at a time. Galvenā ekrāna izpratne Galvenajā ekrānā tiek parādīti hidrolokatoru dati, kurus ir interpretējusi lietotne Deeper. Ekrāna augšdaļa atbilst jūsu Deeper ūdens virsmai. Ekrāna apakšā redzams ūdens dziļums un grunts. Interpretējot hidrolokatoru datus, atcerieties, ka Deeper uztver tikai to, kas atrodas zem tā, un ka ekrāns nepārtraukti iet uz priekšu. Ekrāna labajā pusē tiek parādīti jaunākie hidrolokatoru dati, un labās malas attēlo rādījumus šobrīd. Kad tiek saņemti jauni sonāra dati, vecāki dati tiek pārvietoti pa kreisi un displejs iet uz priekšu. Ekrāna vidū apakšā jūs vienmēr redzēsiet sava Deeper statusu:

9 Lādējās Savienots un sonāra nosaukums Jūsu sonārs ir pieslēgts pie strāvas avota un lādējās. Jūsu Deeper ir veiksmīgi savienots ar viedtālruni vai planšeti. T.i. Savienots: Deeper PRO B23A Atvienots Ir pārtraukts savienojums starp jūsu Deeper sonāru un mobilo ierīci. Noklikšķiniet instrukcijas. Savienošana / atkārtota savienošana Jūsu sonārs mēģina izveidot vai atjaunot savienojumu ar jūsu mobilo ierīci. Lūdzu, sekundes, līdz ierīces atkal izveido savienojumu. Noklikšķiniet šeit, lai iegūtu norād rīkoties, ja viņi nesavienojas. Ārpus ūdens Jūsu hidrolokatoru ierīce ir ārpus ūdens. Ja redzat, ka šis ziņojums tiek parādīts, ka lūdzu, iztīriet ūdens sensorus (instrukcijas par to izdarīšanu var atrast šeit). Par Seklu vai dziļu Jūsu sonārs nevar iegūt precīzu nolasījumu. Visbiežākais iemesls tam ir tas, ka ūde pārāk dziļš. Deeper sonāriem ir dziļuma prasības precīzai skenēšanai: Deeper PRO, PRO+ Šaurs stars minimālais dziļums 2ft / 0,5m; Minimālais platā staru dziļums 4.3m / 1 Maksimālais dziļums abiem stariem 260 pēdas / 80 metri Deeper CHIRP+ Min. dziļums: 5.9 collas / 0.15 metri Narrow CHIRP 23.6 collas / 0.6 metri Medium CHIRP 31.4 collas / 0.8 metri Wide CHIRP Maksimālis dziļums visiem stariem 328 pēdas / 100 metri Deeper START Minimālais dziļums 4.3 pēdas / 1.3 metri; Maks. Dziļums 160 pēdas / 50 metri Deeper 3.0 Narrow Beam minimālais dziļums 2 pēdas / 0.5 metri; Wide stara minimālais dziļum metri Maksimālais dziļums ir 130 pēdas / 40 metri Šis ziņojums var parādīties arī tad, ja hidrolokatoru noliec, kad to ietin vai velcē, k taisni uz leju (sīkāka informācija šeit). Tas tiks parādīts arī tad, ja skenējat slēgtos vannās vai peldbaseinos.

10 (Deeper nosaukums)(nesavienots) Jūsu sonārs un mobilā ierīce ir savienoti, bet sonārs pašlaik neveic skenēšanu, jo t t.i. Deeper PRO B23A (akumulatora taupīšana). Lai atkal sāktu skenēšanu, deaktivizējiet miega režīmu. Standarta režīms. Detalizēts attēlveidošana (PRO sērija) Grunts: ja iestatīts uz detalizētu attēlveidošanu, jūsu Deeper var palīdzēt noteikt, vai apakšdaļa ir cieta vai mīksta. Kad sonāra impulsus, kas nosūtīti no jūsu Deeper, atspoguļo apakšdaļa, cieta grunts atgriezīs spēcīgāku signālu nekā mīksta grunts. Izmantojot klasiskā ekrāna krāsu režīmu, apakšdaļa var tikt attēlota šādi: oranža (cietākā apakšdaļa), brūna (vidēja) un melna (mīkstākā). Apakšdaļa vienmēr sniegs visspēcīgāko signālu par jebkura objekta atgriešanos; tāpēc tai būs visintensīvākā krāsa. Apakšdaļa tiek parādīta kā nepārtraukta, intensīvi krāsaina līnija, kas iet pāri ekrāna apakšdaļai. Otrās hidrolokatūras atgriešanās: Jūs varat redzēt arī otro hidrolokatoru atgriešanos: tas notiek, kad hidrolokatoru signāls atlec starp ūdens grunti un virsmu un atkal atpakaļ. Cietā grunts parādīs spēcīgu otro atgriešanos, savukārt mīkstie grunts rādīs ļoti vāju vai vispār nepastāv. Zivju ikona: Zivju ikonas tiek parādītas trīs dažādos izmēros. Zivju klasifikācija pēc lieluma ir atkarīga no daudziem mainīgiem lielumiem, un svars ir tikai viens no tiem. Tas nozīmē, ka zivju ikonas ne vienmēr precīzi atspoguļo faktisko zivju lielumu. Ja vēlaties precīzāk noteikt zivju faktisko izmēru, jums jāizvēlas Detalizēta vieda attēlveidošana un noņemiet zivju ikonas. Izmantojot šos iestatījumus, jūs varat diezgan precīzi noteikt zivju izmēru, lai gan sākumā zivju identificēšana var būt grūtāka. Plašāk par šo tēmu lasiet šeit. Ūdens virsma: Ekrāna augšdaļā jūs redzēsiet zilu ūdens virsmas līniju ar intensīvu krāsu grupu. Šis apgabals ir virskārtas juceklis, ko var izraisīt viļņi vai citi hidrolokatoru iejaukšanās ūdens virsmā. Virsmas juceklis ir aklā zona, kurā hidrolokatoru neatzīs nekādas zivis vai zemūdens objektus. Virsmas jucekļa garums ir atkarīgs no izmantotā stara leņķa un frekvences. Jo augstāka frekvence - jo mazāks ir virskārtas juceklis, un jo mazāks dziļums Deeperm darbam būs nepieciešams. Šaurajam staram (290 khz) būs virskārtas traucējumu zona, kas stiepjas līdz 0,5 m (2 pēdām) no ūdens virsmas. Šajā apgabalā netiks atklātas zivis vai zemūdens objekti. Deeper sonārā parādīsies kļūdas ziņojums pārāk sekla vai pārāk dziļa, ja faktiskais ūdens dziļums ir mazāks par 0,5 m (2 pēdām). Plašajam staram (90 khz) virsmas traucējumu zona būs 1,3 m (4,3 pēdas), un šajā apgabalā netiks noteiktas zivis. Deeper sonārā parādīsies kļūdas ziņojums pārāk sekla vai pārāk dziļa, ja faktiskais ūdens dziļums ir mazāks par 1,3 m (4,3 pēdām). Nezāle: nezāļu gultne un veģetācija ir parādīta zaļā krāsā. Zivju bari: Deeper sonāri skaidri parādīs ēsmas zivju barus, kuras attēlo kā dažādu formu un izmēru mākoņus. To precīzais izskats būs atkarīgs no zivju skaita un laivas ātruma, ja velcēsiet.
11 Connection issues with Deeper s Wi-Fi Firstly, please bear in mind that the connection ranges of 100m / 330ft (PRO/PRO+) and 50m / 165ft (START) are maximum ranges and can only be achieved in perfect conditions and with a smartphone or tablet that has a strong reception antenna. Conditions like bad weather or using an incorrect attachment point may reduce the connection range. To ensure a better connection range, first switch off Mobile Data on your smartphone / tablet, as this can affect the strength of your Wi-Fi signal. Mobile data strongly reduces the amount of information your device can send via its Wi-Fi connection. For iphones and ipads, it is very important to turn off the Wi-Fi assist feature as this feature can automatically switch off the connection with your Deeper. You can find this feature in the settings menu of your device. Some Android phones have a similar feature, although the name of it may vary depending on the model of the phone. On Samsung phones, it is called Smart network switch. Other Android phones may have a similar feature with a different name. Please make sure that you turn off any settings that make your smartphone automatically disconnect from Wi-Fi networks with a poor internet connection. Other possible names for this feature include: Adaptive Wi-Fi / Auto Network Switch / Wi-Fi+. If you re using any VPN services that may require a Wi-FI connection it is better to turn them off. If you don t, the Deeper App may have difficulties connecting to the device automatically. Do not to keep your smartphone or tablet on the ground while using the Deeper, as this can also reduce the strength of the signal. To maximize connectivity you should use the Deeper Smartphone Mount. Please also note that it is only possible to connect to the Deeper using one smart device at a time. This means it will be impossible to connect to a Deeper Sonar if it is already connected to another phone or tablet. To switch off all current connections, simply take the Deeper out of the water, wipe it and wait for 5 minutes for the unit to turn off. Then, put it in the water again and connect. If the device connects when on charge but does not connect when in the water, please check the water sensors on the bottom (the two metal points on the bottom housing of your Deeper). You can clean them by roughly scrubbing them with a sponge, or an electronic contact cleaner can be used if needed. For the 3.0/PRO/PRO+ models only, make sure you are using the correct attachment point in order to ensure a stable. When fishing from a dock or bridge, screw your attachment bolt to the middle attachment point. Use the bottom attachment point if you're fishing from the shore. It is important that your Deeper does not tilt when being trolled or reeled. When it tilts, it scans the water surface rather than the bottom, giving inaccurate readings, and
12 it s Wi-Fi transmissions can be blocked, causing connectivity issues. If these tips do not solve the issue, please reach out to the Deeper Support team. Charging and connecting First unscrew the top cover to open the device please always ensure the device is dry before opening it. Now connect your Deeper Sonar to a USB power source using the cable included. For charging, please use a standard smartphone or tablet charger, or connect the cable to your personal computer, your car s power outlet, or the USB outlet of another device. When you connect your Deeper PRO or PRO+ to a power source, it automatically turns on. An orange light will flash in intervals to show the device is charging. The number of flashes indicates the status of the battery. One flash means charging just started and the battery is still empty. Two flashes mean 25% charged Three flashes mean 50% charged Four flashes mean 75% charged A green light means the battery is fully charged. A blue light indicates that the temperature is too cold for charging. The lithium-ion battery cannot be charged at temperatures below 3 C / 37.4 F. Please take your Deeper Sonar to room temperature conditions and resume charging. A red light means there is a problem with charging. In this case, first please try a different charger and cable. Next, please leave the device charging for a longer period (over 1 hour). If the light is still red, please contact Support. Once your device is charged, screw the top cover back on, ensuring it is closed tightly so that the words Water and Proof align perfectly.
13 Never put your Deeper in water when it is connected to the charger cable. This could damage the device and any damage will not be covered by the warranty. Always ensure the top cover is firmly closed and the Water Proof marks are perfectly aligned before putting your Deeper Sonar in water. Please note you can only connect to one Deeper Sonar at a time from your phone or tablet. And your Deeper Sonar can only connect to one phone or tablet at a time. Charging and connecting Connect your Deeper Sonar to a USB power source using the cable included. For charging please use a standard smartphone or tablet charger or connect the cable to your personal computer or the USB outlet of another device (outlets must meet USB standards and have a voltage level of 5V). When you connect your Deeper START to a power source, it automatically turns on. The light shown indicates the charge status of the battery: An orange blinking light means that the fishfinder is charging. The number of flashes shows the battery status: One flash means charging just started and the battery is still empty. Two flashes mean 25% charged Three flashes mean 50% charged Four flashes mean 75% charged A constant light means the battery is fully charged.
14 If the light blinks rapidly without stopping there is a problem with charging. In this case, please follow these 2 steps. 1. Check the temperature. If it is 0 C / 32 F or lower, please try charging your Deeper START in room temperature conditions. 2. If you still see a rapidly blinking light, please contact Support. Deeper Sonar models
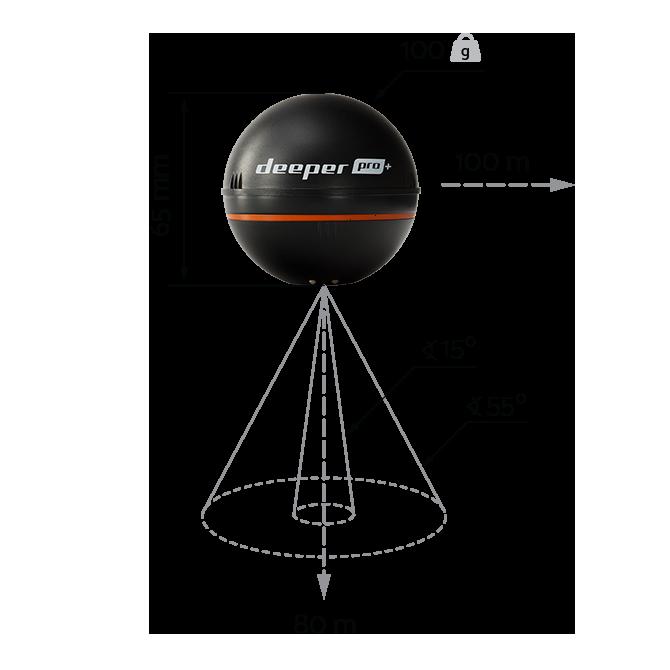
15 Deeper Smart Sonar PRO Technical Specifications Weight: 3.5oz / 100g Size: 65mm / 2.5in in Diameter Sonar Type: Dual Beam Frequency (Beam cone): 290 khz, 15 and 90 khz, 55 Depth Range Max/Min: Max 260ft / 80 m, Min 2ft / 0.5m Sonar Scan rate: Up to 15 scans per second Operating Temperature: -20 C to 40 C / -4 F to 104 F Internal Battery: Lithium Polymer, 3.7V Rechargeable, 850mAh Power Supply input: Micro USB B type, 5V DC, 450mA max (for charging battery) Power Adapter Input: AC 110V/240V. Output Micro USB, 5V 450mAh Wireless connection type: Wi-Fi Casting Range:
16 Up to 330ft / 100m. Range depends on the OS and smartphone model Battery Life: Up to 6 hours Charging Time: 2 hours My Deeper My Deeper is a personal account that will allow you get the most from Deeper s range of products and services. My Deeper account is absolutely free, and is mandatory to have in order to use the Deeper Sonar. You cannot use the FishDeeper app without an account. How to create your My Deeper account You can create an account in the Deeper App. You can register using your , Google or Facebook. You can also register on the My Deeper page on our website ( - follow the onscreen instructions to set up your account. How to change your password You can change your password on the My Deeper page on our website ( Click on My Profile > Manage Account, and you will find the Change Password box on the bottom of the page. What to do if you do not receive a verification or password reset When you register or reset your password, you should receive an . You will need this to complete your registration or password change. If you have not received an , please check your spam/trash folder. If you still cannot find the , please contact our support team at support@deeper.eu How to delete your account If you would like to delete your My Deeper account, please go to the My Deeper page on our website ( choose Privacy Settings and click Delete My Account. Deleting the account is non-reversable. Account is needed in order to use the Deeper sonar. Krasta makšķerēšana dažādos apstākļos piestātnes un doki, upju makšķerēšana Jūs varat izmantot savu Deeper sonāru makšķerēšanai no krasta, no piestātnēm, dokiem un tiltiem (arī sālsūdenī) un upēm. Bet jums būs jāpielāgo iestatīšana un pieeja. Lietošanai no dokiem, piestātnēm un tiltiem Pārliecinieties, ka jūsu aukla ir piestiprināta pie vidējā piestiprināšanas punkta uz jūsu Deeper (tas neattiecas uz Deeper START, kam ir tikai viens piestiprināšanas punkts). Izmantojot vienu no citiem piestiprināšanas punktiem, sonārs sēdēs ūdenī nepareizā leņķī. Deeper sonāri ir piemēroti lietošanai sālsūdenī, tāpēc dodieties uz priekšu un mierīgos apstākļos izmantojiet savu
17 Deeper pie piestātnes. Ja jūrā ir lielāki viļņi, tas var ietekmēt savienojumu ar viedtālruni. Makšķerējot upēs Deeperi sonāri ir piemēroti, lai atrastu upju dziļumu un grunts izmaiņas, ar nosacījumu, ka upē nav ļoti liela straume. Izmantojiet to pašu piestiprināšanas punktu, kuru izmantotu ezeru makšķerēšanai (piestiprināšanas punkts apakšā no upes krasta, vidējais piestiprināšanas punkts no tilta vai piestātnes). Visefektīvākā jūsu Deeper sonāra izmantošana upēs, kad makšķerēšanai ir paredzēta dziļuma un īpašību noteikšanai - kad straume ir strauja, precīzi noteikt zivis var būt grūti. Straumes izmantošana, lai Deeper sonāru novirzītu lejup pa upi, bieži vien ir efektīvs veids, kā apsekot jūsu upes apgabalus. Ja jūs izmantojat Deeper PRO + vai CHIRP +, mēs iesakām izmantot sauszemes GPS režīmu (Iestatījumi> Sonar> Sonar Mode> Onshore GPS), jo tas ļaus jums kartēt upes dziļumu, kad sonārs iet pa straumi. Ja izmantojat Deeper PRO vai PRO +, augstākai kartēšanas precizitātei ieteicams izmantot šauro staru (290 khz). Ja izmantojat CHIRP +, iesakām izmantot ahigh CHIRP vai Mid CHIRP, lai kartēšanas precizitāte būtu augstāka. Pairing with the mobile device Deeper sonar turns on automatically when it is in water or connected to a power source. When it s out of water or not being charged, it switches off automatically to save battery life. To use the Deeper sonar, you will need to Download the app from App Store or Google Play. You will see a register screen when you first launch the app. Only registered users will get all the features that application can offer.
18 Pairing with an Android mobile device: Be sure that your Deeper Sonar is switched on (either connected to a power source or in the water); Open Settings in your smartphone or tablet and turn on Wi-Fi; Find your Deeper sonar in the Wi-Fi devices list and click to pair it; When you are asked for the password, enter Turn Off the Smart Network Switch function (if available on your device) Your Deeper CHIRP+ is now connected with your mobile device - you might see Internet may not be available displayed, or something similar. Don t worry, this is normal. It simply means that your mobile device s Wi-Fi connection is now being used for your Deeper sonar and not the internet. Pairing your Deeper CHIRP+ with an iphone or ipad If you use an iphone or ipad, follow these steps: Be sure that your Deeper Sonar is switched on (either connected to a power source or in the water); Open Settings in your mobile device, then open Mobile Data and make sure that the Wi-Fi Assist function is turned off. This is important because when this function is active, the connection with your Deeper sonar may be unstable. Then open Settings in your mobile device, then Wi-Fi and turn it on. Find your Deeper PRO or PRO+ in the list of available Wi-Fi networks and click to pair it. When you are asked for the password, enter Your Deeper CHIRP+ is now connected with your iphone or ipad - you might see Internet may not be available displayed, or something similar. Don t worry, this is normal. It simply means that your mobile device s Wi-Fi connection is now being used for your Deeper sonar and not the internet. You can try your sonar at home, but you probably won t see fish accurately

19 If you put your Deeper CHIRP+ in a fish tank, cup, bucket, bathtub, or similar container at home you will be able to turn the device on and pair it with your mobile device. But most likely the device won t be able to scan properly you will probably just see an empty screen and the status message: Too shallow or too deep. If your CHIRP+ is set to Narrow CHIRP (7 ), you may even see phantom fishes and other strange readings on the screen. This is normal, Deeper sonar is designed for scanning in wide open waters like rivers, lakes, and the sea. In small, shallow and enclosed waters the sonar tries to scan, but receives too many sonar returns from the bottom and walls of your tank and cannot make an accurate reading. Read more about How Sonars Work Sinhronizējot datus Mūsu drošajā mākoņa serverī ir iespējams dublēt visus skenētos datus, izmantojot jūsu Deeper. Tas var būt noderīgs: Piekļūstiet visiem saviem datiem jebkurā Android vai ios ierīcē, izmantojot lietotni Deeper, izmantojot savu unikālo lietotāja vārdu. Skenēto attēlu, kā arī karšu skatīšana no jebkura datora caur Lakebook. Atbrīvojiet vietu viedtālrunī, nezaudējot skenēšanu - datus varat saglabāt tikai Deeper mākonī. Visu esošo skenējumu iegūšana jaunā ierīcē, piemēram, kad jūs pērkat jaunu tālruni. Visas jūsu veiktās jaunās kartes vai skenētie dati tiks automātiski sinhronizēti ar mūsu mākoņa serveri, taču tas var nenotikt uzreiz. Ja sesijai ir mākoņa ikona ar atzīmi, tad tā jau ir sinhronizēta. Ja tam ir tikai mākoņa kontūra, tas vēl nav

20 sinhronizēts. Lai nekavējoties augšupielādētu nesinhronizētas sesijas, vienkārši atrodieties ikonā ekrāna augšējā labajā stūrī (mākonis ar augšupvērstu bultiņu), kad atrodaties vēstures režīmā. Sinhronizācijas laikā pārliecinieties, vai tālrunis ir savienots ar stabilu interneta tīklu. Nesinhronizētie dati ir pieejami tikai jūsu tālrunī, nevis citās ierīcēs vai Lakebook. Sinhronizējot datus, jums tagad ir lielāka elastība attiecībā uz to glabāšanu. Jums ir 2 galvenās datu saglabāšanas iespējas: - Sinhronizēts - šāda veida dati tiek saglabāti gan jūsu tālrunī, gan mūsu mākoņa serverī. Tam var piekļūt, izmantojot tālruni un jebkuru citu ierīci, izmantojot lietotni Deeper. Kartes un skenētos datus var apskatīt arī Lakebook. Sinhronizētajiem datiem var piekļūt jebkurā ierīcē, kartes un skenētus datus var apskatīt Lakebook. - Attālā - šāda veida dati tiek saglabāti tikai mūsu mākoņa serverī. Tam nevar uzreiz piekļūt, izmantojot lietotni Deeper - ja vēlaties to apskatīt savā tālrunī vai kādā citā Android vai ios ierīcē, vispirms tas būs jālejupielādē no mākoņa, izmantojot lietotni Deeper. Kartes un skenētos datus, kas saglabāti kā attālie dati, joprojām var apskatīt Lakebook tīmekļa portālā. Jūsu skenētie dati pēc noklusējuma tiks saglabāti kā sinhronizēti dati. Lai pārveidotu sesiju par attālinātiem datiem, kas nozīmē, ka tā neaizņems vietu jūsu tālrunī, vienkārši atlasiet dzēšanas ikonu un pēc tam izvēlieties opciju Dzēst tikai no lietotnes. Dzēšanas ikona parādīsies, ja nospiedīsit pirkstu uz skenēšanas (vai slīdiet to pa kreisi, ja izmantojat Apple ierīci). Skenētie dati, kas saglabāti kā sinhronizēti dati, lietotnē parādīsies kā parasti, turpretī attālie dati joprojām būs redzami, bet tikai kā pelēka kontūra. Iestatījumi Sonar settings can be accessed by clicking the gear icon on the top right corner. This will open a menu with all available settings for your model of Deeper sonar. You can close the menu at any time by sliding it to the right. Fishing mode lets you choose between 4 fishing modes: Standard, Ice fishing, Boat, and Onshore GPS. This setting is not available for Deeper START.


21 Sonar display switch between Raw and Basic sonar display. Raw sonar display shows detailed sonar, without any filtering. Basic sonar display filters out the amount of information and shows only the basic data bottom structure, depth, fishes. Deeper START has Basic sonar display enabled by default. Beam angle switch between the sonar beam angles of your Deeper sonar. This setting is not available for Deeper START Sensitivity controls how much detail is shown on the display and can be used to adjust the sensitivity of all sonar frequencies. If you use a high sensitivity, the sonar display will show everything, including small baitfish and floating debris in the water. When operating in very clear water or at greater depths, you should increase the sensitivity, so you can see even weaker returns that may be of interest. Decreasing the sensitivity eliminates clutter from the display, which can occur when the water is muddy. If the sensitivity is set too low, the display will not show a lot of sonar returns that could be fish. We recommend starting from 100% sensitivity and then gradually decreasing sensitivity until you get the best results. This setting is not available for Deeper START
. You can choose which size to show by adjusting the slider.")
22 Show fish icons turn on/off special algorithms that interpret fishes and mark them with fish symbols on the screen. Fish size When Fish Icons are enabled, allows you to choose which fish size to show (Large/Medium/Small). You can choose which size to show by adjusting the slider. Selecting L/M/S will result in all 3 sizes being shown, L/M will show only large and medium sized fishes, while L setting will show only large fishes. This feature will only work if Fish icons are enabled. Show depth enables or disables depth readings that are displayed above or below fish icons. You can choose the distance from surface to the fish (Fish icon with arrow up) or distance from the bottom to the fish (Fish icon with arrow down). This feature will only work if Fish icons are enabled. Fish alarm enable fish alarms, that will make a sound alarm whenever a fish is detected. This feature will only work if Fish icons are enabled. Color palette allows you to choose the most convenient color palette for viewing your sonar data based on the environment, conditions and the time of day you are fishing. Alongside the Classic color palette, there are two other options Day and Night - which can be used for the best viewing of your sonar readings in either bright sunny conditions (Day mode) or low light conditions (Night mode). This setting is not available for Deeper START


23 The Night Fishing feature should be turned on when fishing at night or in low light conditions. With the Deeper START it can be activated immediately, whereas with the Deeper PRO, PRO+ and 3.0 models you will need to replace the standard cover with a Deeper Night Fishing Cover first. Night Fishing mode activates a blinking light that is only visible through a transparent cover. Standarta režīms. Detalizēts attēlveidošana (CHIRP +) Grunts: ja iestatīts uz detalizētu attēlveidošanu, jūsu Deeper var palīdzēt noteikt, vai apakšdaļa ir cieta vai mīksta. Kad sonāra impulsus, kas nosūtīti no jūsu Deeper, atspoguļo apakšdaļa, cieta grunts atgriezīs spēcīgāku signālu nekā mīksta grunts. Izmantojot dienas ekrāna krāsu režīmu, apakšdaļa var tikt parādīta šādi: dzeltena (cietākā apakšdaļa), sarkana (vidēja) un zila (mīkstākā). Apakšdaļa vienmēr sniegs visspēcīgāko signālu par jebkura objekta atgriešanos; tāpēc tai būs visintensīvākā krāsa. Apakšdaļa tiek parādīta kā nepārtraukta, intensīvi krāsaina līnija, kas iet pāri ekrāna apakšdaļai. Otrās hidrolokatūras atgriešanās: Jūs varat redzēt arī otro hidrolokatoru atgriešanos: tas notiek, kad hidrolokatoru signāls atlec starp ūdens grunti un virsmu un atkal atpakaļ. Cietā grunts parādīs spēcīgu otro atgriešanos, savukārt mīkstā grunts rādīs ļoti vāju vai vispār nepastāv. Zivju ikona: Zivju ikonas tiek parādītas trīs dažādos izmēros. Zivju klasifikācija pēc lieluma ir atkarīga no daudziem mainīgiem lielumiem, un svars ir tikai viens no tiem. Tas nozīmē, ka zivju ikonas ne vienmēr precīzi atspoguļo faktisko zivju lielumu. Ja vēlaties precīzāk noteikt zivju faktisko izmēru, jums jāizvēlas Detalizēta vieda attēlveidošana un noņemiet zivju ikonas. Izmantojot šos iestatījumus, jūs varat diezgan precīzi noteikt zivju izmēru, lai gan sākumā zivju identificēšana var būt grūtāka. Plašāk par šo tēmu lasiet šeit. Ūdens virsma: Ekrāna augšdaļā jūs redzēsiet zilu ūdens virsmas līniju ar intensīvu krāsu grupu. Šis apgabals ir virskārtas juceklis, ko var izraisīt viļņi vai citi hidrolokatoru iejaukšanās ūdens virsmā. Virsmas juceklis ir aklā zona, kurā hidrolokatoru neatzīs nekādas zivis vai zemūdens objektus.
, virskārtas traucējumu zona būs līdz 0,15 m (0,5 pēdām) no ūdens virsmas. Šajā apgabalā netiks atklātas zivis vai zemūdens objekti.")
24 Virsmas jucekļa garums ir atkarīgs no izmantotā stara leņķa un frekvences. Jo augstāka frekvence - jo mazāks ir virskārtas juceklis, un jo mazāk Deeper darbam būs nepieciešams. Izmantojot Narrow CHIRP staru (675 khz), virskārtas traucējumu zona būs līdz 0,15 m (0,5 pēdām) no ūdens virsmas. Šajā apgabalā netiks atklātas zivis vai zemūdens objekti. Deeper sonārā parādīsies kļūdas ziņojums pārāk sekla vai pārāk dziļa, ja faktiskais ūdens dziļums ir mazāks par 0,15 m (0,5 pēdām). Vidējā CHIRP (290 khz) virszemes jucekļa zona būs 0,6 m (2 pēdas), un tajā netiks noteiktas zivis vai zemūdens objekti. Plašajam CHIRP (100 khz) virskārtas traucējumu zona būs 0,8 m (2,6 pēdas), un tajā netiks noteiktas zivis vai zemūdens objekti. Nezāle: nezāļu gultne un veģetācija ir parādīta zaļā krāsā. Zivju bari: Deeper sonāri skaidri parādīs ēsmas zivju barus, kuras attēlo kā dažādu formu un izmēru mākoņus. To precīzais izskats būs atkarīgs no zivju skaita un laivas ātruma, ja velcēsiet. Viewing and analyzing your maps and scans Once you are logged in, on the left side of the screen you will see a list of the locations where you have used your Deeper. If you did not name the sessions, they will be listed as Untitled. Click on a location to view your data. Lakebook will show both sonar scans - on the bottom of the screen- and bathymetric mapping data shown on the map. Bathymetry will only be shown if the scan was made in Boat Mode or Onshore GPS Mode. You will see that your maps and scans are grouped by location (all scans are grouped by the water body ). Once you have selected the location and sessions you want, you are ready to start analyzing them. What you see on screen will vary depending on the fishing mode you used for scanning at that location: - For Standard Mode and Ice Fishing Mode, you will see a split screen. On the top half there is a map with pins marking the different locations where you scanned. The bottom half shows the scans themselves.
25 - For Boat Mode and Onshore GPS, you also see a split screen. This time the Bathymetric map you created is shown on the top half, and the scans that were recorded while you were mapping are shown on the bottom half. Scrolling your scans You can scroll through your scans from right to left. Use the scroll bar at the bottom of the screen or click on the scan and move your mouse. For scans made using Boat Mode and Onshore GPS mode, you will notice that an arrow icon is shown on the map itself. This icon shows where the scanning data you are looking at now was made. As you scroll through your scan, the icon will move on the map. This enables you to locate exact points on the map where you marked a fish or located some good structure. You can also click on a particularly interesting point on the bathymetric map and see the sonar scan in that precise area. You also have the option to add or remove fish icons from your scans. Instant depth and GPS data When analyzing your bathymetric maps, simply click on any part of the map you have created. A pop-up box will appear with the GPS coordinates and depth at that exact spot. Other useful display tools - Zoom: In the top right of the screen there is a plus / minus icon. Use this for zooming in or out. - Map settings: Below the zoom icon is a menu for changing your viewing settings. Click on this then select either Map (for a simple map display) or Satellite (for a satellite image). In the Map view you can add or remove terrain. In the Satellite view you can add or remove labels. - Distance measurement: Below the map settings menu there is a ruler icon. Click this and you can now measure distances just click one spot and then another, and you will get a distance reading between the two. - Removing menu from display: If you want to see you map and scan in full, without the left hand menu bar displayed, simply press the x in the top right corner of the menu bar. Connection issues with the Deeper 3.0 s Bluetooth connection Firstly, please bear in mind that the connection range of 40 m (130ft.) is the maximum range the Deeper 3.0 can achieve, and this range is only achievable in very good conditions and a smartphone / tablet that has a strong reception antenna. Conditions like bad weather, or using an incorrect attachment position, may reduce the connection range. First, check that you are holding your smartphone correctly and not covering its Bluetooth antenna. Positioning of the Bluetooth antenna may vary depending on the model of your smartphone / tablet. Do not keep your smartphone on the ground or in your pocket and remove any smartphone cases. Make sure that your Deeper App is up to date. If you re using the latest version of the app and it fails to connect to your Deeper even though you have successfully established a Bluetooth connection previously, please follow these steps: Remove (Forget) Deeper from your smartphone's Bluetooth devices. 1. Restart your phone; 2. Connect your Deeper to a charger; 3. Pair your Deeper with your smartphone again.
26 Please also note that it is only possible to connect to your Deeper using one smart device at a time. This means it will be impossible to connect to a Deeper Sonar if it is already connected to another phone or tablet. To switch off all current connections, simply take the Deeper out of the water, wipe it and wait for 5 minutes for the unit to turn off. Then, put it in the water again and connect. If these tips do not solve the issue, please reach out to the Deeper Support team. Pairing with the mobile device Deeper sonar turns on automatically when it is in water or connected to a power source. When it s out of water or not being charged, it switches off automatically to save battery life. To use the Deeper sonar, you will need to Download the app from App Store or Google Play. You will see a register screen when you first launch the app. Only registered users will get all the features that application can offer. Pairing with an Android mobile device: Be sure that your Deeper Sonar is switched on (either connected to a power source or in the water); Open Settings in your smartphone or tablet and turn on Wi-Fi; Find your Deeper sonar in the Wi-Fi devices list and click to pair it; When you are asked for the password, enter Turn Off the Smart Network Switch function (if available on your device) Your Deeper PRO or PRO+ is now connected with your mobile device - you might see Internet may not be available displayed, or something similar. Don t worry, this is normal. It simply means that your mobile device s Wi-Fi connection is now being used for your Deeper sonar and not the internet. Pairing your Deeper PRO or PRO+ with an iphone or ipad If you use an iphone or ipad, follow these steps: Be sure that your Deeper Sonar is switched on (either connected to a power source or in the water); Open Settings in your mobile device, then open Mobile Data and make sure that the Wi-Fi Assist function is turned off. This is important because when this function is active, the connection with your Deeper sonar may be unstable. Then open Settings in your mobile device, then Wi-Fi and turn it on. Find your Deeper PRO or PRO+ in the list of available Wi-Fi networks and click to pair it. When you are asked for the password, enter Your Deeper PRO or PRO+ is now connected with your iphone or ipad - you might see Internet may not be available
27 displayed, or something similar. Don t worry, this is normal. It simply means that your mobile device s Wi-Fi connection is now being used for your Deeper sonar and not the internet. You can try your sonar at home, but you probably won t see fish accurately If you put your Deeper PRO or PRO+ in a fish tank, cup, bucket, bathtub, or similar container at home you will be able to turn the device on and pair it with your mobile device. But most likely the device won t be able to scan properly you will probably just see an empty screen and the status message: Too shallow or too deep. This is normal, Deeper sonar is designed for scanning in wide open waters like rivers, lakes, and the sea. In small, shallow and enclosed waters the sonar tries to scan, but receives too many sonar returns from the bottom and walls of your tank and cannot make an accurate reading. Read more about How Sonars Work Pairing with a phone or tablet There s no power button on your Deeper START: it turns on automatically when it is in water or connected to a power source. When it s out of water or not being charged, it switches off to save battery life. Never put your Deeper in water when it is connected to the charger cable! This could damage the device and any damage will not be covered by the warranty.
28 Pair your Deeper START with an Android mobile device If you use an Android smartphone or tablet, follow these steps: Be sure that your fishfinder is switched on (either connected to a power source or in the water); Open Settings in your mobile device and turn on Wi-Fi Connection; Find your Deeper START in the list of available Wi-Fi networks and click it. Your Deeper START is now connected with your mobile device you might see Internet may not be available displayed, or something similar. Don t worry, this is normal. It simply means that your mobile device s WiFi connection is now being used for your Deeper START and not the internet.
29 Pair your Deeper START with an iphone or ipad If you use an iphone or ipad, follow these steps: Be sure that your fishfinder is switched on (either connected to a power source or in the water); Open Settings in your mobile device, then open Mobile Data and make sure that the Wi-Fi Assist function is turned off. This is important because when this function is active, the connection with your Deeper START may be unstable. Then open Settings in your mobile device, then Wi-Fi and turn it on. Find your Deeper START in the list of available Wi-Fi networks and click it. Your Deeper START is now connected with your iphone or ipad - you might see No Internet Connection written. Don t worry, this is normal. It simply means that your mobile device s WiFi connection is now being used for your Deeper START and not the internet.
30 You can try your fishfinder at home, but you probably won t see fish accurately If you put your Deeper START in a fish tank, cup, bucket, bathtub, or similar container at home you will be able to turn the device on and pair it with your mobile device. But most likely the device won t be able to scan properly you will probably just see an empty screen and the status message: Too shallow or too deep. Don t worry, this is normal. Your Deeper START is a sensitive sonar device that is designed for scanning in wide open waters like rivers, lakes, and the sea. In small, shallow and enclosed waters the sonar tries to scan, but receives too many sonar returns from the bottom and walls of your tank and cannot make an accurate reading. Just try it at a real fishing spot and you ll get a real result!
31 Deeper Smart Sonar PRO+
32 Technical Specifications

33 Weight: 3.5oz / 100g Size: 65mm / 2.5in in Diameter Sonar Type: Dual Beam Frequency (Beam cone): 290 khz, 15 and 90 khz, 55 Depth Range Max/Min: Max 260ft / 80 m, Min 2ft / 0.5m Sonar Scan rate: Up to 15 scans per second Operating Temperature: -20 C to 40 C / -4 F to 104 F Internal Battery: Lithium Polymer, 3.7V Rechargeable, 850mAh Power Supply input: Micro USB B type, 5V DC, 450mA max (for charging battery) Power Adapter Input: AC 110V/240V. Output Micro USB, 5V 450mAh Wireless connection type: Wi-Fi GPS Positioning: L1 48 channel GPS receiver, high 3m@50% accuracy Casting Range: Up to 330ft / 100m. Range depends on the OS and smartphone model Battery Life: Up to 6 hours Charging Time: 2 hours Status bar On the top right corner, you will find the Status Bar. Status Bar shows the most essential information from left to right: status of your Deeper sonar, time, battery life and so on. Current Status (left side of the status bar) shows the current status of your Deeper sonar: Charging - Your sonar is plugged in to a power source and the battery is charging. Connected - Your Deeper Sonar is successfully connected to your mobile device. Not Connected - The connection between your Deeper Sonar and your mobile device has not been established or was interrupted. Out of water - Your sonar device is out of the water but is still connected to your mobile device. GPS found The GPS connection of your Deeper is accurate enough for bathymetric mapping. This status appears only in On-shore GPS mode (PRO+ or CHIRP+ models). Looking for GPS The GPS connection of your Deeper is being established. This status appears only in On-shore GPS mode (PRO+ or CHIRP+ models). Click here for the tips on how to increase the GPS connectivity. Too shallow or too deep - Your sonar is unable to get an accurate depth reading. The most common cause of this is
34 that the water is too shallow or too deep. Deeper sonars have depth requirements for accurate scanning: Deeper PRO, PRO+ Narrow beam min depth 2ft / 0.5m; Wide beam min depth 4.3ft / 1.3m Max depth (both beams) 260ft / 80m Deeper START Min depth 4.3ft / 1.3m; Max depth 160ft / 50m Deeper 3.0 Narrow beam min depth 2ft / 0.5m; Wide beam min depth 4.3ft / 1.3m Max 130 ft / 40 m Deeper CHIRP+ Min depth: 5.9 in / 0.15 m. Narrow CHIRP 23.6 in / 0.6 m. Medium CHIRP 31.4 in / 0.8 m. Wide CHIRP Max depth (all beams): 328 ft. / 100 meters This message can also appear if the sonar has tilted as it is being reeled in or trolled, which results in it not scanning straight down (click here for instructions). It will also be shown if you are scanning in contained waters like bathtubs or swimming pools. Time: Shows current time. Device battery: Shows the battery charge percentage of your smart device and the Deeper sonar. Water temperature and movement speed: Shows water temperature and boat movement speed, if your sonar is set to Boat mode (not supported in Deeper Start model) Settings opens sonar settings menu. Sharing, printing and downloading Select any scan and click on the expandable menu (three dots): - Printing: will allow you to print out the map. - Bathymetry: Auto and Fast displays will use the exact mapping data you gathered to fill in estimated depths for sections nearby. The Detailed option will show only the exact data that your Deeper gathered.
35 - Sharing: The third icon on the menu is for sharing. Click this and a unique link will be created. Then just copy the link and send it to anyone you want to share this map or scan with.please note that only bathymetric map can be shared at the moment, and it is not possible to share the sonar scan data. - Downloading: The fourth icon is for downloading your data. Click this icon and you will get a download of all your mapping data in CSV format. You can then use this raw data in other mapping applications and programs. It is only possible to export data that was created in Boat or On-shore GPS modes. Recordings made using Standard and Ice Fishing modes contain only the sonar data, which cannot be exported. Pamati laivu un kajaku makšķerēšanai ar Deeper Deeper PRO, PRO + un CHIRP + ir piemēroti velcēšanai no kajaka vai laivas, izmantojot Deeper Flexible Arm Mount. Varat arī izmest šīs ierīces no laivas, lai skenētu grūti sasniedzamus punktus vai izvairītos no velcēšanas pa mērķa apgabaliem. Deeper START ir piemērots lietošanai no kajaka vai laivas. Velcēšana Kad esat piestiprinājis savu Deeper PRO, PRO + vai CHIRP + kajakā vai laivā, izmantojot Deeper Flexible Arm Mount, esat gatavs doties velcēt. Velcēšana ar lielāku ātrumu (piemēram, 3,5 jūdzes stundā / 5 km / h) ir piemērota, lai iegūtu vispārīgus dziļuma rādījumus. Palēniniet ātrumu līdz 2 jūdzēm stundā / 3 km / h vai lēnāk, lai precīzi atrastu zivis un detalizēti pārbaudītu zemūdens struktūru. Kartēšana Deeper App izmanto GPS jūsu viedtālrunī vai planšetdatorā, lai izveidotu batimetrisks (zemūdens kontūras) kartes. Lai veiktu šo funkciju, izvēlieties laivu režīmu (Iestatījumi> Sonar> Sonar Mode> Laivas režīms). Jūs saņemsiet sadalītu ekrānu, kurā būs redzami gan kartēšanas, gan hidrolokatoru rādījumi. Ja izmantojat Deeper PRO vai PRO +, augstākai kartēšanas precizitātei ieteicams izmantot šauro staru (290 khz). Ja izmantojat CHIRP +, iesakām izmantot High CHIRP vai Mid CHIRP, lai kartēšanas precizitāte būtu augstāka. Skenēšana Skenēšanu varat turpināt laivu režīmā (dalītā ekrāna displejā tiks parādīts arī skenētais un jūs varat pielāgot, cik lielu daļu ekrāna aizņem karte) vai pārslēgties uz standarta režīmu pilnekrāna skenēšanas displejam. Neaizmirstiet, ka ir 3 krāsu paletes, no kurām izvēlēties (Settings > Sonar > Screen Color Mode). Attaching for shore fishing To set up for shore fishing with your Deeper, follow these steps: Ensure the top cover is screwed on tightly, with the Water Proof marks perfectly aligned. To screw the top
36 cover on, turn it anti-clockwise until it dips, then turn it clockwise until it is screwed on tightly. Take an attachment bolt and securely tie it to your fishing line. Now screw the attachment bolt firmly into the correct attachment point. If you are fishing from a dock or pier, use the middle attachment point. If you are fishing from the shore, use the bottom attachment point. Please only use 1 attachment bolt the second bolt that comes in the box is a spare. Please ensure you use the correct attachment point. Using the wrong attachment point will cause the device to tilt in the water, affecting connectivity and the accuracy of the sonar readings. Before you cast out your Deeper sonar, it is very important to ensure it is correctly attached to your line and rod. Every time you attach your Deeper sonar, please be careful to attach it correctly and check these points: 1. Is your line passing correctly through the tip top (the last and smallest line guide on your rod)? If the line is looped or knotted here, the line can break when casting and you could lose your sonar. 2. Are you using good quality line that is not worn or frayed? Is the line firmly tied to the attachment bolt on your Deeper? This is important because your sonar could be lost if it is not tied securely. Kā atrast zivis, izmantojot detalizētu attēlveidošanas režīmu? (PRO sērija un CHIRP +) Ir 2 veidi, kā zivis tiek parādītas lietotnē Deeper. Vienkāršākais veids, kā tos atklāt, ir ieslēgt Zivju ikonas. Šeit lietotne interpretē hidrolokatoru rādījumus, identificējot dažus no tiem kā zivis. Zivju ikonām ir 3 izmēri - mazas,


37 vidējas un lielas. Pareiza zivju un tās lieluma identificēšana ir atkarīga no daudziem mainīgiem lielumiem, un zivju svars ir tikai viens no tiem. Zivju ikonas nav visprecīzākais veids, kā spriest par zivju lielumu, jo algoritms varētu parādīt vienu lielāku zivi, ja patiesībā patiesībā ir dažas mazas zivis. Visprecīzākais veids, kā novērtēt zivju lielumu, ir izslēgt Zivju ikonas. Ja zivju ikonas ir izslēgtas, zivis tiks parādītas kā arkas vai līnijas. Šim zivju atrašanas veidam ir mācīšanās līkne, un sākumā tas var šķist mulsinošs. Bet ar prakses palīdzību jūs varēsiet noteikt, kas ir zivs un cik liela tā ir. Šeit jūs varat atrast padziļinātu ceļvedi par šo zivju noteikšanas veidu: Zivju un zemūdens objektu atrašana ar PRO sēriju Zivju un zemūdens objektu atrašana, izmantojot CHIRP + Daži zivju piemēri sonāra ekrānā: Daudz mazu zivju parādītas ar zivju ikonām un bez tām Zivju arkās ir redzamas dažas mazas zivis blakus viena otrai, bet maza izmēra iemesls ir zems jutības iestatījums. Patiesībā zivis bija daudz lielākas. Karpas, kas redzamas lietotnē un patiesībā Automašīna zem ūdens
; Too shallow or too deep message. Most often, the reason behind these inaccurate readings is the fact that the sonar is moving sideways.")
38 Inaccurate sonar readings Sometimes the Deeper App displays incorrect depth or inaccurate sonar readings, like these: The Depth reading is shown as much deeper than in reality; Sonar noise (clutter of small dots or lines on the screen of the sonar); Too shallow or too deep message. Most often, the reason behind these inaccurate readings is the fact that the sonar is moving sideways. This may occur, for example, just after the Deeper hits the water after being cast out, when there are heavy waves, or when it is tilting because it is being reeled/trolled too fast. The Deeper App will start displaying the correct depth as soon as unit stabilizes in the water. The PRO, PRO+ and 3.0 require at least 2ft / 0.5 m minimum depth in order to operate when using the wide beam, and at least 4.3 ft / 1.3 m when using the narrow beam. The Deeper START requires 2ft / 0.5 m. For the PRO, PRO+ and 3.0, using the correct attachment position is essential to ensure the stability of the device when it is being reeled back. When fishing from a dock or bridge, screw your attachment bolt to the middle attachment point. Use the bottom one if you're fishing from the shore. It is important that your Deeper does not tilt when being reeled in / trolled. When it tilts it scans the water surface rather than the bottom, resulting in inaccurate sonar readings and connectivity issues. If these tips do not solve the issue, please reach out to the Deeper Support team.
39 Attaching for shore fishing To set up for shore fishing with your Deeper, follow these steps: Ensure the top cover is screwed on tightly, with the Water Proof marks perfectly aligned. To screw the top cover on, turn it anti-clockwise until it dips, then turn it clockwise until it is screwed on tightly. Take an attachment bolt and securely tie it to your fishing line. Now screw the attachment bolt firmly into the correct attachment point. If you are fishing from a dock or pier, use the middle attachment point. If you are fishing from the shore, use the bottom attachment point. Please only use 1 attachment bolt the second bolt that comes in the box is a spare. Please ensure you use the correct attachment point. Using the wrong attachment point will cause the device to tilt in the water, affecting connectivity and the accuracy of the sonar readings. Before you cast out your Deeper sonar, it is very important to ensure it is correctly attached to your line and rod. Every time you attach your Deeper sonar, please be careful to attach it correctly and check these points: 1. Is your line passing correctly through the tip top (the last and smallest line guide on your rod)? If the line is looped or knotted here, the line can break when casting and you could lose your sonar. 2. Are you using good quality line that is not worn or frayed? 3. Is the line firmly tied to the attachment bolt on your Deeper? This is important because your sonar could be lost if it is not tied securely.
40 Attaching and connecting Attach your Deeper START carefully and securely Before you cast out your fishfinder, it is very important to ensure it is correctly attached to your line and rod. Every time you attach your Deeper START, please be careful to attach it correctly and check these points: 1. Is your line passing correctly through the tip top (the last and smallest line guide on your rod)? If the line is looped or knotted here, the line can break when casting and you could lose your fishfinder. 2. Are you using good quality line that is not worn or frayed? 3. Is the swivel clip fully and correctly closed? This is important because your fishfinder could be lost if the clip is not closed correctly. Switch on your Deeper for scanning Launch the Deeper app in your smartphone or tablet, then put your fishfinder in the water close to where you are (no further than 2m / 6ft). Your Deeper START will automatically turn on and connect with your mobile device. If your Deeper START is in the water but doesn t connect with your mobile device (in the Deeper app you will see the status message Deeper is disconnected at the bottom of the screen), please follow these steps: 1. Open settings in your mobile device and make sure that Wi-Fi is on. 2. Make sure your Deeper START s battery is charged. When you re out on your fishing trip you can connect your fishfinder to a car charger or a portable power bank and check which light shows. If the battery is empty, charge it! 3. Check the temperature. The Deeper START has an operating range of 0 C to 40 C / 32 F to 104 F. Please note that water and air temperature may be different, and here water temperature is most important. 4. Make sure you are using a compatible mobile device and you are using the latest version of the app. 5. If the devices still don t connect, contact our support.
41 Deeper Smart Sonar CHIRP+ TECHNICAL SPECIFICATION Material: ABS enclosure, Titanium inserts Sonar type: 3 Frequency CHIRP Narrow CHIRP 675 khz (cone angle 7 ) Medium CHIRP 290 khz (cone angle 16 ) Wide CHIRP 100 khz (cone angle 47 ) Target separation: 1 cm. / 0.4 in Narrow Chirp 2.4 cm. / 0.94 in Medium Chirp
42 2.4 cm. / 0.94 in Wide Chirp Depth Range: 15 cm. / 6 in 100 m. / 330 ft Sonar Scan Rate: Up to 15 / second Sonar modes: Standard, Ice fishing, Boat, Onshore GPS Temperature sensor: Water surface temperature sensor in Fahrenheit / Celsius Operating temperature: -20 C to 40 C / -4 F to 104 F GNSS (Global positioning systems supported): GPS, GLONASS, Galileo, BeiDou, QZSS Operating time: GPS ON up to 4.5 hours GPS OFF up to 6 hours Charging technology: Fast charge 80% in 45 min. 100% in 75 min. Internal battery: Lithium Polymer, 3.7V Rechargeable, 950 mah Power adapter (not included in the box, recommended): Input 110V/220V. Output Micro USB, 5V 2A Connection Type: Wi-Fi Connection Range: Stable connection up to 100 m. / 330 ft. Color: Military Green Kasting og skanning Kast Deeper CHIRP + til stedet du vil skanne (opptil 100 m / 330 ft unna) og sveiv det inn igjen. Når du sveiver sakte inn, vil du se undervannsskanninger på smarttelefonen eller nettbrettet.
43 Hold smarttelefonen / nettbrettet i en posisjon der det enkelt kan fange opp signalet fra ekkoloddet når du kaster ut og ruller inn Deeper-ekkoloddet. Hvis smarttelefonen / nettbrettet ligger på bakken eller i lommen, kan forbindelsen bli ustabil. Vi anbefaler at du bruker Deeper smarttelefonmontering for fiskestenger. Med CHIRP + kan du også opprette kart over undervannstopografi mens du kaster. Følg disse trinnene: Velg Landbasert GPS-modus (innstilling > ekkoloddmodus > Landbasert GPS). Kast ut en kort avstand, og vent på at satellittikonet går fra blinkende oransje (søker) til grønt (GPS-tilkobling er etablert). Når ikonet er grønt kan du kaste til det stedet du vil kartlegge, og sveive inn. Kartet i Deeper-appen fylles ut med fargekodede dybdedata. Vi anbefaler at du bruker middels eller brede CHIRP-stråler til batymetrisk kartlegging. Smal CHIRP-stråle kan gi unøyaktige avlesninger dersom Deeper er ustabil i vannet for eksempel når det er bølger eller vind. Vær oppmerksom på at det kan ta litt tid før GPS-systemet fanger opp posisjonen din, spesielt hvis du ikke har brukt enheten på en stund. Når du kaster mange ganger kan det hende at satellittikonet endres fra grønt og tilbake til blinkende oransje mellom kastene. Vent til ikonet blir grønt igjen. Et rødt satellittikon betyr at GPS-signalet ikke er tilgjengelig. Dette kan skyldes værforhold, det omkringliggende landskapet, konfigurasjonen av selve satellittene, eller at signalet fra Deeper-ekkoloddet hindres av noe. Pamati ledus makšķerēšanai Deeper PRO, PRO + un CHIRP + ir piemēroti zemledus makšķerēšanai - tie darbojas temperatūrā līdz -20 C / -4 F. Deeper START nav paredzēts zemledus makšķerēšanai - tas darbojas temperatūrā līdz 0 C / 32 F. Ja izmantojat savu PRO / PRO + / CHIRP + zemledus makšķerēšanai, ieslēdziet zemledus makšķerēšanas režīmu (Settings > Sonar Mode > Ice Fishing). Iespējojot šo iestatījumu, tiek iegūtas vislabākās zemledus makšķerēšanas displeja iespējas un automātiski konfigurēti vislabākie hidrolokatoru iestatījumi zemledus makšķerēšanai. Izurd un Iemet
44 Kad esat izurbis ledus caurumu, varat vienkārši iemest Deeper hidrolokatoru, lai sāktu skenēšanu. Auklu jeb pīto auklu savam Deeper nav nepieciešams piestiprināt, lai gan jūs to varat izvēlēties, lai to viegli izņemtu no ledus cauruma - šajā gadījumā auklas piestiprināšanai izmantojiet augšējo stiprinājuma punktu. Deeper automātiski ieslēgsies ūdenī, pēc tam sinhronizēs viedtālruni un sāks skenēšanu. Lūdzu, ņemiet vērā, ka ļoti aukstos apstākļos uz diviem elektriskiem mezgliem, kas atrodas Deeper apakšā, var uzkrāties ledus, un tas var novērst ierīces ieslēgšanos. Vienkārši notīriet ledu no diviem mezgliem un ielieciet Deeper atpakaļ ledus caurumā, un tas varētu atrisināt problēmu. Ledus Biezums Deeper sonārs peld uz ūdens virsmas (nevis ir iegremdēti kā citi ledus mirgotāji). Tas nozīmē, ka tad, kad ledus ir ļoti biezs, hidrolokatoru var neskenēt pareizi, jo hidrolokatoru konuss iesit ledus cauruma malās un hidrolokatoru impulsi tiek atspoguļoti atpakaļ. Lai no tā izvairītos, varat darīt divas lietas: urbiet lielākus ledus caurumus, ja ledus ir ļoti biezs. Tas samazinās iespēju, ka hidrolokatoru konuss varētu iesist ledus cauruma pusē. pārliecinieties, vai jūsu Deeper sonārs ir novietots tieši ledus cauruma centrā. notīriet ledus caurumu no ledus un sniega. ja jūs izmantojat CHIRP +, ieslēdziet High CHIRP staru (7 ) Baterija Jums jāzina, ka temperatūrā, kas ir zemāka par sasalšanu, gan jūsu Deeper ierīces, gan viedtālruņa / planšetdatora akumulatori ātrāk izlādēsies. Lai novērstu šo, rīkojieties šādi: Deeper Baterija 1. Pirms jebkura brauciena pārliecinieties, vai akumulators ir pilnībā uzlādēts. 2. Ja nelietojat to, izņemiet Deeper zivju meklētāju no ūdens un turiet to izolētu (piemēram, neoprēna maisiņa iekšpusē, kas nāk ar Deeper PRO / PRO + / CHIRP +, vai kabatas iekšpusē). 3. Turiet uzlādes banku, lai uzlādētu Deeper ceļojuma laikā. Lūdzu, atcerieties, ka jūsu Deeper litija jonu akumulatoru var uzlādēt tikai temperatūrā 3 C / 37,4 F vai augstāk (kad sākat uzlādēt Deeper, zilas gaismas diode parādīs, vai apstākļi ir pārāk auksti uzlādei). Labas iespējas ir uzlāde automašīnā vai sasildītā ledus vaigā. Viedtālruņa baterija 1. Pirms ceļojuma pārliecinieties, vai viedtālrunis / planšetdators ir pilnībā uzlādēts. 2. Izmantojiet Deeper Winter Smartphone Case, lai izolētu viedtālruni tā lietošanas laikā, tādējādi saglabājot tā akumulatora darbības laiku. 3. Lai jums būtu iespēja viedtālruni uzlādēt ceļojuma laikā, jums ir rokas banka. Atrodi pareizo vietu Spriežot pēc tā, ja makšķerējat pareizajā vietā, ir vienkārši. Vienkārši nometiet Deeper ledus caurumā. Dziļums tiks parādīts apļveida mirgojošā displeja centrā un displeja ekrāna augšējā labajā stūrī. Varat arī meklēt veģetāciju, izmantojot displeja ekrāna tradicionālo sonāru sadaļu, kur tā tiks parādīta zaļā krāsā. Šī informācija par veģetāciju un dziļumu var palīdzēt jums izlemt, vai šī ir piemērota vieta zvejai. Efektīva pieeja ir arī ledus caurumu režģa urbšana. Kad esat izurbis savu režģi, varat iemest Deeper katrā caurumā, lai uzraudzītu, kā mainās dziļums, un atrastu labāko vietu. Visbeidzot, ja jums ir izdevies kartēt apgabalu vasarā, izmantojot savu laivu / kajaku, vai no krasta ar savu Deeper PRO + vai CHIRP +, varat izmantot karti, lai atgrieztos labākajās vietās cietā ūdens sezonā.
45 Zivju marķēšana un ēsmas izsekošana Zemledus makšķerēšanas displejs lietotnē Deeper sniedz jums vairākus veidus, kā atrast zivis, izsekot jūsu vilinājumam un redzēt, kā zivis reaģē uz jūsu darbībām. Kreisajā pusē ir tradicionālais apļveida zibspuldzes displejs, vidus daļā labajā pusē ir sonāra displejs, bet labajā malā tālajā pusē ir vertikālā zibspuldze. Sonāra displejs: tas ir tāds pats kā standarta displejs skenēšanai no krasta. Zilā josla, kas parādīta augšpusē, ir ledus, oranžā josla - apakšā, apakšā, un visi starp tām attēlotie priekšmeti ir vai nu zivis, vai arī jūsu ēsma. Kreisās puses izvēlnē varat pielāgot šī displeja jutīgumu un mainīt krāsu paleti uz dienas vai nakts paletēm (Settings > Sonar > Screen Color Mode). Tradicionāls apļveida mirgojošais indikators: šis displejs ir tieši tāds pats kā tradicionālais ledus mirgojošais indikators. Centrā redzēsiet parādīto dziļumu un virszemes ūdens temperatūru. Apkārt ir faktiskais gaismas signāls. Pašā augšā jūs redzēsiet zilas / pelēkas krāsas joslu - tas ir pats ledus. Pēc tam sekojiet displejam pulksteņrādītāja virzienā, līdz redzat brūnu / oranžu krāsu joslu - tā ir apakšdaļa. Jebkas, kas tiek parādīts starp ledu un dibenu, būs jūsu ēsma vai zivs. Tās tiks parādītas kā zaļas / dzeltenas krāsas joslas. Vertikālais zibspuldze: displeja labajā pusē ir vertikālais zibspuldze. Visi hidrolokatoru rādījumi ir parādīti baltā krāsā uz melna fona. Pašā augšpusē jūs redzēsiet baltu lāsi, kas nedaudz pārvietojas - tas ir ledus. Tad displeja apakšā būs bieza balta forma, kas apakšā sašaurinās - tā ir grunts. Jebkura ēsma, džiga vai zivis tiks parādītas starp šīm divām kā kustīgas baltas joslas. Joslas lielums un biezums ļauj norādīt objekta lielumu. Tālummaiņa: lai iespējotu tālummaiņu, atveriet kreiso izvēlni. Augšpusē redzēsit divas iespējas - Detalizēta un Tālummaiņa. Izvēlieties tālummaiņas displeju. Tagad uz vertikālās mirgošanas ierīces tiks parādītas divas sarkanas līnijas (tas nosaka apgabalu, kas tiks tuvināts) un vēl divas sarkanas līnijas ar dziļuma nolasījumiem tur, kur iepriekš bija sonāra displejs (šeit tiek parādīts tuvināts displejs). Veiciet šīs darbības, lai iestatītu tuvinājumu līdz dziļumam, kuru vēlaties pārraudzīt: 1. Iestatiet tuvināmā apgabala lielumu. Lai to izdarītu, novietojiet īkšķi kaut kur vertikālās zibspuldzes displeja apakšējā daļā un rādītājpirkstu kaut kur vertikālā zibspuldzes displeja augšējā daļā. Lai tuvinātu apgabalu padarītu lielāku, pārvietojiet īkšķi un pirkstu atsevišķi - sarkanās līnijas atdalīsies. Lai tuvinātu apgabalu padarītu mazāku, pārvietojiet īkšķi un pirkstu kopā - redzēsiet, ka sarkanās līnijas pārvietojas kopā. 2. Pārvietojiet tuvinātu apgabalu uz ūdens dziļuma daļu, kuru vēlaties pārraudzīt. Lai to izdarītu, vienkārši novietojiet pirkstu kaut kur starp divām sarkanajām līnijām uz vertikālā stara un pēc tam, turot pirkstu piespiestu ekrānam, pārvietojiet pirkstu uz augšu vai uz leju. Jūs redzēsiet, ka tuvinātais apgabals pārvietojas ar pirkstu - dziļuma rādījumi kreisajā pusē automātiski mainīsies. Varat tos uzraudzīt, lai pārliecinātos, ka esat pareizā dziļuma diapazonā. Piemēram, ja vēlaties tuvināt apgabalu 20 pēdas / 6 metri un zemāk, velciet laukumu uz leju, līdz augšējās sarkanās līnijas dziļuma rādījums parāda 20 pēdas / 6 metri. 3. Sīki pārraugiet zemūdens darbību. Tagad visi objekti, kas parādās jūsu iestatītajā tuvinātajā apgabalā, tiks detalizēti parādīti pa kreisi no vertikālās mirgošanas ierīces. Tas ļauj precīzi izsekot visiem mērķiem - īpaši zivju baros - un reālā laikā novērot, kā zivis reaģē uz jūsu pievilinājumu. Karte un GPS ledus āliņģa marķēšana
46 Ledus makšķerēšanas displejam ir arī kartēšanas funkcija (lai nodrošinātu šīs funkcijas darbību, pārliecinieties, vai esat reģistrēts lietotājs un vai esat lejupielādējis jūsu valsts vai valsts bezsaistes kartes). Displeja kreisajā pusē redzēsit kartes ikonu. Noklikšķinot uz tā, tiks atvērta karte, kurā parādīta jūsu pašreizējā atrašanās vieta. Iemetot Deeper ledus caurumā, šī vieta automātiski tiks atzīmēta jūsu kartē un saglabāta. Makšķerējot vairākos āliņģos, tie tiks pievienoti arī jūsu kartei. Noklikšķinot uz vienas no šīm vietām, tas automātiski parādīs dziļumu attiecīgajā vietā. Pēc makšķerēšanas sesijas varat doties uz lietotnes sadaļu Vēsture (History) un noklikšķināt uz makšķerēšanas sesijas. Šeit tiks parādīta jūsu karte ar visiem ledus caurumiem. Pēc tam vienkārši noklikšķiniet uz āliņģa, un jūs redzēsiet šīs vietas skenēšanu, kā arī skenēšanas sesijas ūdens tempu, datumu un laiku. Lūdzu, ņemiet vērā, ka lietotne Deeper šai funkcijai izmanto viedtālruņa vai planšetdatora GPS (nav nepieciešams interneta savienojums). Lai precīzi noteiktu vietas atrašanās vietu, lūdzu, pārliecinieties, ka, pirmo reizi nolaižot Deeper, viedtālrunis atrodas 3 pēdu / 1 metra attālumā no āliņģa. Makšķerējot vairākos āliņģos Izmantojot savu bezvadu diapazonu 330 pēdas, Deeper PRO / PRO + / CHIRP + ļauj jums novērot āliņģi no attāluma. Tas nozīmē, ka jūs varat makšķerēt vienā āliņģī, bet Deeper - citā, tāpēc jūs varat uzraudzīt aktivitātes arī šajā caurumā. Sonāra traucējumi no citiem stariem Ja netālu no jūsu āliņģa tiek izmantoti citi sonāri, šīs vienības var radīt traucējumus hidrolokatorā. Tas var ietekmēt sonāra nolasījumu precizitāti, ko iegūstat no sava Deeper.Cenšaties ieturēt pēc iespējas lielāku distanci no blakus esošiem sonāriem. Casting and scanning Cast your Deeper CHIRP+ to the spot you want to scan (up to 100 m / 330 ft away) and reel it back in. As you

47 slowly reel back, you will see underwater scans shown on your smartphone or tablet. When you cast and reel in your Deeper sonar, keep your smartphone/tablet in a position where it can easily pick up the signal from your sonar. If your smartphone / tablet is on the ground or in your pocket, the connection may be unstable. We recommend using the Deeper Smartphone Mount for rods. With the CHIRP+, you can also create underwater topography maps as you cast. Follow these steps: Select Onshore GPS mode (Settings > Onshore GPS). Cast out a short distance and wait for the satellite status to change from Looking for GPS to GPS found When the status is changed to GPS found, cast to the spot you want to map, and reel in. The map on the Deeper App will fill in with color-coded depth data. Please note it can take some time for the GPS system to pick up your position, especially if you have not used your device for some time. When making a series of casts, it is possible the GPS status will change back to Looking for GPS between casts. Please wait for the status to change back to GPS found. If the status doesn t change to GPS found for a long time, this can be caused by weather conditions, the surrounding landscape, the configuration of the satellites themselves, or if the signal from your Deeper Sonar is obstructed by something. Ledus makšķerēšanas režīms (PRO sērija un CHIRP +) Deeper sonāri ir izturīgi pret aukstumu un ir izstrādāti, lai darbotos ziemas apstākļos (tas neietver Deeper START). Standarta ekrānam zemledus makšķerēšanas režīmā ir tradicionāls zemledus makšķerēšanas displejs, lai uzraudzītu apstākļus zem ledus. Labās puses displejā redzamais amplitūdas diapazona režīms (vertikālais zibspuldze) ļauj reāllaikā izsekot pat vismazākās pievilināšanas vai ēsmas kustībai. Dalītā ekrāna displejā vienā ekrānā ir redzami gan parastie sonāri, gan zemledus makšķerēšanas indikatori. Redzot
48 no jums datus, kas padziļināti pārraidīti reāllaikā, ļauj jums sekot katrai zemūdens kustībai, ieskaitot jūsu vilināšanas vai ēsmas kustību un jebkuru zivju atrašanās vietu. Varat arī ieslēgt tālummaiņas funkciju, kas atrodama detalizētajos iestatījumos kreisās puses izvēlnē. Palielināšanas funkcija ļauj jums koncentrēties uz noteiktiem objektiem uz vertikālās mirgojošās daļas, kā arī palielināt vai samazināt tuvinātu apgabalu. Tas dod vēl labāku reāllaika vilinājumu un zivju izsekošanu. Tas ir ārkārtīgi precīzs rīks, lai uzraudzītu un reaģētu uz visām zemūdens darbībām. Ja pamanāt zivis, izmantojiet palielināšanas funkciju, lai palielinātu novērošanu, pēc tam mērķējiet to ar savu ēsmu. GPS āliņģa marķēšana. Deeper App ierakstīs un saglabās visus zivju ledus caurumus tieši kartē ar GPS Ice Hole Marking funkciju. Katrai jaunai jūsu atrašanās vietai jūsu kartē tiks atzīmēta jauna vieta. Tiks saglabāti arī visi dati, kurus jūsu Deeper uztver šajā vietā. Tātad jūs galu galā iegūsiet detalizētu informāciju par katru āliņģi, kuru varēsiet izmantot atkal nākamreiz, kad zvejosiet šajā vietnē (karte ir pieejama bezsaistē). Šī funkcija izmanto GPS tālrunī vai planšetdatorā, tāpēc pārliecinieties, vai ierīce ir pēc iespējas tuvāk āliņģim, kurā makšķerējat, kad pirmo reizi ievietojat Deeper; pēc pāris sekundēm jūsu atrašanās vieta tiks atzīmēta, un jūs varat pārvietot savu tālruni prom. Uploading your data to Lakebook The maps and scans you create in the Deeper App will automatically sync with the Deeper cloud server. It takes 24 hours for the scans to be synced automatically. Once they are synced, you can access them on Lakebook. To check if a fishing session has been synced, go to History in the Deeper App. Here you will find a record of all your fishing sessions with your Deeper. If a session has been synced, it will have a cloud icon with a tick. If it has not been synced yet, the icon will be only the outline of a cloud with no tick. To sync any unsynced sessions, press the icon in the top right corner of the screen a white cloud with an up arrow. It can take up to one minute for new data to be added to Lakebook from the App. You should also refresh the Lakebook web page for the new data to be visible. You can read more about data synchronization here. LED indicator and battery issues If you are experiencing any issues with the charging of the device, please connect your Deeper PRO, PRO+ or 3.0 to a charger and check the color of the light indicator. This will show the status of the battery. A blinking orange light means that the battery is charging, and there are no issues. It takes roughly 2 hours to fully charge the battery from 0% to 100% A green light means that the battery is fully charged A blue light means that it is too cold to charge the battery. Lithium batteries cannot be charged at a temperature below 3 C (37.4 F). A white light means that the unit requires a firmware update. Make sure that your Deeper App is up to date,
49 and then pair with your Deeper via the Deeper App while the unit is being charged. The firmware update will be initiated. A red light or no light at all means that there may be an issue with the battery or the charging cable. Please try plugging the cable in and out for few times, as well as trying a different micro USB type B cable. If the problem persists, please contact Deeper Support. QUICK GUIDE (PRO/PRO+) Casting and scanning Cast your Deeper PRO or PRO+ to the spot you want to scan (up to 100 m / 330 ft away) and reel it back in. As you slowly reel back, you will see underwater scans shown on your smartphone or tablet.
50 With the PRO+, you can also create underwater topography maps as you cast. Follow these steps: When you cast and reel in your Deeper sonar, keep your smartphone/tablet in a position where it can easily pick up the signal from your sonar. If your smartphone / tablet is on the ground or in your pocket, the connection may be unstable. We recommend using the Deeper Smartphone Mount for rods. Select Onshore GPS mode (Settings > Onshore GPS). Cast out a short distance and wait for the satellite status to change from Looking for GPS to GPS found When the status is changed to GPS found, cast to the spot you want to map, and reel in. The map on the Deeper App will fill in with color-coded depth data. Please note it can take some time for the GPS system to pick up your position, especially if you have not used your device for some time. When making a series of casts, it is possible the GPS status will change back to Looking for GPS between casts. Please wait for the status to change back to GPS found. If the status doesn t change to GPS found for a long time, this can be caused by weather conditions, the surrounding landscape, the configuration of the satellites themselves, or if the signal from your Deeper Sonar is obstructed by something.
51 Casting and scanning Cast your Deeper START to the spot you want to scan and reel it back in. As you reel back, look at the underwater scans shown on your smartphone or tablet. When you cast and reel in your Deeper START, keep your smartphone/tablet in a position where it can easily pick up the signal from your fishfinder. If your smartphone / tablet is on the ground or in your pocket, the connection may be unstable. We recommend using Deeper Smartphone Mount for rods. Connection and playback
.")


52 Connection button is found on the bottom right corner of the main screen. This button will serve as a main tool for controlling the connection and sonar data playback of your Deeper sonar. Press this button to establish a connection with your Deeper sonar (your Deeper sonar needs to be turned on: either placed in the water or connected to a charger). Once you are connected to your Deeper sonar, the Connection button will change to Start/Pause button. Press Start to beging your scanning session. If you click the Pause button, your scanning will be paused and the Deeper sonar will go into a Power save mode: Once in Power save mode, Wi-Fi connection with your Deeper is still active, but the sonar will not record any data, thus preserving the battery. You can resume the scan at any time. Rewind When your Deeper sonar is connected and scanning, you can rewind the scan by pressing anywhere on the screen and scrolling it to the left. This is helpful in case you ve missed something and wish to go back and review it again. When rewinding, a button with an arrow will appear - you can press in order to go back to the most recent sonar data.

53 Kā pareizi lietot Deeper Sonar Savienoja maksimizēšana Visas Deeper ierīces izveido savu Wi-Fi signālu, ko izmanto sonāra datu nosūtīšanai uz viedtālruni vai planšetdatoru. Interneta vai mobilā tīkla signāls nav nepieciešams. Lūdzu, ņemiet vērā, ka maksimālo savienojuma diapazonu 100 m / 330 pēdas PRO / PRO + / CHIRP +, 50 m / 165 pēdas, START 40 m / 130 pēdas Deeper 3.0 var sasniegt tikai perfektos apstākļos. Spēja sasniegt maksimālo savienojuma diapazonu ir atkarīga arī no izmantotā viedtālruņa / planšetdatora - viedtālruņi / planšetdatori ar spēcīgu uztveršanas antenu ļaus sasniegt maksimālo savienojuma diapazonu. Viedtālruņa un planšetdatora uzstādījumi Sīkāku skaidrojumu, kā izveidot savienojumu ar dziļāku ierīci, varat atrast mūsu rokasgrāmatā. Lai sasniegtu maksimālo savienojuma diapazonu, jums vajadzētu izslēgt mobilo datu savienojumu. Ja jums ir iphone vai ipad, jums vajadzētu arī izslēgt Wi-Fi Assist funkciju. Šī funkcija nozīmē, ka viedtālrunis automātiski pārslēdzas no Wi-Fi signāla uz mobilā tīkla datiem, ja Wi-Fi signāls kļūst vājāks. Tātad, izmetot Deeper sonāru lielākos attālumos, viedtālrunis konstatē, ka Wi-Fi signāls ir palicis vājāks, un pārslēdzas uz mobiliem datiem, atvienojot Deeper. Dažām Android ierīcēm ir līdzīgas funkcijas, ko sauc par Smart Network Switch. Kā novietot Jūsu viedtālruni vai planšeti Vienmēr novietojiet viedtālruni / planšetdatoru tā, lai tas varētu viegli uztvert Wi-Fi signālu no jūsu Deeper sonāra. Kad jūs savienojat pārī ierīces jaunās sesijas sākumā, ielieciet Deeper ierīci ūdenī tuvu viedtālrunim (apmēram 6,5
54 pēdas / 2 metri). Kad ir izveidots Wi-Fi savienojums, jūs varat ierīci izmest tālāk. Vienmēr mēģiniet noturēt viedtālruni / planšetdatoru paaugstinātā stāvoklī attiecībā pret ūdens līniju - mērķējiet uz 3-5 pēdām / 1 1,5 m virs ūdens līnijas. Deeper viedtālruņa stiprinājuma izmantošana makšķerēm ir labs veids, kā noturēt viedtālruni augstā vietā, kur to var viegli savienot ar jūsu Deeper. Nelieciet viedtālruni / planšetdatoru uz zemes vai kabatā, kad neskatāties uz displeju. Tas var bloķēt Wi-Fi signālu, un jums pēc tam būs jāpieslēdzas atkārtoti. Izmantojot viedtālruņa vāciņu / turētāju, kas piestiprināts pie ķermeņa, var tikt traucēta viedtālruņa spēja uztvert Wi-Fi signālu un var rasties savienojuma problēmas. Ja, lietojot šādu vāciņu / turētāju, rodas savienojuma problēmas, noņemiet tālruni no korpusa vai izņemiet to no vāciņa. Telefonu korpusi, kas izgatavoti no metāla vai karbona, var samazināt savienojuma diapazonu. Ja, lietojot šādu lietu, rodas savienojuma problēmas, izņemiet tālruni no vāciņiem. Kā pareizi turēt ierīci peldošu Wi-Fi signāli nevar pārvietoties caur ūdeni. Tas nozīmē, ka, ja jūsu Deeper ierīce ir iegremdēta zem ūdens vai karājas virs tā, signāls nevarēs sasniegt jūsu viedtālruni vai planšetdatoru. Modeļiem PRO / PRO + / CHIRP + / 3.0 izmantojiet apakšējo stiprinājuma punktu krasta makšķerēšanai un vidējo piestiprināšanas punktu liešanai no piestātnes vai tilta. Tas nodrošinās, ka jūsu Deeper ierīce peld pareizi. Makšķerējot ar laivu / kajaku ar Deeper PRO, PRO +, CHIRP + vai 3.0, pārliecinieties, vai laivas puse neaizsedz signālu starp jūsu Deeper ierīci un viedtālruni. Lūdzu, ņemiet vērā: kamēr jūs montējat savu Deeper, laiva var noliekties uz vienu pusi. Tāpēc pārliecinieties, ka, atrodoties laivas vidū, tas ir pareizi novietots un nav noliekts. Lai iegūtu precīzākus hidrolokatoru rādījumus, makšķerējot ar laivu, ieteicamais velcēšanas ātrums ir līdz 2,7 mph / 5 km / h. Ietinot auklu ar spoli, pārliecinieties par to, lai ūdens neiet pāri Deeper sonāram, kas var bloķēt signālu. Tiniet spoli lēnām. Bargos laika apstākļos spēcīgi viļņi var iegremdēt jūsu Deeper ierīci, izraisot Wi-Fi signāla pārtraukšanu. Attaching for kayak, float tube or boat fishing To set up for boat fishing with your Deeper, follow these steps: Ensure the top cover is screwed on tightly, with the Water Proof marks perfectly aligned. Take your Deeper Flexible Arm or Flexible Arm 2.0 and place the security strap on it. Mount your Deeper Sonar to your Flexible Arm Mount: - If you are using a Deeper Flexible Arm, screw your Deeper sonar onto the Flexible Arm Mount using the top attachment point. Then attach the flex arm to your vessel using the crab clamp for optimal security, clamp to a
55 circular object. - If you are using a Deeper Flexible Arm 2.0, first place the plastic node of the flexible arm into the bottom attachment point of your Deeper sonar, then firmly tighten the screw into the middle attachment point. Then attach the G-Clamp to any part of your boat which is 70mm / 2.7 thick or less. Secure the security strap to your vessel. Adjust the flexible column to position your Deeper Sonar so it is semi-submerged in the water. Please always use the security strap when using the Flexible Arm or Flexible Arm 2.0. Do not fully submerge your Deeper Sonar it will be unable to send Wi-Fi signals back to your phone. Laivas režīms (PRO sērija un CHIRP +) Deeper sonārus var viegli uzstādīt uz laivām, kajakiem un pludiņa caurulēm, izmantojot Flexible Arm Mount. Makšķerējot laivu režīmā, velkot, jūs varat izveidot savu zvejas vietu batimetriskas kartes. Darbojoties laivu režīmā, Deeper App uzreiz izveido savienojumu ar GPS viedtālrunī vai planšetdatorā un izveido pielāgotas, reāllaika batimetriskas kartes, kuras varat redzēt ekrāna kreisajā pusē. Lai pārliecinātos, ka laivu režīmā izveidotās batimetriskās kartes ir precīzas, pārliecinieties, vai jūsu Deeper sonārs atrodas tuvu jūsu viedtālrunim vai planšetdatoram, jo tas izmanto viņu GPS moduli. Batimetriskās kartes tiek automātiski saglabātas, un tām var piekļūt vēlāk lietotnes sadaļā Vēsture. Tie tiks augšupielādēti arī jūsu Lakebook kontā. 1. Lai izmantotu šo funkciju, ieslēdziet Laivas režīmu (atrodas augšējā izvēlnes joslā galvenajā iestatījumu laukā). 2. Kartēšanas funkcija ļauj jums uzreiz novērot grunts kontūras detaļas un dziļumu un noteikt labākos zvejas apgabalus. 3. Baltā līnija kartē norāda GPS ierakstu, bet krāsas pakāpe attēlo jūsu kartētās dziļumu un zemūdens kontūras. 4. Lai piekļūtu sonāru skenējumu ierakstiem un batimetriskām kartēm, visām ar neierobežotu datu glabāšanu, dodieties uz funkciju Vēsture, kas atrodas augšējā izvēlnes joslā. Lai iegūtu labāko pieredzi laivu makšķerēšanā, lejupielādējiet bezsaistes kartes (atrodiet tās izvēlnē Iestatījumi). Ja neesat lejupielādējis bezsaistes kartes, lietotne Deeper kartes informācijai izmantos mobilos datus, kas var izraisīt savienojamības problēmas un maksu par mobilajiem datiem. Ja atgriežaties apgabalā, kuru jau esat kartējis, jūs redzēsiet savus iepriekšējos batimetrijas skenējumus, kas parādīti kartē. Varat plānot jaunu atrašanās vietu vai atgriezties tajā, kas jums patīk vislabāk. Turklāt, divreiz noklikšķinot uz krāsainas batimetrijas zonas kartē, jūs iegūsiet informāciju par dziļumu šajā vietā. Deleting your data on Lakebook At the moment, there is no option to delete scans or maps using the Lakebook directly.
56 In order to delete data from Lakebook, you would need to go to the Deeper app -> History. When there, press and hold the scan or map you wish to delete (or swipe it to the left if you're using an ios device). Delete option will appear, and you will need to select "Delete from everywhere". This will result in the scan being deleted both form the phone and Lakebook. Please note that after deleting the scan or map using this method, it will be deleted with no option of recovery. App issues Issues with the app may occur if you re using an outdated version of the app. Issues may include: Incorrect depth measurements; Reduced functionality of app features; Connection issues with your Deeper. There are two ways to ensure that you have the latest version of the Deeper App. The first is to set your phone to automatically download and update apps whenever new versions of the app come out. Another is to check for updates manually by going to the Google Play Store or App Store and searching for the Deeper App. You will then see whether an update is available or not. If you have the latest version of our app but are still experiencing issues, please contact the Deeper support team. Attaching for kayak, float tube or boat fishing To set up for boat fishing with your Deeper, follow these steps: Ensure the top cover is screwed on tightly, with the Water Proof marks perfectly aligned. Take your Deeper Flexible Arm or Flexible Arm 2.0 and place the security strap on it. Mount your Deeper Sonar to your Flexible Arm Mount: - If you are using a Deeper Flexible Arm, screw your Deeper sonar onto the Flexible Arm Mount using the top attachment point. Then attach the flex arm to your vessel using the crab clamp for optimal security, clamp to a circular object. - If you are using a Deeper Flexible Arm 2.0, first place the plastic node of the flexible arm into the bottom attachment point of your Deeper sonar, then firmly tighten the screw into the middle attachment point. Then attach the G-Clamp to any part of your boat which is 70mm / 2.7 thick or less. Secure the security strap to your vessel. Adjust the flexible column to position your Deeper Sonar so it is semi-submerged in the water.
57 Please always use the security strap when using the Flexible Arm or Flexible Arm 2.0. Do not fully submerge your Deeper Sonar it will be unable to send Wi-Fi signals back to your phone. Quick guide (START) Maksimiziranje povezivosti Svi Deeper uređaji stvaraju svoj vlastiti Wi-Fi signal koji se koristi za slanje podataka sa sonara na vaš pametni telefon ili tablet. Nije potreban internet ili signal mobilne mreže. Imajte na umu da se domet veze od 100 m za PRO/PRO+/CHIRP+, 50 m za START, 40 m za Deeper 3.0 može postići samo u idealnim uvjetima. Maksimalan domet veze također ovisi o pametnom telefonu ili tabletu kojim se koristite, oni s jačom antenom omogućit će vam da postignete maksimalan domet veze. Postavke pametnog telefona ili tableta Detaljno objašnjenje o tome kako povezati svoj uređaj Deeper pronaći ćete u našem Kratkom priručniku. Kako biste postigli maksimalan domet veze morate isključiti mobilne podatke. Ako upotrebljavate iphone ili ipad, trebate isključiti i funkciju Wi-Fi Assist. Ta funkcija znači da će se vaš pametni telefon s bežičnog signala automatski prebaciti na mobilne podatke ako bežični signal oslabi. Tako da ako sonar Deeper zabacite na veću udaljenost, pametni telefon prepoznaje da je bežični signal oslabio i prebacuje se na mobilne podatke i time isključuje Deeper. Neki uređaji Androida imaju slične funkcije zvane pametno prebacivanje mreže. Pozicioniranje pametnog telefona ili tableta Pametni telefon ili tablet uvijek smjestite tako da lako primaju Wi-Fi signal sa sonara Deeper. Kada uređaje uparujete na početku nove sesije, Deeper smjestite u vodu blizu svog pametnog telefona (oko 2 m). Kada je Wi-Fi veza uspostavljena, uređaj možete zabaciti malo dalje. Pokušajte pametni telefon ili tablet uvijek držati na povišenoj poziciji u odnosu na površinu vode 1 do 1,5 m iznad površine vode. Korištenje Deeper držača pametnog telefona za štapove dobar je način za držanje telefona na visokoj poziciji s koje se lako može povezati s uređajem Deeper. Izbjegavajte odlaganje pametnog telefona ili tableta na tlo ili u džep kad ne gledate u zaslon. To bi moglo blokirati Wi-Fi signal pa ćete se morati ponovo povezivati.
58 Upotrebljavanje futrole ili držača za pametni telefon koji su pričvršćeni na vaše tijelo može umanjiti mogućnost hvatanja Wi-Fi signala i uzrokovati probleme s vezom. Ako imate problema s vezom za vrijeme upotrebe futrole ili držača na ovaj način, izvadite telefon iz futrole. Futrole za telefone izrađene od metala ili ugljičnih vlakana mogu smanjiti domet veze. Ako naiđete na probleme s vezom za vrijeme korištenja takve futrole, izvadite telefon iz futrole. Kako da uređaj pravilno pluta Wi-Fi signali ne putuju kroz vodu. To znači da ako je uređaj Deeper potopljen ili visi iznad vode, signal neće moći doprijeti do telefona ili tableta. Za modele PRO/PRO+/CHIRP+/3.0 upotrijebite donju točku pričvršćivanja za ribolov s obale ili nasipa i srednju točku pričvršćivanja za zabacivanje s pristaništa ili mola. Tako ćete biti sigurni da Deeper ispravno pluta. Za ribolov s broda ili kajaka s uređajima Deeper PRO, PRO+, CHIRP+ ili 3.0, pobrinite se da strana broda ne blokira signal između uređaja Deeper i pametnog telefona. Imajte na umu da se dok montirate Deeper brod može nagnuti na jednu stranu. Zato se pobrinite da je pravilno pozicioniran dok se nalazite na sredini broda i brod nije nagnut. Za najtočnija očitanja sonara dok pecate s broda, preporučena brzina panulanja je do 5 km/h. Dok sonar Deeper povlačite rolom, povlačite ga polako kako biste spriječili da voda prelazi preko njega i blokira signal. U lošim vremenskim uvjetima jaki valovi mogu potopiti uređaj i na taj način prekinuti Wi-Fi signal. Csónakmód (PRO sorozat és CHIRP+) A rugalmas rögzítővel (Flexible Arm Mount) könnyen rögzítheti a Deeper szonárokat csónakokra, kajakokra vagy vízi járművekre. Amikor Csónakmódban horgászik, vontatás közben batimetrikus térképeket hozhat létre a horgászpontokról. Csónakmódban használva, a Deeper alkalmazás azonnal csatlakozik az okostelefon vagy tablet GPS jeléhez, és egy egyedi, valós idejű batimetrikus térképet hoz létre, amely a képernyő bal oldalán tekinthető meg. A Csónakmódban létrehozott batimetrikus térkép pontosságának biztosítása érdekében ellenőrizze, hogy a Deeper szonár az okostelefon vagy tablet közvetlen közelében legyen, mivel azok GPS modulját használja. Az alkalmazés automatikusan menti a batimetrikus térképeket az Előzmények mappába. A térképek feltöltődnek a Lakebook fiókba is.

59 1. A funkció használatához kapcsolja be a Csónakmódot (a fő Beállítás mező felső menüsorában). 2. A feltérképezés funkcióval azonnal részletesen ellenőrizheti a meder kontúrját és mélységét, illetve megtalálhatja a legjobb horgász helyeket. 3. A térképen fehér vonal jelzi a GPS adatokat, a színskála pedig a mélységet és a víz alatti objektumok kontúrjait mutatja. 4. A szonár szkennelések és batimetrikus térképek adatait a korlátlan adattárban érheti el a felső menüsoron található Előzmény funkcióval. Ha csónakból horgászik, a legjobb élmény érdekében töltse le az Offline térképeket (a Beállítások menüben keresse a térképeket). Ha nem töltötte le az Offline térképeket, a Deeper alkalmazás mobiladatot használ a térkép információk betöltésére, amely adatforgalommal járhat, és csatlakozási problémákat okozhat. Ha olyan helyen horgászik, ahol járt már korábban, és térképet is készített, a korábbi batimetrikus szkennelések megjelennek a térképen. Új helyeket térképezhet fel, vagy visszatérhet kedvenc helyeire is. Ha a batimetrikus térképen egy színes területre duplán koppint, megjelennek az adott pont mélység adatai. Other settings History - History stores all your recorded scans. It can store an unlimited amount of data. Every recording can be scrolled through from beginning to end. You can also see the exact date and time when the scan was made, as well as its duration and sonar mode that was used. Offline maps an option to download maps for offline use. Maps are sorted by region and country. Once you have download map from the list, you will be able to access it anytime you use Boat or On-shore GPS mode, even if you do not have an internet connection. Preferences allows you to choose the time format (24/12 hour), as well as measurement units: Metric (m, C), Imperial (ft, F), Fathoms (ftm, F), Mixed (fr, C) QUICK GUIDE (CHIRP+)
60 Firmware updates Sometimes your Deeper will require a firmware update to ensure its full functionality. The process of updating firmware is very simple: 1. Have the latest version of the Deeper App on your phone; 2. Connect your Deeper to a charger; 3. Open the Deeper App, which will automatically connect to your Deeper; 4. You will then see a status message indicating that the update is being carried out; 5. After the update is complete you can continue to use your Deeper. GPS savienojums un lietošana Viedtālruņa / planšetes GPS Deeper aplikācija, viedtālruņa vai planšetdatora GPS izmanto dažādām kartēšanas funkcijām, ieskaitot batimetrisko kartēšanu braucot, saglabājot skenēto attēlu atrašanās vietu un GPS Ice Hole Marking. Lai veiktu šīs funkcijas, viedtālrunim / planšetdatoram jāatrodas tuvāk par 1 m no Deeper sonāra. Ja ierīces atrodas tālu viena no otras, informācija par sonāra nolasījumiem būs nepareiza. Iebuvēts GPS (Deeper PRO+/CHIRP+) Deeper PRO + / CHIRP + ir iebūvēts GPS uztvērējs. Tas nozīmē, ka šiem modeļiem nav jāatrodas tajā pašā vietā, kur viedtālrunim, lai izveidotu kartes, tāpēc jūs varat izveidot karti, izmetot to. Kad esat izvēlējies piekrastes GPS režīmu, kartes augšējā labajā stūrī atrodiet satelīta ikonu. Satelīta ikonas krāsa norāda, vai ir izveidots GPS savienojums: Zaļš nozīmē, ka jūsu dziļākā GPS atrašanās vieta ir noteikta, un jūs esat gatavs sākt kartēšanu. Mirgojoša oranža ikona nozīmē, ka jūsu Deeper ierīce apstrādā informāciju par satelītu, un pašlaik jūsu ierīces atrašanās vieta nav zināma vai nav pietiekami precīza kartēšanai. Sarkans nozīmē, ka nav pieejams GPS signāls. Tas varētu būt tāpēc, ka Deeper atrodas iekštelpās vai zem laivas jumta, tāpēc, ka ierīce ir iegremdēta, vai tāpēc, ka apkārtne bloķē GPS signālu (piemēram, aizā vai kalnainā apvidū). GPS savienojuma maksimizēšana krasta GPS režīmā Ir dažas darbības, kuras varat veikt, lai uzlabotu GPS savienojumu, izmantojot sauszemes GPS režīmu: Dodiet savam Deeper PRO + / CHIRP + laiku, lai izveidotu spēcīgu GPS savienojumu. Deeper GPS uztvērējam ir jābūt savienotam ar satelītiem, kas riņķo pa zemi, un šis savienojums var nebūt tūlītējs. Turklāt šo satelītu pieejamība dažādās dienās var atšķirties, kas nozīmē, ka spēcīga GPS savienojuma izveidošana var būt ātra vienu dienu, bet nākamo lēni. Mēs iesakām ievietot Deeper ūdenī, aktivizējot GPS režīmu krastā, pēc tam 5 10 minūtes nogaidīt, pirms to iemest. Pārbaudiet, vai satelīta simbols ir zaļš. Kad Deeper ir izveidojis labu GPS savienojumu, satelīta ikona kartes ekrāna augšējā labajā stūrī mainīsies no sarkanas uz zaļu. Pēc Deeper izmešanas, lūdzu, vēlreiz pārbaudiet, vai
61 satelīta ikona joprojām ir zaļa. Ja tas atkal ir kļuvis sarkanā krāsā, pagaidiet dažus mirkļus, līdz tiek atjaunots GPS savienojums. Pārbaudiet apstākļus un apkārtni. Laika apstākļi un šķēršļi var ietekmēt GPS signālus. Signāls var būt vājāks, ja ir stipri mākoņi vai lietus. To var bloķēt arī šķēršļi, piemēram, zari un elektrolīnijas. Fish Deeper aplikācija Trolling and scanning Once your Deeper sonar is mounted to your vessel, start moving across the water to scan or create underwater topography maps. Use Boat mode in the FishDeeper App (Settings > Boat Mode) for a split screen view of your scanning and mapping. We recommended speed limit of the boat is up to 5 km/h (2.7 knots). When trolling your Deeper sonar, keep your smartphone/tablet in a position where it can easily pick up the signal from your sonar. If your smartphone / tablet is on the floor of your boat or in your pocket, the connection may be unstable. Krasta GPS režīms (tikai PRO + un CHIRP + modeļiem) Deeper Smart Sonar PRO + un CHIRP + ir GPS uztvērējs, kas ļauj šīm ierīcēm kartēt jūsu makšķerēšanas vietas, izveidojot batimetriskas, grunts kontūru kartes, makšķerējot no krasta. Krasta GPS režīms darbojas tāpat kā laivu režīms, bet klēpjdatora GPS režīma vietā viedtālruņu GPS vietā tiek izmantots iekšējais GPS uztvērējs, kas uzstādīts

62 Deeper PRO + vai CHIRP +. Atrodoties GPS režīmā krastā, jūs pamanīsiet, ka ekrāna augšdaļā ir GPS statusa ikona. Labs labojums. Kad GPS ikona ir zaļa un nepārtraukti paliek ekrānā, tas nozīmē, ka jūsu Deeper atrašanās vieta ir precīzi noteikta. Visi GPS dati ir piemēroti apakšējās kontūras kartēšanai, tāpēc esat gatavs sākt kartēšanu. Iegūstamā pozīcija. Kad GPS ikona ir oranža un mirgo, tas nozīmē, ka jūsu Deeper ierīce apstrādā satelīta informāciju un pašlaik jūsu atrašanās vieta ir vai nu nezināma (jūsu Deeper viedais sonārs nav parādīts kartē), vai arī nav pietiekami precīza, lai to izmantotu batimetrijai (jūsu Deeper viedtālrunis). Sonārs ir parādīts kartē). Iespējams, ka dažreiz GPS statuss mainīsies no laba labojuma uz iegūšanas pozīciju, kad pārmetīsiet Deeper ierīci. Pēc ilgāka laika (vairākas dienas / nedēļas) nelietojot ierīci, var paiet ilgāks laiks, lai iegūtu GPS pozīciju, kad to ievieto ūdenī. Signāls nav pieejams. Kad GPS ikona ir sarkana, tas nozīmē, ka nav GPS signāla. Šis statuss var rasties, ja jūsu Deeper tiek izmantots telpās, transportlīdzekļa iekšpusē, zem laivas jumta, zem blīvas zaļuma vai citos skarbos dabas apstākļos (piemēram, aizās, neapstrādātā ūdenī). Tas var notikt arī tad, ja jūsu Deeper ierīce ir iegremdēta zem ūdens. Iekšējā GPS uztvērēja darbība ir atkarīga no laika apstākļiem, ainavas īpašībām un satelīta konstelācijas. Apkārtnes augstsprieguma elektrības vadi pasliktinās veiktspēju. Adding Point of Interest (POI) To add a point of interest (POI) to your map, you would need to access Maps feature of the Deeper app. Map feature offers a range of different POI that you can choose to add to your map. After adding a POI, it will appear in Lakebook under the "My POI" tab. Same POI will be also visible on your bathyemtric map, when it is viewed via Lakebook. Trolling and scanning Once your Deeper sonar is mounted to your vessel, start moving across the water to scan or create underwater topography maps. Use Boat mode in the FishDeeper app (Settings > Boat Mode) for a split screen view of your scanning and mapping. We recommended speed limit of the boat is up to 5 km/h (2.7 knots). When trolling your Deeper sonar, keep your smartphone/tablet in a position where it can easily pick up the signal from your sonar. If your smartphone / tablet is on the floor of your boat or in your pocket, the connection may be unstable.
63 Skenēšanas režīmi (standarta, laivu, ledus, sauszemes GPS) Ice fishing To set up for ice fishing with your Deeper, follow these steps: Ensure the top cover is screwed on tightly, with the Water Proof marks perfectly aligned. Drill your ice hole and drop in your Deeper Sonar. Enable Ice Fishing Mode in the Deeper App (Settings > Sonar Mode > Ice Fishing Mode) Ensure your Deeper Sonar is in the center of the ice hole so the sonar readings don t catch the ice. There is no need to attach your Deeper Sonar to a line, but for convenience or extra peace of mind you can add an attachment bolt to the top attachment point and tie a line to it if you like. Every ice hole you drop your Deeper in will be automatically marked on your map. When you have dropped your Deeper sonar into an ice hole, keep your smartphone/tablet in a position where it can easily pick up the signal from your sonar. If your smartphone / tablet is in your pocket, the connection may be unstable. For accurately recording the location of each ice hole on your map, please ensure you smartphone is close to the ice hole when you first drop in your Deeper sonar. After this, you can move further away. Sonar noise Sonar noise appears as dots or vertical lines on your sonar display, and can be caused by the following conditions: Very thick ice when ice fishing Other sonar units / fish finders operating nearby Murky water Obstacles like edges of a boat or pier Currents Thick ice when ice fishing Deeper Sonars will perform fine in thick ice up to roughly 1 m / 40in, although some sonar noise may occur. This occurs because some of the sonar pulses are reflected from the edge of the ice hole, causing small inaccuracies on the top part of the sonar screen. This will not affect the depth or structure reading function of the
64 Deeper, and you can still easily mark fish and see your jig. If you wish to reduce this sonar noise, widen the ice holes you are fishing and position your Deeper directly in the center of the ice hole. Furthermore, it is important to always use the Ice Fishing Mode on the Deeper App. Other sonar units operating nearby Deeper sonars transmit ultra sound in the form of a cone, like most other sonar units. If the sonar cones of different sonars interfere with one another, both units will experience sonar noise. To reduce the amount of sonar noise, make sure you are using the narrow beam of the sonar, and try to stay as far away as possible from other sonar units. Reducing the sensitivity of the sonar can also help. Murky water Due to the high density of murky water, sonar waves may reflect from it, causing sonar noise or clutter. Try reducing the sensitivity of the Deeper as this will reduce the amount of sonar noise. Get more information about sensitivity here. Obstacles nearby Any hard obstacles nearby such as boat or pier edges can cause sonar waves to reflect from them, resulting in sonar noise. If this issue occurs when you are using your Deeper mounted to a boat, try to adjust the position of your Deeper so the sides of the boat are not interfering with the sonar cone. Рыбалка на льду Чтобы настроить ваш эхолот Deeper для рыбалки со льда, выполните следующие действия: Убедитесь, что верхняя крышка плотно прикручена, а надпись Water Proof идеально выровнена. Просверлите лунку и опустите в нее эхолот Deeper. Включите режим подледной рыбалки в приложении Deeper App (Settings (Настройки) > Sonar Mode (Режим эхолота) > Ice Fishing Mode (Режим подледной рыбалки)) Убедитесь, что ваш эхолот Deeper находится в центре лунки, так что лед не портит показания. Нет необходимости крепить эхолот Deeper к леске, но для удобства или дополнительного спокойствия вы можете установить крепежный болт к верхней точке крепления и привязать к нему леску, если хотите. Каждая лунка в которую вы опускаете эхолот Deeper сразу же отобразится на вашей карте.
65 При опускании эхолота Deeper в лунку смартфон/планшет следует держать в таком положении в котором он сможет легко принять сигнал от эхолота. Если смартфон/планшет находится в кармане, то соединение может оказаться нестабильно. Для точной записи местоположения каждой ледяной лунки на вашей карте убедитесь, что смартфон находится рядом с ледяной лункой когда вы впервые опускаете в нее эхолот Deeper. После этого можно отойти подальше. Ice fishing To set up for ice fishing with your Deeper, follow these steps: Ensure the top cover is screwed on tightly, with the Water Proof marks perfectly aligned. Drill your ice hole and drop in your Deeper Sonar. Enable Ice Fishing Mode in the Deeper App (Settings > Sonar Mode > Ice Fishing Mode) Ensure your Deeper Sonar is in the center of the ice hole so the sonar readings don t catch the ice. There is no need to attach your Deeper Sonar to a line, but for convenience or extra peace of mind you can add an attachment bolt to the top attachment point and tie a line to it if you like. Every ice hole you drop your Deeper in will be automatically marked on your map. When you have dropped your Deeper sonar into an ice hole, keep your smartphone/tablet in a position where it can easily pick up the signal from your sonar. If your smartphone / tablet is in your pocket, the connection may be unstable. For accurately recording the location of each ice hole on your map, please ensure you smartphone is close to the ice hole when you first drop in your Deeper sonar. After this, you can move further away. Battery and Charging Please read our Quick Guides for step by step instructions on how to charge your Deeper device. Here you will find information on how often you should charge the battery and other important points about charging your Deeper. Connecting the USB charging cable (PRO/PRO+/CHIRP+) The USB charging cable that comes with your device is compatible with any standard USB port. This includes standard smartphone and tablet chargers, and the USB outlets of your computer and car. Outlets must meet USB standards and have a voltage level of 5V. Charging Deeper Start Connect your Deeper Sonar to a USB power source using the cable included. For charging please use a standard smartphone or tablet charger, or connect the cable to your personal computer or the USB outlet of another device.
66 When and where to charge you Deeper Remember you should never charge your Deeper device in the water, and you should always ensure the charger and device are dry before charging. By regularly charging your Deeper you will maximize the battery s life. The battery should be recharged at least every 6 months, even if the device is not being used. The battery charger should be disconnected from the mains supply if unused for long periods. The battery in your Deeper device is Li-poly and cannot be charged at temperatures below 3 C / 37.4 F. Li-poly batteries can be dangerous if handled inappropriately. The safe usage instructions (included in the box) must be followed at all times Apkope Produkta kalpošanas laika pagarināšana Pārliecinieties, ka jūsu lietotne Deeper vienmēr ir atjaunināta. Ja neesat pārliecināts, vai jums ir instalēta jaunākā versija, apmeklējiet Google Play veikalu vai App Store, lai pārbaudītu, vai ir pieejama jauna lietotnes Deeper versija. Kad jums būs jaunākā programma, tā automātiski atjauninās jūsu Deeper sonāra programmaparatūru, kad izveidosiet savienojumu ar savu Deeper. Jūsu Deeper akumulatoram jābūt uzlādētam vairāk nekā 50%, lai atjauninātu programmaparatūru. Visus Deeper sonārus darbina ar li-poli akumulatoru, un šo akumulatoru regulāra uzlāde pagarinās to kalpošanas laiku. Mēs iesakām uzlādēt PRO, PRO +, CHIRP + un START vismaz reizi 6 mēnešos. Deeper 3.0 jāuzlādē ik pēc 2 mēnešiem, pat ja jūs to nelietojat. Uzglabājiet ierīci tīrā vietā, bez mitruma. Temperatūra no 16 C līdz 22 C (62 F - 72 F) ir ideāla, un ilgstoši neatstājiet Deeper karstā vai ļoti aukstā vietā. Deeper PRO, PRO +, CHIRP + un 3.0 augšējam vākam vienmēr jābūt cieši pieskrūvētam (ūdensnecaurlaidīgajām atzīmēm jāsakrīt). Lūdzu, aizsargājiet Deeper ķermeni no fiziskiem bojājumiem - neļaujiet tam iespraukties zemē vai akmeņos utt. Spēcīgas fiziskas ietekmes var neatgriezeniski sabojāt hidrolokatoru. Tīrīšana Notīriet Deeper ierīci ar mīkstu lupatiņu. Ja jūsu Deeper kļūst pārāk netīrs, notīriet to ar ūdenī vai saudzīgā mazgāšanas līdzeklī samitrinātu drānu. Deeper tīrīšanai nelietojiet nevienu abrazīvu spilventiņu vai tīrīšanas pulveri, kā arī šķīdinātājus, piemēram, spirtu vai benzolu, jo tas var sabojāt Deeper virsmu.
 GPS is an essential component for creating accurate bathymetric maps. GPS accuracy and reception quality can be affected by the conditions.")
67 Ūdens sensorus (divus metāla punktus Deeper PRO, PRO +, CHIRP + un 3.0) var notīrīt, rupji beržot tos ar švammi. Ja nepieciešams, var izmantot elektronisku kontaktu tīrītāju. GPS (Deeper PRO+, Deeper CHIRP+) GPS is an essential component for creating accurate bathymetric maps. GPS accuracy and reception quality can be affected by the conditions. Heavy, cloudy weather can affect the strength of the signal, while branches, pylons and other obstacles like electricity lines can also affect connectivity, as can the availability of satellites. These factors can cause the following issues: Your Deeper failing to connect with satellites the satellite icon is flashing red or orange Your bathymetric mapping (the depth colors) appear to be drawn on land, instead of on water The GPS in your Deeper PRO+ connects directly to satellites. So, to ensure rock solid connectivity, we recommend putting your PRO+ in the water for around 10 minutes prior to usage to enable it to establish a strong connection. When you are using your Deeper PRO+ for bathymetric mapping, make sure the satellite icon is green, showing that your Deeper PRO+ has established a strong GPS connection. Only when the satellite icon turns green can you start creating bathymetric maps. The time it takes for the unit to establish a strong GPS fix depends on the number of obstacles nearby as well as the weather conditions. If you are using the Deeper PRO+ in Onshore GPS Mode but the GPS connection is never established, please contact the Deeper Support team. Support and contacts If you encounter any problems, have questions or just want to share your experience, please feel free to contact us in the way that suits you best. Our contact details can be found on our support page. History History stores all your recorded scans. It can store an unlimited amount of data. Every recording can be scrolled through from beginning to end. You are also able to see the exact date and time when the scan was made, plus the
Frequently Asked Questions
 Saturs 1. Audio... 1 2. Tālrunis... 2 3. Apple CarPlay... 2 4. Android Auto... 5 5. Galerija... 8 6. Citi... 8 1. Audio J: Kā es varu pārslēgties starp dažādiem radio un multivides avotiem, piemēram, FM
series_155
 RAILING SERIES 155 RIPO fabrika SIA Hanzas Street 2, Pinki, Babite district, LV 2107, Latvia 155 Alumīnija margu sērija Aluminum railing series AL.01 AL.02 AL.03 AL.04 AL.05 AL.06 AL.07 AL.08 AL.09 155
7. Tēma: Polinomi ar veseliem koeficientiem Uzdevums 7.1 (IMO1982.4): Prove that if n is a positive integer such that the equation x 3 3xy 2 + y 3 = n
: Prove that if n is a positive integer such that the equation x 3 3xy 2 + y 3 = n") 7. Tēma: Polinomi ar veseliem koeficientiem Uzdevums 7.1 (IMO1982.): Prove that if n is a positive integer such that the equation x xy 2 + y = n has a solution in integers x, y, then it has at least three
7. Tēma: Polinomi ar veseliem koeficientiem Uzdevums 7.1 (IMO1982.): Prove that if n is a positive integer such that the equation x xy 2 + y = n has a solution in integers x, y, then it has at least three
K 5 ( )
") Detaļu saraksts (1.180-633.0) K 5 27.01.2016 www.kaercher.com LV Lapa 2 / 66 Lapa 3 / 66 Lapa 4 / 66 Satura rādītājs Pasūtīšanas norādījumi K 5 (1.180-633.0) Short spare parts list 201 Spare parts list
Detaļu saraksts (1.180-633.0) K 5 27.01.2016 www.kaercher.com LV Lapa 2 / 66 Lapa 3 / 66 Lapa 4 / 66 Satura rādītājs Pasūtīšanas norādījumi K 5 (1.180-633.0) Short spare parts list 201 Spare parts list
Dual TEMP PRO
 Dual TEMP PRO 1 Darbības instrukcija Rezultāta nolasījums 5 Ievietotas zondes nolasījums HACCP pārbaudes gaismas diods (LED) SCAN poga (infrasarkanā) Režīma poga Zondes poga (zondes ievietošanas) Ievads
Latvijas labie piemēri vietu zīmola veidošanā un popularizēšanā.
 SEM Search Engine Marketing ir SEO un SEA apvienojums. > SEO Search Engine Optimization > SEA Search Engine Advertising SEO & SEA rīcības eksperimentālais piemērs MAKŠĶERĒŠANA UN ATPŪTA USMAS EZERĀ Imantas,
SNP3000_UM_LV_2.2.indd
 Register your product and get support at www.philips.com/welcome Philips Presenter SNP3000 LV Lietotāja rokasgrāmata 1 a b c d e g f h 2 3 4 LASER LIGHT DO NOT STARE INTO BEAM CLASS 2 LASER PRODUCT Wavelength
ViedTV_instrukcija_10x21cm_apvien_2017Nov_new
 VIEDTELEVĪZIJAS PRIEKŠROCĪBAS Atklājiet jaunu TV pieredzi! Pieslēdzot savam televizoram Mājas Viedtelevīziju, skatieties vietējos un ārzemju TV kanālus, filmas, seriālus un LMT Straumes tiešraides, kā
Tick Chart Trader
 MT4 Supreme Edition Tick Chart Trader Šajā rokasgrāmatā atradīsiet uzstādīšanas un lietošanas instrukcijas priekš MT4 Supreme Edition. Instalēšanas process un lietošana ir tāda pati kā jaunajā MT5 Supreme
Formblatt Zafira im Dialog.indd
 Saturs 1. Audio... 1 2. Navigācija (tikai Navi 900 IntelliLink)... 2 4. Apple CarPlay... 4 5. Android Auto... 6 6. Balss at paz īšana... 9 7. Krāsu mērinstrumentu panelis... 10 8. Izlase... 10 9. Video...
Microsoft Word - Papildmaterials.doc
 SATURS DARBĪBAS AR DARBGRĀMATAS LAPĀM... 2 1.1. Pārvietošanās pa lapām...2 1.2. Lapas nosaukuma maiņa...3 1.3. Jaunas darblapas pievienošana...3 1.4. Lapas pārvietošana un dublēšana, lietojot peli...4
nüvi sērija īsa īsa rokasgrāmata pamācība lietošanai ar sekojošiem modeļiem: 1300, 1310, lietošanai 1340, 1350, ar šādiem 1370, modeļiem: 13
 nüvi 1200 1300 sērija īsa īsa rokasgrāmata pamācība lietošanai ar sekojošiem modeļiem: 1300, 1310, lietošanai 1340, 1350, ar šādiem 1370, modeļiem: 1390 1200, 1210, 1240, 1250, 1260 2009 Garmin Ltd. vai
Mēbeļu piedāvājums / Office furniture offer
 Mēbeļu piedāvājums / Office furniture offer Ovāls pārrunu galds 1 - kļava, 1 - tumši pelēks Uz divām mono-kājām (nerūs.tērauds) 200cm virsmas garums, 90cm virsmas platums, 75cm augstums Skaits - 2 Cena
Fishfinder 300C īsa rokasgrāmata
 Fishfinder 300C īsa rokasgrāmata 2008 Garmin Ltd. vai tās filiāles Garmin International, Inc. 1200 East 151st Street, Olathe, Kansas 66062, USA Tel. (913) 397.8200 or (800) 800.1020 Fax (913) 397.8282
Nintex Workflow 2010 instalēšanas ceļvedis Instalēšanas ceļvedis Nintex USA LLC 2012, visas tiesības paturētas. Kļūdas un izlaidumi novērsti.
 Instalēšanas ceļvedis Nintex USA LLC 2012, visas tiesības paturētas. Kļūdas un izlaidumi novērsti. support@nintex.com 1 www.nintex.com Saturs 1. Nintex Workflow 2010 instalēšana... 4 1.1. Instalēšanas
PowerPoint Presentation
 MODERNIE VIESNĪCU TELEFONA APARĀTI UN VIESU ISTABAS KOPTĒLS Katrīna Levita Adventus Solutions SATURS Viesnīcu telefonu priekšrocības Kolekcija AEI telefoni Cetis (Teledex, Telematrix) telefoni VTech telefoni
Sūtījuma noformēšana Epaka.lv sūtījumu veidošanas programmā Autorizācija 1. Sekojiet norādei E-pastā, lai atvērtu DPD Epaka programmu. Pēcāk, lai auto
 Sūtījuma noformēšana Epaka.lv sūtījumu veidošanas programmā Autorizācija 1. Sekojiet norādei E-pastā, lai atvērtu DPD Epaka programmu. Pēcāk, lai autorizētos programmā, jāatver lapa myprofile.dpd.lv. 2.
RietumuAPI_PSD2_v1_LV
 Rietumu PSD2 API vispa re jais apraksts v.1.0 0 Izmaiņu saraksts... 2 Vispārējā informācija... 3 Rietumu PSD2 API pārskats... 3 Informācija par kontiem Account Information Services (AIS)... 3 Maksājumu
ipod shuffle Lietošanas instrukcija
 ipod shuffle Lietošanas instrukcija Saturs 5 Par ipod shuffle 5 ipod shuffle jaunumi 6 ipod shuffle pamati 6 ipod shuffle pārskats 7 ipod shuffle vadību izmantošana 8 ipod shuffle savienošana un atvienošana
Drives, PLC and automation products for all needs
 BU Drives and Controls, May Frekvenču pārveidotāji visām vajadzībām. Slide 1 Biznesa struktūra piedziņa un vadība Pielietojuma nozares HVAC Pārtikas rūpniecība Dzērienu industrija Tīrais un netīrais ūdens
State Revenue Services of the Republic Latvia Talejas iela 1, Riga LV-1978 Latvia Ihr Vor- und Zuname Ihre Straße und Hausnummer Ihre Postleitzahl Ihr
 State Revenue Services of the Republic Latvia Talejas iela 1, Riga LV-1978 Latvia Ihr Vor- und Zuname Ihre Straße und Hausnummer Ihre Postleitzahl Ihr Wohnort aktuelles Datum Ihre ZINSPILOT-Kundennummer
KURSA KODS
 Lappuse 1 no 5 KURSA KODS STUDIJU KURSA PROGRAMMAS STRUKTŪRA Kursa nosaukums latviski Kursa nosaukums angliski Kursa nosaukums otrā svešvalodā Studiju /-as, kurai/-ām tiek piedāvāts studiju kurss Statuss
v, m/s Projekta numurs: /16/I/002 Nacionāla un starptautiska mēroga pasākumu īstenošana izglītojamo talantu attīstībai 10 1 Velobraukšanas sace
 v, m/s Projekta numurs: 8.3.2.1/16/I/002 Nacionāla un starptautiska mēroga pasākumu īstenošana izglītojamo talantu attīstībai 10 1 Velobraukšanas sacensības Fizikas valsts 68. olimpiāde Otrā posma uzdevumi
Ldz vpn INSTRUKCIJA WINDOWS LIETOTĀJIEM.
 2018 Dokumenta versija: 2018.003 Pēdējie labojumi: 2018-06-13 [LDZ VPN INSTRUKCIJA WINDOWS LIETOTĀJIEM.] Instrukcija iepazīstina ar CheckPoint Endpoint VPN programmatūru, tā instalāciju / konfigurāciju
ASUS planšetdators E-ROKASGRĀMATA
 ASUS planšetdators E-ROKASGRĀMATA LV9052 Augusts 2014 Pirmais izdevums 2 Satura rādītājs Šajā rokasgrāmatā izmantotie apzīmējumi...9 Apkope un drošība... 10 Vadlīnijas...10 Pareiza utilizācija...11 1.
3D_modeli_atskaite.pages
 Projektā ietverto dabas liegumu un tiem piegulošo teritoriju vizualizācijai sagatavoti reljefa virsmas 3D modeļi. Dati modeļu sagatavošanai iegūti digitizējot bijušās PSRS armijas ģenerālštāba kartes M
Oracle SQL teikuma izpildes plāns (execution plan)
") SQL teikuma izpildes plāns gints.plivna@gmail.com Kas es esmu? Pieredze darbā ar Oracle kopš 1997 Oficiālais amats sistēmanalītiėis Rix Technologies Oracle sertificēto kursu pasniedzējs Affecto Latvija
SQL teikuma izpildes plāns gints.plivna@gmail.com Kas es esmu? Pieredze darbā ar Oracle kopš 1997 Oficiālais amats sistēmanalītiėis Rix Technologies Oracle sertificēto kursu pasniedzējs Affecto Latvija
Mūsu programmas Programmu ilgums 1 semestris 15 nodarbības 1,5 h nodarbības ilgums
 Mūsu programmas Programmu ilgums 1 semestris 15 nodarbības 1,5 h nodarbības ilgums Algoritmika un datorzinības (Vecums: 8 gadi) Kursa mērķis ir sniegt bērniem kopīgo izpratni par datoru un datorprogrammām.
TomTom GO PROFESSIONAL
 TomTom GO PROFESSIONAL Lietošanas pamācība 17.1 Saturs Laipni lūdzam navigācijā ar TomTom! 7 Darba sākšana 8 Uzstādīšana automašīnā... 8 Ierīces novietošana... 8 Ieslēgšana un izslēgšana... 8 Drošības
Dārzā Lidijas Edenas teksts Andras Otto ilustrācijas Zaķis skatās lielām, brūnām acīm. Ko tu redzi, zaķīt? Skaties, re, kur māmiņas puķu dārzs! Nē, nē
 Dārzā Lidijas Edenas teksts Andras Otto ilustrācijas Zaķis skatās lielām, brūnām acīm. Ko tu redzi, zaķīt? Skaties, re, kur māmiņas puķu dārzs! Nē, nē, zaķīt! Māmiņas puķes nevar ēst! Zaķis lēkā mūsu dārzā.
OWASP Top 10 Latvijā Biežākās drošības problēmas 4mekļa lietojumos Agris Krusts, IT Centrs, SIA
 OWASP Top 10 Latvijā Biežākās drošības problēmas 4mekļa lietojumos Agris Krusts, IT Centrs, SIA 28.03.2019 Par mani Agris Krusts, SIA IT Centrs dibinātājs, drošības konsultants Drošības audi= un tes=,
Lietošanas rokasgrāmata
 Lietošanas rokasgrāmata Copyright 2014 Hewlett-Packard Development Company, L.P. Bluetooth ir preču zīme, kas pieder tās īpašniekam un ko saskaņā ar licenci izmanto uzņēmums Hewlett-Packard Company. SD
Slide 1
 Inovācijas viesnīcu telefonijas risinājumos Andris Laumanis Alcatel-Lucent Enterprise Adventus Solutions Tirgus tendences Ko vēlas mūsdienu ceļotāji: Wi-Fi un digitālus risinājumus! E C A 65% Use WiFi
Microsoft Word - Mobilais_telefons_NG4
 1 Mobilais telefons NG4 Lietošanas instrukcija Paldies, ka iegādājāties šo produktu. Pirms produkta lietošanas, lūdzu, rūpīgi izlasiet šo lietošanas instrukciju. Ja Jūs šo produktu nododat citam lietotājam
Viss labs Daces Copeland teksts Andras Otto ilustrācijas Lietus līst. Lietus līst lielām, lēnām lāsēm. Labi, lai līst! Lietus ir labs. A1:12
 Viss labs Daces Copeland teksts Andras Otto ilustrācijas Lietus līst. Lietus līst lielām, lēnām lāsēm. Labi, lai līst! Lietus ir labs. A1:12 Vabole lien. Vabole lien lēnām. Labi, lai lien! Vabole ir laba.
Mounting_Instruction_Owl_Class_II_High_Bay_
 VIZULO OWL LED high bay Mounting instruction Montāžas instrukcija Mонтажная инструкция IEC EN 60598 IP66 min 40 C max + 50 C (+45 C)* 198-264 V AC * Depends on configuration. Check label or technical specification.
Prezentacja programu PowerPoint
 Kā gudri pārdot internetā? Turība 29.09.2016 www.gemius.lv Kas ir Linda Egle BAT absolvente mag.soc.sc. Gemius Latvia, PR & Mārketings LASAP, biedre LRA, biedre Gemius Latvia, vadītāja LASAP, valdes locekle
Piezīmjdatora E-rokasgrāmata
 Piezīmjdatora E-rokasgrāmata LV8233 Pirmais izdevums Jūnijs 2013 Autortiesību atruna Šo rokasgrāmatu, ieskaitot tajā aprakstītos produktus un programmatūru, bez rakstiskas ASUSTeK COMPUTER INC. ("ASUS")
suzuki vitara izpardošana-2
 Suzuki Vitara GL 127135 127137 127138 127139 127149 Riepas 215 / 60R16 + tērauda diski (pilna lieluma vāciņi) Melns priekšējais režģis Priekšējā bufera rotājums pelēks (vidus) / melns (sāni) Melns spārna
Svarīgākais par skolēnu redzi
 «Veselības mācības» stunda par redzi Svarīgākais par skolēnu redzi Saturs Redzes sistēma Redze un dators Sūdzības Redzes režīms Apgaismojums Mācību un darba vietas iekārtojums un ķermeņa pozīcija Redzes
NISSAN LEAF & LEAF e+ tabula, Nissan papildu pakalpojumi LV-04C-1186 NISSAN LEAF
 & LEAF e+ tabula, Nissan papildu pakalpojumi. CENU LAPA Transmisija LEAF 40 kwh Acenta 100% elektrisks 4x2 Acenta 100% elektrisks 4x2 N-Connecta 100% elektrisks 4x2 Tekna 100% elektrisks 4x2 LEAF 62 kwh
LV10572 Otrais izdevums Oktobris 2015 E-rokasgrāmata
 LV10572 Otrais izdevums Oktobris 2015 E-rokasgrāmata AUTORTIESĪBU ATRUNA Šo rokasgrāmatu, ieskaitot tajā aprakstītos produktus un programmatūru, bez rakstiskas ASUSTeK COMPUTER INC. ("ASUS") atļaujas nekādā
Beo4 Papildu pogu leksikons
 Beo4 Papildu pogu leksikons 2 PIEZĪME! Ar * marķētas pogas ir piemērojamas vienīgi tālvadības pults Beo4 iepriekšējiem variantiem. A A.AUX (audio papildavots) Bang & Olufsen audio sistēmai pievienota papildu
Pārskatu aizpildīšana
 Atkritumu pārvadājumu pavadzīmju izveides instrukcija Atkritumu Pārvadājumu Uzskaites Sistēma (APUS) ir jālieto ir visiem, kam to nosaka MK noteikumi Nr.494 (07.08.2018) (https://likumi.lv/ta/id/300874-atkritumu-parvadajumuuzskaites-kartiba)
untitled
 D I A BĒ TA Ā R S T Ē Š A N A S VA DĪ B AS PR O G R AM M AT ŪR A Ziņojuma rokasgrāmata Report sastādīšanas Interpretation Guide 2007 Medtronic MiniMed. Autortiesības aizsargātas. MP6025274-321 _Date 120707
Microsoft Word - M-80XT
 Izplatītājs SIA Mednieks LV Reģ. Nr.: 40003884948 info@mednieks.lv Lietošanas instrukcija ierīcei: digitālajam fotoaparātam ar kustību sensoru M-80XT; M80BLX Paldies par Jūsu izvēli iegādāties Moultrie
Regio RC CDOC
 RC-CDOC Ieprogrammēts istabas kontrolieris ar displeju un komunikācijas iespēju RC-CDOC ir pilnībā ieprogrammēts istabas kontrolieris no Regio Midi sērijas, paredzēts sildīšanas, dzesēšanas un CO 2 regulēšanai
untitled
 Ziņojumu lietošanas pamācība DIABĒTA ĀRSTĒŠANAS VADĪBAS PROGRAMMATŪRA 2. lpp. Adherence Report (ziņojums par režīma ievērošanu). Šajā ziņojumā tiek atspoguļota pacienta uzvedība izvēlētajā laikposmā. Tas
Apple TV Lietotāja instrukcija
 Apple TV Lietotāja instrukcija Saturs 5 Darba sākšana 5 Pārskats 6 Siri Remote 6 Iestatīt Apple TV 8 Iestatiet kontus 10 Pamati 10 Naviģēt Apple TV: 11 Pārvaldiet savas lietojumprogrammas 12 Vadiet to,
LV10524 Pirmais izdevums Septembris 2015 ASUS Piezīmjdatora E-rokasgrāmata
 LV10524 Pirmais izdevums Septembris 2015 ASUS Piezīmjdatora E-rokasgrāmata AUTORTIESĪBU ATRUNA Šo rokasgrāmatu, ieskaitot tajā aprakstītos produktus un programmatūru, bez rakstiskas ASUSTeK COMPUTER INC.
LV11215 Otrais izdevums Janvāris 2016 E-rokasgrāmata
 LV11215 Otrais izdevums Janvāris 2016 E-rokasgrāmata AUTORTIESĪBU ATRUNA Šo rokasgrāmatu, ieskaitot tajā aprakstītos produktus un programmatūru, bez rakstiskas ASUSTeK COMPUTER INC. ("ASUS") atļaujas nekādā
OPEL ZAFIRA paneļa apgaismojuma lampu maiņa Kā nomainīt apgaismojuma lampiņas ZAFIRA mēraparātu panelī tas ir viens no jautājumiem, kuru var lasīt daž
 OPEL ZAFIRA paneļa apgaismojuma lampu maiņa Kā nomainīt apgaismojuma lampiņas ZAFIRA mēraparātu panelī tas ir viens no jautājumiem, kuru var lasīt dažādos OPEL Zafira autoīpašnieku forumos. Līdz šim man
LIETOTĀJA ROKASGRĀMATA SM-G970F/DS SM-G973F/DS SM-G975F/DS Latvian. 03/2019. Rev.1.0
 LIETOTĀJA ROKASGRĀMATA SM-G970F/DS SM-G973F/DS SM-G975F/DS Latvian. 03/2019. Rev.1.0 www.samsung.com Saturs Pamatinformācija 4 Sākumā izlasi mani 7 Ierīces pārkaršanas situācijas un to risinājumi 11 Ierīces
Cat viedtālrunis S40 Lietotāja rokasgrāmata
 Cat viedtālrunis S40 Lietotāja rokasgrāmata Lūdzu, izlasiet šo informāciju, pirms turpināt Piesardzības pasākumi Lūdzu, rūpīgi izlasiet informāciju par piesardzības pasākumiem, lai apgūtu pareizu mobilā
LV11061 Pirmais izdevums Februāris 2016 E-rokasgrāmata
 LV11061 Pirmais izdevums Februāris 2016 E-rokasgrāmata AUTORTIESĪBU ATRUNA Šo rokasgrāmatu, ieskaitot tajā aprakstītos produktus un programmatūru, bez rakstiskas ASUSTeK COMPUTER INC. ("ASUS") atļaujas
Microsoft PowerPoint - DS.AM.01.ppt
 Dalīto sistēmu izmantošana transporta līdzekļu kustības raksturlielumu fiksēšanā un apstrādē Doktorantūras skolas seminārs 30.06.2010 Doktorants: Artis Mednis Promocijas darba vadītājs: Dr.sc.comp. Guntis
CEĻVEDIS PIRCĒJIEM Iebūvētais virtuves apgaismojums Labs, funkcionāls apgaismojums Funckionāls apgaismojums ir svarīgs jebkurā virtuves interjerā. Ar
 CEĻVEDIS PIRCĒJIEM Iebūvētais virtuves apgaismojums Labs, funkcionāls apgaismojums Funckionāls apgaismojums ir svarīgs jebkurā virtuves interjerā. Ar labu, vienmērīgu apgaismojumu virs darba virsmas gatavot
Sērijas apraksts: Wilo-Yonos PICO Līdzīgs attēlā redzamajam piemēram Modelis Aprīkojums / funkcija Slapjā rotora cirkulācijas sūknis ar skrūvsavienoju
 Sērijas apraksts: Wilo-Yonos PICO Līdzīgs attēlā redzamajam piemēram Modelis Aprīkojums / funkcija Slapjā rotora cirkulācijas sūknis ar skrūvsavienojumu, bloķējošās strāvas pārbaudes EC motors un integrēta
SolidCAM Solution Presentation
 SolidCAM Integrētā CAM līderis Dibināta 1984. - 35 gadu pieredze CAM programmatūras izstrādē SolidCAM Ltd. galvenais birojs Izraēlā 2 birojii Eiropā: SolidCAM GmbH, Vācijā 7 biroji Saistītās kompānijas:
Presentation WP6 DisComEx
 KeepWarm projekts Nr. 784966 «Centralizētās siltumapgādes uzņēmumu darbības uzlabošana Centrāleiropā un Austrumeiropā» SIA Fortum Jelgava pieredze (uzņēmuma tēla veidošana, sadarbība ar klientiem un iestādēm,
Datu lapa: Wilo-Stratos PICO 25/1-4 Raksturlīknes Δp-c (konstants) v 3 4 Rp ½ 0,4 0,8 1,2 Rp 1 m/s 0 0,2 0,4 0,6 0,8 1,0 Rp 1¼ H/m Wilo-Strato
 v 3 4 Rp ½ 0,4 0,8 1,2 Rp 1 m/s 0 0,2 0,4 0,6 0,8 1,0 Rp 1¼ H/m Wilo-Strato") Datu lapa: Wilo-Stratos PICO 25/1-4 Raksturlīknes Δp-c (konstants) 1 2 v 3 4 Rp ½,4,8 1,2 Rp 1 m/s,2,4,6,8 1, Rp 1¼ H/m Wilo-Stratos PICO 15/1-4, 25/1-4, 3/1-4 1~23 V - Rp ½, Rp 1, Rp 1¼ 4 Atļautie sūknējamie
Datu lapa: Wilo-Stratos PICO 25/1-4 Raksturlīknes Δp-c (konstants) 1 2 v 3 4 Rp ½,4,8 1,2 Rp 1 m/s,2,4,6,8 1, Rp 1¼ H/m Wilo-Stratos PICO 15/1-4, 25/1-4, 3/1-4 1~23 V - Rp ½, Rp 1, Rp 1¼ 4 Atļautie sūknējamie
2.2/20 IEGULDĪJUMS TAVĀ NĀKOTNĒ! Eiropas Reģionālās attīstības fonds Prioritāte: 2.1. Zinātne un inovācijas Pasākums: Zinātne, pētniecība un at
 2.2/20 IEGULDĪJUMS TAVĀ NĀKOTNĒ! Eiropas Reģionālās attīstības fonds Prioritāte: 2.1. Zinātne un inovācijas Pasākums: 2.1.1. Zinātne, pētniecība un attīstība Aktivitāte: 2.1.1.1. Atbalsts zinātnei un pētniecībai
Microsoft Word - KK_NOR'19.docx
 2019.GADA KUIVIŽU KAUSS Optimist un Laser klasēs 14.-16.jūnijs, Kuiviži, Salacgrīva SACENSĪBU NOLIKUMS 1. SACENSĪBU RĪKOTĀJI 1.1.Sacensību rīkotājs ir Kuivižu Jahtklubs 2. NOTEIKUMI 2.1.Sacensības notiek
HORIZONTĀLAIS SAULES PULKSTENIS. LUDZA Laukuma rekonstrukcija pie Ludzas novada ēkas Raiņa un Stacijas ielau krustojumā. Stacijas iela 38, Ludza LD -1
 HORIZONTĀLAIS SAULES PULKSTENIS. LUDZA LD - GRANĪTA BRUĢA RAKSTS SP LAUKUMA IEKLĀŠANA R 00,00 cm 7 2 4 Tianshan red 4 6 2 4 N 4 GRANĪTA TONĀLS SALIKUMS 4 Granīts G 60 6 Granīts G 60 M=:0 PASŪTĪTĀJS: LUDZAS
Instrukcija par semināru Seminārs ir e-studiju aktivitāšu modulis, kas ir līdzīgs uzdevuma modulim, kurā studenti var iesniegt savus darbus. Tikai sem
 Instrukcija par semināru Seminārs ir e-studiju aktivitāšu modulis, kas ir līdzīgs uzdevuma modulim, kurā studenti var iesniegt savus darbus. Tikai semināra modulī tiek paplašināta uzdevuma funkcionalitāte.
WA 3D Dobele Nolikums 1. Mērķis un uzdevumi Noskaidrot WA 3D Dobele gada uzvarētājus atbilstošās loka klasēs, uzlabot personīgos rezultātus un r
 WA 3D Dobele Nolikums 1. Mērķis un uzdevumi Noskaidrot WA 3D Dobele 2018. gada uzvarētājus atbilstošās loka klasēs, uzlabot personīgos rezultātus un rekordrezultātus un popularizēt loka šaušanas sporta
PROFESSIONAL AROMA GRINDER et lv lt Z6 lietošanas pamācība ru
 PROFESSIONAL AROMA GRINDER et lv lt Z6 lietošanas pamācība ru Satura rādītājs Jūsu Z6 Vadības elementi 54 Svarīga informācija 56 Pareiza lietošana...56 Jūsu drošībai...56 1 Sagatavošana un pirmā lietošanas
AMV 655/658 SU / 658 SD / 659 SD
 Datu lapa Izpildmehānismi trīs punktu vadībai bez drošības funkcijas SU, SD ar drošības funkciju (atspere uz augšu/uz leju) Apraksts Izpildmehānismus bez jebkāda adaptera var izmantot kopā ar: - Vārstu
Individuālās tirgvedības stratēģijas attīstīšana
 Individuālās tirgvedības stratēģijas attīstīšana ZĪMOLVEDĪBAS NOZĪME Andris Klepers 26.02.2019. Vai es risinu kādu reālu problēmu? Kāds ir mans devums ar biznesu labākai sabiedrībai? PERSONISKĀS VĒRTĪBAS
ISKU ekspozīcijas izpārdošana
 LIELĀ ISKU EKSPOZĪCIJAS IZPĀRDOŠANA ISKU ISKU ISKU ISKU ISKU ISKU ISKU ISKU ISKU Moduļtipa dīvāns Kaari Materiāls: Tumši pelēks un zaļš filcs. Augstās sienas noņemamas un maināmas Cena: EUR 2450 + PVN
MMS kamera 1
 MMS kamera 1 Saturs... 3 1.1 Apraksts:... 3 1.2 Funkciju apraksts... 4 1.3 Pielietošana... 4 1.4... 4 kopskats... 5... 7 3.1 Barošana (divi veidi)... 7 3.2 Kameras ie... 8 3.3... 10... 10 4.1... 10 4.2
 transporta plūsmas monitorēšanai Roberts Kadiķis Kārlis Freivalds Multifunkcionāla inteliģenta transporta sistēmas punkta tehnoloģija Nr.2DP/2.1.1.1.0/10/APIA/VIAA/086 Motivācija Nepieciešamība efektīvāk