ENGLISH 12 DEUTSCH 15. K-Type Sensor FRANÇAIS 18. Chiarimenti sul display e i tasti, le impostazioni, il comando Indicazioni e avvertenze importanti
|
|
|
- Milda Vilciņš
- pirms 2 gadiem
- Skatījumi:
Transkripts

1 C12 LTGE Original instructions Originalbetriebsanleitung Notice originale Istruzioni originali Manual original Manual original Oorspronkelijke gebruiksaanwijzing Original brugsanvisning Original bruksanvisning Bruksanvisning i original Alkuperäiset ohjeet Πρωτότυπο οδηγιών χρήσης Orijinal işletme talimatı Původním návodem k používání Pôvodný návod na použitie Instrukcją oryginalną Eredeti használati utasítás Izvirna navodila Originalne pogonske upute Instrukcijām oriģinālvalodā Originali instrukcija Algupärane kasutusjuhend Оригинальное руководство по эксплуатации Оригинално ръководство за експлоатация Instrucţiuni de folosire originale Оригинален прирачник за работа 原始的指南


2 8 10 K-Type Sensor Description of Display and Buttons, Settings, Operation Important Informations and Notes Erklärung des Displays und der Tasten, Einstellungen, Bedienung Wichtige Angaben und Hinweise Explication de l afficheur et des touches, des réglages, du maniement, Indications et remarques importantes ENGLISH 12 DEUTSCH 15 FRANÇAIS 18 Chiarimenti sul display e i tasti, le impostazioni, il comando Indicazioni e avvertenze importanti ITALIANO 21 Explicación de la pantalla y de las teclas, ajustes, manejo, datos e indicaciones importantes ESPAÑOL 24 Discrição do Display e dos Botões, Ajustes, Operação Informações e Avisos Importantes PORTUGUES 27 Verklaring van display, toetsen, instellingen en bediening Belangrijke gegevens en aanwijzingen NEDERLANDS 30 Beskrivelse af display og taster, indstillinger, betjening Vigitge angivelser og oplysninger DANSK 33 Forklaring av displayet, tastene, innstillingene, bruk Viktige informasjoner og instruksjoner NORSK 36 Beskrivning av display och knappar, inställningar, betjäning Viktig information och anvisningar SVENSKA 39 Näyttöruudun ja näppäinten, asetusten ja käytön selitys Tärkeitä tietoja ja ohjeita. SUOMI 42 Εξήγηση της οθόνης και των πλήκτρων, ρυθμίσεις, χειρισμός Σημαντικές αναφορές και υποδείξεις ÅËËÇNÉÊÁ 45 Ekran ve tuş açıklamaları, ayarlar, kullanım Önemli bilgiler ve notlar TÜRKÇE 48 7 Vysvětlivky k displeji a klávesám, nastavení, obsluha Důležité údaje a pokyny ČESKY 51 Vysvetlivky k displeju a klávesom, nastavenie, obsluha Dôležité údaje a pokyny SLOVENSKY 54 Objaśnienia ekranu i przycisków, ustawienia, obsługa Ważne dane i wskazówki POLSKI 57 A kijelző és a billentyűk ismertetése, beállítások, kezelés Fontos adatok és útmutatások MAGYAR 60 Obrazložitev displeja in tipk, nastavitev, uporabe Pomembne navedbe in opozorila SLOVENSKO 63 Objašnjenje displeja i tipki, podešavanja, posluživanja Važni podatci i upute HRVATSKI 66 6 Paskaidrojumi displejam un taustiņiem, uzstādīšanai, apkalpošanai Svarīga informācija un norādījumi Ekrano ir klavišų paaiškinimas, nustatymai, aptarnavimas Svarbūs duomenys ir nurodymai LATVISKI 69 LIETUVIŠKAI 72 Selgitused näidiku, nuppude, seadistuse ja kasutamise kohta Olulised andmed ja näpunäited EESTI 75 Разъяснения по дисплею и кнопкам, настройкам и обслуживанию, Основные данные и указания ÐÓÑÑÊÈÉ 78 OFF ON 5 Разясняване на дисплея и бутоните, настройките, обслужването Важни данни и указания Descrierea afişajului şi a tastelor, reglaje, operare Date importante şi instrucţiuni БЪЛГАРСКИ 81 ROMÂNIA 84 Објаснување на дисплејот и тастерите, нагодување, употреба, Важни податоци и упатства МАКЕДОНСКИ 87 关于显示屏和键的说明, 调整, 操作重要说明和提示 中文


3 1 Überkleben Sie den englischen Text auf dem Leistungsschild vor der ersten Inbetriebnahme mit dem mitgelieferten Aufkleber in Ihrer Landessprache. Avant la première mise en service, collez l autocollant livré dans votre langue nationale sur le texte anglais de la plaquette signalétique. Prima della prima messa in esercizio, coprire il testo inglese della targhetta di fabbrica con l'etichetta fornita a corredo nella Sua lingua nazionale. Tape el texto en inglés en la placa indicadora de potencia antes de la puesta en funcionamiento con la etiqueta suministrada en el idioma de su país. Por favor, cole o autocolante na sua língua nacional juntado sobre o texto em inglês na placa das características do equipamento antes da primeira colocação em serviço. Plak de Engelse tekst op het vermogensplaatje vóór de eerste inbedrijfstelling af met de bijgeleverde sticker in uw taal. Inden idriftsættelse første gang skal den medfølgende mærkat med dansk tekst klæbes oven på den engelske tekst på mærkepladen. Før første ibruktaking skal det klistres over prestasjonsetiketten med opplysniner på engelsk språ. Til dette er det vedlagt et klebemerket med opplysninger på deres språk. Före första idrifttagning: Klistra över den engelska texten på märkskylten med medföljande etikett på det aktuella landets språk. Liimaa ennen ensimmäistä käyttöönottoa mukana toimitettu maasi kielinen tarra laitteen tyyppikilven englanninkielisen tekstin päälle. Πριν την πρώτη θέση σε λειτουργία κολλήστε την συμπαραδιδόμενη αυτοκόλλητη ετικέτα στοιχείων με κείμενο στη μητρική σας γλώσσα πάνω στο αγγλικό κείμενο. İlk defa çalıştırmaya başlamadan önce birlikte gönderilen yapıştırıcı ile kendi ülke lisanınızda İngilizce metni verim tabelasının üzerine yapıştırınız. Před prvním zprovozněním přelepte anglický text na výkonovém štítku samolepkou s českým textem, která je součástí dodávky. Pred prvým uvedením do prevádzky prelepte anglický text na výkonovom štítku samolepkou so slovenským textom, ktorá je súčasťou dodávky. Przed pierwszym uruchomieniem należy nakleić na angielski tekst tabliczki mocy załączoną naklejkę w języku Pańskiego kraju. Ragassza az első üzembehelyezés előtt az anyanyelvén mellékelt matricát a teljesítménytáblán lévő angol nyelvű szövegre. Pred prvim zagonom prelepite angleško besedilo na podatkovni tablici z dobavljeno nalepko v jeziku vaše države. "Oblijepite engleski tekst na pločici snage prije prvotnog puštanja u rad sa suisporučenom naljepnicom na Vašem jeziku." Pirms pirmās pieņemšanas ekspluatācijā angļu valodas teksts firmas dēlītī ir jāaizlīmē ar piegādāto uzlīmi Jūsu dzimtā valodā. Prieš pradėdami eksploatuoti, užklijuokite pridėtą lipduką valstybine kalba ant teksto anglų kalba duomenų lentelėje. Enne ekspluatatsiooni võtmist tuleb ingliskeelsele tekstile firmalaual peale liimida vastav kleebis Teie emakeeles. Перед первым вводом в эксплуатацию заклейте английский текст на фирменной табличке прилагаемой наклейкой на вашем языке. Преди първото пускане в експлоатация залепете приложената лепенка на Вашия език върху английския текст на табелката с технически храктеристики. Lipiţi eticheta livrată în limba ţării dvs., înainte de prima punere în funcţiune, peste textul în engleză de pe tăbliţa indicatoare a caracteristicilor maşinii. Пред првото пуштање во употреба поставете ја доставената лепенка на јазикот на вашата земја врз текстот на англиски јазик што се наоѓа на плочката со карактеристики. 最初操作前请将附送的贵国语言贴纸贴到英文铭牌上 Remove the battery pack before starting any work on the machine. Vor allen Arbeiten an der Maschine den Wechselakku herausnehmen Avant tous travaux sur la machine retirer l accu interchangeable. Prima di iniziare togliere la batteria dalla macchina. Retire la batería antes de comenzar cualquier trabajo en la máquina. Antes de efectuar qualquer intervenção na máquina retirar o bloco acumulador. Voor alle werkzaamheden aan de machine de akku verwijderen. Ved arbejde inden i maskinen, bør batteriet tages ud. Ta ut vekselbatteriet før du arbeider på maskinen Drag ur batteripaket innan arbete utföres på maskinen. Ota akku pois ennen kaikkia koneeseen tehtäviä toimenpiteitä. Ðñéí áðü êüèå åñãáóßá óôç ìç áíþ áöáéñåßôå ôçí áíôáëëáêôéêþ ìðáôáñßá. Aletin kendinde bir çalışma yapmadan önce kartuş aküyü çıkarın. Před zahájením veškerých prací na vrtacím šroubováku vyjmout výměnný akumulátor. Pred každou prácou na stroji výmenný akumulátor vytiahnuť. Przed przystąpieniem do jakichkolwiek prac na elektronarzędziu należy wyjąć wkładkę akumulatorową. Karbantartás, javítás, tisztítás, stb. előtt az akkumulátort ki kell venni a készülékből. Pred deli na stroju izvlecite izmenljivi akumulator. Prije svih radova na stroju izvaditi bateriju za zamjenu. Pirms mašīnai veikt jebkāda veida apkopes darbus, ir jāizņem ārā akumulātors. Prieš atlikdami bet kokius darbus įrenginyje, išimkite keičiamą akumuliatorių. Enne kõiki töid masina kallal võtke vahetatav aku välja. Bûíüòå àêêóìóëÿòîð èç ìàøèíû ïåðåä ïðîâåäåíèåì ñ íåé êàêèõ-ëèáî ìàíèïóëÿöèé. Преди започване на каквито е да е работи по машината извадете акумулатора. Scoateţi acumulatorul înainte de a începe orice intervenţie pe maşină. Отстранете ја батеријата пред да започнете да ја користите машината. 在机器上进行任何修护工作之前, 先拿出蓄电池 click 4 5

4 ON OFF ON/LOCK 2 1 OFF 6 7

5 a a - Distance laser point to center of spot temperature area (18 mm) b - Temperature area c - Distance Laser Thermometer to measure point The rate between distance Laser Thermometer and measure point is approx. 40:1. a - Abstand Laserpunkt - Mitte des Temperaturmessbereichs (18 mm) b - Temperaturmessbereich c - Entfernung Laserthermometer - Messpunkt Das Verhältnis zwischen Entfernung Laserthermometer und Messbereich beträgt ca. 40:1 a Distance Point laser Centre de la plage de mesure de la température (18 mm) b - Plage de mesure de la température c Suppression du thermomètre laser - Point de mesure Le rapport entre la suppression du thermomètre laser et plage de mesure se monte à environ 40:1 a Distanza punto laser centro del campo di misura della temperatura (18 mm) b Campo di misura della temperatura c Distanza termometro laser punto di misurazione Il rapporto tra la distanza del termometro laser e il campo di misura è di ca. 40:1 a Distancia del punto láser al centro del intervalo de medición de la temperatura (18 mm) b Intervalo de medición de la temperatura c Distancia entre el termómetro láser y el punto de medición La relación entre la distancia del termómetro láser y el intervalo de medición es de aprox. 40:1. a vzdialenosť laserového bodu stred meraného teplotného rozsahu (18 mm) b merací teplotný rozsah c vzdialenosť laserového teplomera meraný bod Pomer medzi vzdialenosťou laserového teplomera a meracieho rozsahu je cca 40:1. a - odstęp punkt laserowy - środek zakresu pomiaru temperatury (18 mm) b zakres pomiaru temperatury c - odległość termometr laserowy punkt pomiarowy Stosunek między odległością: termometr laserowy i zakres pomiaru wynosi ca. 40:1 a lézerpont távolsága a hőmérsékletmérési tartomány középpontja (18 mm) b hőmérsékletmérési tartomány c lézeres termométer távolsága mérési pont A lézeres termométer távolsága és a mérési tartomány közötti arány kb. 40:1. a Razdalja točke laserja sredina merilnega območja temperature (18 mm) b Merilno območje temperature c Oddaljenost merilne točke laserskega termometra Razmerje med oddaljenostjo laserskega termometra in območja merjenja znaša ca. 40:1 a Razmak laserske točke Sredina područja mjerenja temperature (18 mm) b Područje mjerenja temperature c Udaljenost laserskog termometra Mjerna točka Omjer između udaljenosti laserskog termometra i mjernog područja iznosi ca. 40:1 b 2 = ø 25 mm b 3 = ø 38 mm c 2 = 1 m c 3 = 1,5 m c : b 40 : 1 Laser b 1 = ø 12,5 mm c 1 = 0,5 m a Distância entre o ponto luminoso do laser e o centro da área medida (18 mm) b - Área de medição c Distância entre o termómetro laser e o ponto de medição O termómetro laser tem uma r relação entre a distância e o diâmetro da área medida de aproximadamente 40:1. a - afstand van de laserpunt tot het midden van het temperatuurmeetbereik (18 mm) b - temperatuurmeetbereik c - afstand van de laserthermometer tot de meetpunt De verhouding tussen de afstand van de laserthermometer en het meetbereik bedraagt ongeveer 40:1. a - Afstand laserpunkt midten af temperaturmåleområdet (18 mm) b - Temperaturmåleområde c Afstand lasertermometer - målepunkt Forholdet mellem afstand lasertermometer og måleområde er ca. 40:1 a Avstand laserpunkt midten av temperaturmåleområdet (18 mm) b - Temperaturmåleområde c Avstand lasertermometer - målepunkt Forholdet mellom avstand lasertermometer og måleområdet beløper seg på ca. 40:1 a Avstånd mellan laserpunkt och mätfläckens mitt (18 mm) b - Mätfläck c Avstånd mellan lasertermometer och mätpunkt Mätfläcken ökar med avståndet till lasertermometern i förhållandet ca 40:1. a - Välimatka laserpisteestä lämpötilan mittausalueen keskikohtaan (18 mm) b - Lämpötilan mittausalue c - Laserlämpömittarin etäisyys mittauspisteeseen Laserlämpömittarin etäisyyden ja mittausalueen suhde on noin 40:1 a Απόσταση σημείο λέιζερ κέντρο της περιοχής μέτρησης θερμοκρασίας (18 mm) b Περιοχή μέτρησης θερμοκρασίας c - Απόσταση θερμόμετρο λέιζερ σημείο μέτρησης Η αναλογία μεταξύ απόστασης θερμόμετρου λέιζερ και περιοχής μέτρησης ανέρχεται περ. 40:1 a - Lazer noktası mesafesi - sıcaklık ölçüm aralığının ortası (18 mm) b - Sıcaklık ölçüm aralığı c - Lazer termometre mesafesi - ölçüm noktası Lazer termometre mesafesi ile ölçüm aralığı arasındaki oran yaklaşık 40:1 dir. a vzdálenost laserového bodu střed měřeného teplotního rozsahu (18 mm) b měřicí teplotní rozsah c vzdálenost laserového teploměru měřený bod Poměr mezi vzdáleností laserového teploměru a měřicího rozsahu je cca 40:1. a - Attālums no lāzerpunkta līdz temperatūras mērīšanas zonas vidum (18 mm) b - Temperatūras mērīšanas zona c - Attālums no lāzera termometra līdz mērīšanas punktam Lāzera termometra un mērīšanas zonas attāluma attiecība apt. 40:1 a Lazerio taško atstumas Temperatūros matavimo diapazono vidurys (18 mm) b - Temperatūros matavimo diapazonas c Lazerinio termometro nuotolis Matavimo taškas Lazerinio termometro ir matavimo diapazono santykis yra: maždaug 40:1 a Laserpunkti kaugus temperatuuri mõõtmisvahemiku keskpunkt (18 mm) b Temperatuuri mõõtmisvahemiku c Lasertermomeetri kaugus mõõtmispunkt Lasertermomeetri ja temperatuuri mõõtmisvahemiku vahelise kauguse suhe on umbes 40:1. а расстояние от лазерной точки до середины диапазона измерения температуры (18 mm) b диапазон измерения температуры с расстояние от лазерного термометра до точки измерения Соотношение между расстоянием от лазерного термометра до диапазона измерения составляет ок. 40:1. a Разстояние от лазерната точка до средата на диапазона на измерване на температурата (18 mm) b - Диапазон на измерване на температурата c Разстояние между лазерния термометър и точката на измерване Съотношението между разстоянието от лазерния термометър и диапазона на измерване е прибл. 40:1 a Distanţa punctului laser faţă de zona de măsurare a temperaturii (18 mm) b Zona de măsurare a temperaturii c Distanţa termometrului laser faţă de punctul de măsurare Raportul dintre distanţa termometrului cu laser şi zona de măsurare este de cca. 40:1 а Растојание ласерска точка средина на мерното подрачје за температура (18 mm) b - Мерно подрачје за температура c- Растојание ласерски термометар мерна точка Односот помеѓу растојанието на ласерскиот термометар и мерното подрачје изнесува 40:1 a 激光点和温度测量范围中点间的距离 b 温度测量范围 c 激光测温仪和测量点间的距离激光测温仪距离和测量范围的比率为 40:1 左右 8 9
6 10 11
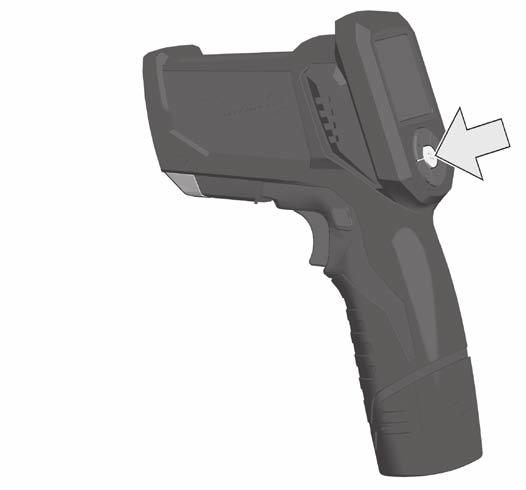
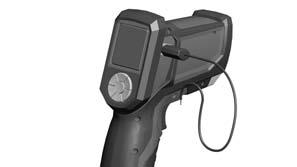
7 TECHNICAL DATA WARNING! Read all safety warnings and all instructions, including those given in the accompanying brochure. Failure to follow the warnings and instructions may result in electric shock, fire and/or serious injury. Save all warnings and instructions for future reference. SAFETY INSTRUCTIONS Do not stare into beam. Do not point laser light at other persons. Do not view directly into beam with optical instruments (binocular, telescope). Do not point laser at reflective surfaces, Avoid exposure to laser radiation. Laser may emit hazardous radiation. Avoid dangerous environments. Do not use in rain, snow, damp or wet locations. Do not use in the presence of explosive atmospheres (gaseous fumes, dust or fammable materials) because sparks may be generated when inserting or removing battery pack, possibly causing fire. Disconnect all the cords and cables from the object under test and power off the instrument before removing or inserting the battery pack. Do not dispose of used battery packs in the household refuse or by burning them. Milwaukee Distributors offer to retrieve old batteries to protect our environment. Do not store the battery pack together with metal objects (short circuit risk). Use only System C 12 chargers for charging System C 12 battery packs. Do not use battery packs from other systems. Battery acid may leak from damaged batteries under extreme load or extreme temperatures. In case of contact with battery acid wash it off immediately with soap and water. In case of eye contact rinse thoroughly for at least 10 minutes and immediately seek medical attention. This appliance is not intended for use by persons (including children) with limited physical, sensory or mental capabilities or insufficient experience and/or knowledge unless they are supervised by a person who is responsible for their safety or Laser Thermometer C12 LTGE Laser class... 2 Max. Power... <1 mw Wavelength nm IR Temperature range C to 800 C IR Accuracy -30 C to 0 C... ±1.5 C +0.1/1 C 0 C to 120 C... ±1.0 C +0.02/1 C 120 C to 380 C... ±1.5 C or 1.5% of reading, whichever is greater 380 C to 800 C... ±2.0 C or 2% of reading, whichever is greater Assume ambient operating temperature of 23 C to 25 C Min. measuring distance mm < 50 C, 100 mm > 50 C Display resolution C (primary and secondary) Contact temperature range C to 550 C Contact temperature input accuracy... ± 1.1 C Temperature display resolution C for primary and secondary K-Type Probe temp range C to 260 C K-Type Probe temp input accuracy... < 400 C ±2.5 C Emissivity...Pre-set 0.95 (can be manually set) Response time... <500 msec Spectral response... 8 to 14 µm Distance to spot to 1 Repeatability... ±0.5 % or ±1 C(whichever is greater) Operating temperature... 0 C to 50 C Storage temperature C to 60 C w/o battery Relative humidity: to 90 % RH non-condensing at <30 C ambient Voltage Battery V Battery life... > 12 h with all functions Weight with battery g have been instructed by them in the safe use of the tool. Children should be supervised in order to ensure that they do not play with the tool. SPECIFIED CONDITIONS OF USE The Laser Thermoemter can be used for non-contact temperature measurement or contact temperature measurement with K-type probe. Do not use this product in any other way as stated for normal use. DISPLAY Battery life indicator Emissivity value Laser active indicator Emissivity active indicator Alarm indicator Hold indicator C or F indicator Primary measurement Secondary measurement Trigger lock indicator Log indicator BUTTONS OPERATION Alarm on/off Arrow up Log LED Floodlight on/off Settings Arrow down Operation modes Scanning Object IR Temperature 1. Pull and hold the trigger for at least 2 seconds and scan the surface temperature of an object. A laser pointer indicates the center of the circular area being scanned. NOTE: The object should be larger than the spot being scanned. If not, readings will be affected. See page 8 for necessary object size. 2. As you continue to hold the trigger, the icon is displayed along with the surface temperature (primary measurement) and maximum temperature (secondary measurement) readings. 3. Release the trigger. HOLD is displayed until the screen shuts off in about seven seconds. NOTE: A quick change in temperature (>10 C) affects the meter s readings. Allow the meter to reach ambient temperature before use (5 to 30 minutes, depending on temperature change). SELECTING MODES Press the MODE button to display one of the following Average Temperature (AVG) During a temperature reading, the average temperature read during the scan is displayed. Maximum Temperature (MAX) During a temperature reading, the highest temperature read during the scan is displayed. Minimum Temperature (MIN) During a temperature reading, the lowest temperature read during the scan is displayed. CONTACT TEMPERATURE MEASUREMENT WITH K-TYPE PROBE Warning! Never connect the Temperature Probe to an energized circuit. Only use K-type Temperature Probes with this meter. 1. Insert the probe. P ull the trigger. The unit detects a connection of a K-type probe and displays the contact temperature (CON) as the secondary measurement. 2. The display will continue to update the contact temperature (CON) while the temperature probe reaches thermal equilibrium with the object being measured. The display will shut off after about 20 min. 3. When the probe is inserted, both IR and contact temperature reading will continue to display as primary and secondary measurement respectively. Removing the probe will set the unit off and turn on to default IR reading when pull the trigger. 4. If set, the alarm will alert for the IR reading regardless the sensor probe is installed or not. SELECTING SETTINGS Press the SET button to display one of the following. Then use the arrow buttons to determine the value: Alarm High (HI) If the set temperature is reached during a scan, HI,, and temperature will flash. Alarm Low (LOW) If the set temperature is reached during a scan, LOW",, and temperature will flash Log (LOG) Use the arrow keys to select the data location (1-20). Pull the trigger to scan the temperature. Press the LOG key to save the reading to the selected data location. 12 ENGLISH ENGLISH 13
8 Emissivity (E) Set the emissivity of the surface being scanned (0.95 is the default). During a temperature scan, the set emissivity value is displayed. Refer to an Emissivity Table for proper surface settings. Laser ON/OFF ( ) Turns the laser pointer on and off while the IR continues to take readings. F / C (F) Determine if temperature readings are displayed in Fahrenheit or Celsius. Alarm ON, OFF, MUTE Use the Alarm ON/OFF button to turn the alarm on and off, and mute the alarm after it sounds. The bell icon will go off. The temperature reading will con-tinue to flash as long as it is outside the preset range. Fuel Gauge The battery icon displays the remaining battery life. Charge the battery according to the battery and charger manual. BATTERIES New battery packs reach full loading capacity after 4-5 chargings and dischargings. Battery packs which have not been used for some time should be recharged before use. Temperatures in excess of 50 C (122 F) reduce the performance of the battery pack. Avoid extended exposure to heat or sunshine (risk of overheating). The contacts of chargers and battery packs must be kept clean. MAINTENANCE Clean the laser windows with a soft, moist cloth to keep them clean and clear. Remove battery before cleaning. Warning! To reduce the risk of personal injury and damage, never immerse your tool in liquid or allow a liquid to fow inside it. Clean dust and debris from tool. Keep tool handles clean, dry and free of oil or grease. Use only mild soap and a damp cloth to clean the tool since certain cleaning agents and solvents are harmful to plastics and other insulated parts. Never use flammable or combustible solvents around tools Use only Milwaukee accessories and Milwaukee spare parts. Should components need to be replaced which have not been described, please contact one of our Milwaukee service agents (see our list of guarantee/service addresses). If needed, an exploded view of the tool can be ordered. Please state the Article No. as well as the machine type printed on the label and order the drawing at your local service agents or directly at: Milwaukee Electric Tool, Max Eyth Straße 10, D Winnenden, Germany. SYMBOLS Please read the instructions carefully before starting the machine. Remove the battery pack before starting any work on the machine. Do not stare into beam. 2 This product corresponds to the laser class 2 in accordance with IEC Do not dispose of electric tools together with household waste material! In observance of European Directive 2002/96/EC on waste electrical and electronic equipment and its implementation in accordance with national law, electric tools that have reached the end of their life must be collected separately and returned to an environmentally compatible recycling facility. TECHNISCHE DATEN WARNUNG! Lesen Sie alle Sicherheitshinweise und Anweisungen, auch die in der beiliegenden Broschüre. Versäumnisse bei der Einhaltung der Sicherheitshinweise und Anweisungen können elektrischen Schlag, Brand und/oder schwere Verletzungen verursachen. Bewahren Sie alle Sicherheitshinweise und Anweisungen für die Zukunft auf. SPEZIELLE SICHERHEITSHINWEISE Nicht in den Laserstrahl blicken und nicht auf andere Personen richten. Nicht mit optischen Hilfsmitteln (Fernglas, Fernrohr) in den Laser blicken. Den Laser nicht auf reflektierende Flächen richten. Nicht der Laserstrahlung aussetzten. Der Laser kann gefährliche Strahlung aussenden. Nicht in gefährlicher Umgebungen benutzen. Nicht bei Regen, Schnee, an feuchten oder nassen Orten verwenden. Nicht in explosionsgefährdeten Bereichen (Rauch, Staub oder entflammbare Materialien) benutzen, da beim Einsetzen oder Entnehmen des Wechselackus Funken erzeugt werden können. Dies kann Feuer verursachen. Vor dem Einsetzen oder Entfernen des Akkus alle Kabel und Leitungen vom zu prüfenden Objekt trennen und Gerät ausschalten. Verbrauchte Wechselakkus nicht ins Feuer oder in den Hausmüll werfen. Milwaukee bietet eine umweltgerechte Alt-Wechselakku-Entsorgung an; bitte fragen Sie Ihren Fachhändler. Wechselakkus nicht zusammen mit Metallgegenständen aufbewahren (Kurzschlussgefahr). Wechselakkus des Systems C12 nur mit Ladegeräten des Systems C12 laden. Keine Akkus aus anderen Systemen laden. Unter extremer Belastung oder extremer Temperatur kann aus beschädigten Wechselakkus Batterieflüssigkeit auslaufen. Bei Berührung mit Batterieflüssigkeit sofort mit Wasser und Seife abwaschen. Bei Augenkontakt sofort mindestens 10 Minuten gründlich spülen und unverzüglich einen Arzt aufsuchen. Laser Thermometer C12 LTGE Laser Klasse... 2 Maximale Leistung... <1 mw Laserwellenlänge nm Infrarot Temperatur Bereich C C Infrarot Messgenauigkeit -30 C - 0 C... ±1,5 C +0.1/1 C 0 C C... ±1,0 C +0.02/1 C 120 C C... ±1,5 C oder 1.5% der Anzeige, der größere Wert zählt 380 C C... ±2,0 C oder 2% der Anzeige, der größere Wert zählt bei einer Umgebungstemperatur von 23 C to 25 C Min. Messdinstanz mm < 50 C, 100 mm > 50 C Auflösung Anzeigen... 0,1 C (Primär- und Sekundäranzeige) Temperaturbereich bei Kontaktmessung C C Eingangsgenauigkeit bei Kontaktmessung... ± 1,1 C Auflösung Temperaturanzeige... 0,1 C (Primär- und Sekundäranzeige) K-Type Sonde Temperaturbereich C C K-Type Sonde Eingangsgenauigkeit... < 400 C ±2,5 C Emmisionsgrad...Voreinstellung 0.95 (kann manuell verändert werden) Reaktionszeit... <500 msec Spektralbereich µm Verhältnis Abstand zu Messbereich...40 zu 1 Wiederholgenauigkeit... ±0,5 % oder ±1 C(der größere Wert zählt) Arbeitstemperatur... 0 C - 50 C Lagerungstemperatur C - 60 C ohne Wechsleakku Relative Luftfeuchtigkeit % RH nicht kondensierend bei <30 C Umgebungstemperatur Spannung Wechselakku V Akkulaufzeit... > 12 h mit allen Funktionen Gewicht mit Wechselakku g Dieses Gerät ist nicht dafür bestimmt, durch Personen (einschließlich Kinder) mit eingeschränkten physischen, sensorischen oder geistigen Fähigkeiten oder mangels Erfahrung und/oder mangels Wissen benutzt zu werden, es sei denn, sie werden durch eine für ihre Sicherheit zuständige Person beaufsichtigt oder erhielten von ihr Anweisungen, wie das Gerät zu benutzen ist. Kinder sollten beaufsichtigt werden, um sicherzustellen, dass sie nicht mit dem Gerät spielen. BESTIMMUNGSGEMÄßE VERWENDUNG Das Laserthermometer ist geeignet zur berührungsfreien Temperaturmessung oder zur Temperaturmessung mit einer K-Type Temperatursonde. Dieses Gerät darf nur wie angegeben bestimmungsgemäß verwendet werden. 14 ENGLISH DEUTSCH 15 DISPLAY Ladezustand Akku Emissionsgrad Laser aktiv Emissionsgrad aktiv Alarm ein Wert halten C oder F Anzeige Primäranzeige Sekundäranzeige Schalterarretierung aktiv Speichern
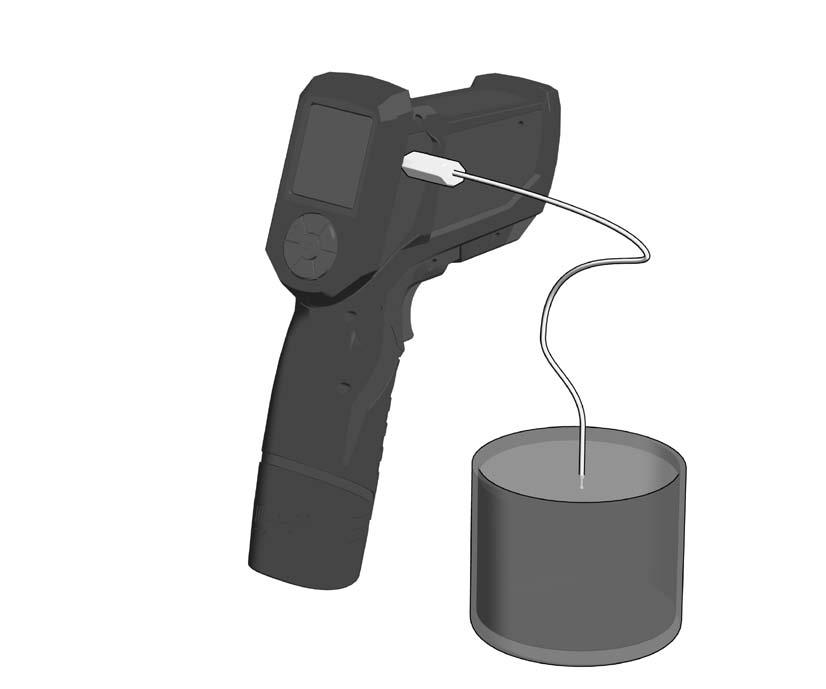
9 TASTEN BEDIENUNG Alarm ein/aus Nach oben Speichern LED Flutlicht ein/aus Einstellungen Nach unten Betriebsarten Berührungsfreie Temperaturmessung 1. Schalterdrücker 2 Sekunden drücken. Die Oberflächentemperatur des Gegenstandes wird gemessen. Der Laserpunkt markiert die Mitte des Messfeldes Hinweis: Der Gegenstand sollte größer sein als das Messfeld. Die Größe des Messfeldes hängt von der Entfernung zum Gegenstand ab (siehe Abbildung Seite 8). 2. Bei gedrücktem Schalterdrücker wird das Symbol (Laser aktiv), der Primärwert und der Sekundärwert angezeigt (im Beispiel die Momentantemperatur und die Durchschnittstemperatur). 3. Schalterdrücker loslassen. HOLD wird angezeigt bis die Anzeige nach 7 Sekunden erlischt. Hinweis: Eine schnelle Änderung der Umgebungstemperatur (>10 C) beeinflusst die Messung. Die Messung erst beginnen, wenn das Gerät Raumtemperatur erreicht hat (5 bis 30 Minuten, abhängig von der Temperaturänderung). BETRIEBSARTEN Mit der Taste MODE zwischen den folgenden Betriensarten umzuschalten: Durchschnittstemperatur (AVG) Während der Temperaturmessung wird im unteren Bereich des Displays die Durchschnittstemperatur angezeigt. Minimaltemperatur (MIN) Während der Temperaturmessung wird im unteren Bereich des Displays die Minimaltemperatur angezeigt. KONTAKT TEMPERATURMESSUNG MIT K-TYPE SONDE Warnung Niemals die Temperatursonde an einen unter Spannung stehenden Sromkreis anschließen. Nur K-Type Sonden mit diesem Gerät einsetzen. 1. Die Sonde anschließen und den Schalterdrücker drücken. Das Gerät erkennt den Anschluss einer K-Typ-Sonde und zeigt die Kontakt-Temperaturmessung (CON) in der Sekundäranzeige an. 2. Im Display wird der Wert in der Sekundäranzeige ständig aktualisert, bis die Temperatur der Sonde mit der Temperatur des zu messenden Gegenstandes oder Flüssigkeit angeglichen ist. Das Display schaltet sich nach 20 min. ab. 3. Bei Verwendung der Sonde werden beide Werte im Display jeweils als Primäranzeige und als Sekundäranzeige angezeigt. Nach Entfernen der Sonde schaltet sich die Einheit ab. Durch Drücken des Schalterdrückers schaltet das Gerät um zur voreingestellten IR-Messung. 4. Ist die Alarmfunktion aktiviert, so wird der Alarm bei IR-Messung ausgelöst, unabhängig davon, ob die Messsonde angeschlossen ist oder nicht. EINSTELLUNGEN Mit der Taste SET eine der folgenden Einstellungen wählen. Mit den Pfeiltasten die Werte ändern. Alarm hoch (HI) Wird die eingestellte Temperatur während einer Messung erreicht dann blinken die Anzeigen HI und Alarm niedrig (LOW) Wird die eingestellte Temperatur während einer Messung erreicht dann blinken die Anzeigen LOW und Emmissionsgrad (E) Mit den Pfeiltasten den gewünschten Emmisionsgrad einstellen (0,95 ist die Voreinstellung). Während einer Temperaturmessung wird der Emmisionsgrad angezeigt. Den entsprechenden Emmisionsgrad zur Oberfläche des zu messenden Gegenstandes aus einer Emmissionstabelle entnehmen. Laser ein/aus ( ) Schaltet den Laser aus und ein. Die temperaturmessung erfolgt weiterhin. Umschaltung F / C (F) Mit den Pfeiltasten zwischen der Maßeinheit Fahrenheit oder Celsius umschalten Alarm ein, aus, stumm Mit dem Taster Alarm den Alarmton ein- oder aussschalten bzw. den Alarmton stumm stellen wenn er ertönt. Die Alarmanzeige erlischt. Die Temperaturanzeige blinkt weiter, so lange die Temperatur außerhalb des eingestellten Wertes ist. LADEZUSTAND AKKU Das Akku Symbol zeigt den Ladezustand des Wechselakkus. Leere Wechselakkus wie in der Bedeinungsanleitung des Ladegerätes beschrieben wieder aufladen AKKUS Neue Wechselakkus erreichen ihre volle Kapazität nach 4-5 Lade-und Entladezyklen. Längere Zeit nicht benutzte Wechselakkus vor Gebrauch nachladen. Eine Temperatur über 50 C vermindert die Leistung des Wechselakkus. Längere Erwärmung durch Sonne oder Heizung vermeiden. Die Anschlusskontakte an Ladegerät und Wechselakku sauber halten. WARTUNG Die Öffnung des Lasers mit einem weichen, feuchten Tuch reinigen. Vor der Reinigung den Wechselakku entnehmen Warnung! Um Personenschäden zu vermeiden, das Gerät niemals in Flüssigkeit tauchen bzw. vermeiden, dass Flüssigkeit in das Gerät gelangt Staub und Schmutz vom Gerät stets entfernen. Den Handgriff sauber, trocken und frei von Öl oder Fett halten. Reinigungsund Lösungsmittel sind schädlich für Kunststoffe und andere isolierende Teile, deshalb nur mit einer milden Seife und einem feuchten Tuch das Gerät reinigen. Verwenden Sie niemals brennbare Lösungsmittel in der Nähe des Gerätes Nur Milwaukee Zubehör und Ersatzteile verwenden. Bauteile, deren Austausch nicht beschrieben wurde, bei einer Milwaukee Kundendienststelle auswechseln lassen (Broschüre Garantie/ Kundendienstadressen beachten). Bei Bedarf kann eine Explosionszeichnung des Gerätes unter Angabe der Maschinen Type und der zehnstelligen Nummer auf dem Leistungsschild bei Ihrer Kundendienststelle oder direkt bei Milwaukee Electric Tool, Max Eyth Straße 10, D Winnenden, Germany angefordert werden. SYMBOLE Bitte lesen Sie die Gebrauchsanweisung vor Inbetriebnahme sorgfältig durch. Vor allen Arbeiten an der Maschine den Wechselakku herausnehmen Nicht in den Laserstrahl sehen. 2 Das Produkt entspricht der Laserklasse 2 gemäss IEC Werfen Sie Elektrowerkzeuge nicht in den Hausmüll! Gemäss Europäischer Richtlinie 2002/96/EG über Elektro- und Elektronik- Altgeräte und Umsetzung in nationales Recht müssen verbrauchte Elektrowerkzeuge getrennt gesammelt und einer umweltgerechten Wiederverwertung zugeführt werden. Maximaltemperatur (MAX) Während der Temperaturmessung wird im unteren Bereich des Displays die Maximaltemperatur angezeigt. Speichern (LOG) Mit den Pfeiltasten den gewünschten Speicherplatz (1-20) wählen. Den Schalterdrücker drücken und die Temperatur messen. Taste LOG drücken und die angezeigte Temperatur speichern. 16 DEUTSCH DEUTSCH 17
10 DONNEES TECHNIQUES AVERTISSEMENT! Lisez toutes les consignes de sécurité et les instructions, même celles qui se trouvent dans la brochure ci-jointe. Le non-respect des avertissements et instructions indiqués ci après peut entraîner un choc électrique, un incendie et/ou de graves blessures sur les personnes. Bien garder tous les avertissements et instructions. INSTRUCTIONS DE SÉCURITÉ PARTICULIERES Ne pas regarder dans le rayon laser et ne pas le diriger sur d autres personnes. Ne pas regarder dans le rayon laser avec des appareils optiques (jumelles, télescope). Ne pas diriger le rayon laser sur des surfaces réfléchissantes. Eviter toute exposition à la radiation laser. Le laser peut émettre une radiation intense et dangereuse. Ne pas utiliser dans des environnements dangereux. Eviter toute utilisation par temps de pluie et de neige, ainsi que sur les endroits humides ou mouillés. Ne pas utiliser dans les zones présentant des risques d explosion (fumée, poussière ou matériaux inflammables) car il se peut que des étincelles soient générées lors de la mise en place ou du remplacement de l accu interchangeable. Cela peut provoquer un incendie. Avant la mise en place ou l enlèvement de l accu, il convient de débrancher tous les câbles et tous les conducteurs de l objet à contrôler et d éteindre l appareil. Ne pas jeter les accus interchangeables usés au feu ou avec les déchets ménagers. Milwaukee offre un système d évacuation écologique des accus usés. Ne pas conserver les accus interchangeables avec des objets métalliques (risque de court-circuit) Ne charger les accus interchangeables du système C12 qu avec le chargeur d accus du système C12. Ne pas charger des accus d autres systèmes. En cas de conditions ou températures extrêmes, du liquide caustique peut s échapper d un accu interchangeable endommagé. En cas de contact avec le liquide caustique de la batterie, laver immédiatement avec de l eau et du savon. En Thermomètre au laser C12 LTGE Classe de laser... 2 Puissance maximale... <1 mw Longueur d onde laser nm Plage de température infrarouge C C Exactitude de mesure infrarouge -30 C - 0 C... ±1,5 C +0.1/1 C 0 C C... ±1,0 C +0.02/1 C 120 C C... ±1,5 C ou 1.5% de l affichage, la plus grande valeur compte 380 C C... ±2,0 C ou 2% de l affichage, la plus grande valeur compte lors d une température ambiante de 23 C à 25 C Distance de mesure minimale mm < 50 C, 100 mm > 50 C Résolution des affichages... 0,1 C (affichage primaire et secondaire) Plage de température lors de la mesure du contact C C Exactitude d entrée lors de la mesure du contact... ± 1,1 C Résolution de l affichage de la température... 0,1 C (affichage primaire et secondaire) Sonde du type «K» - Plage de température C C Sonde du type «K» - Exactitude d entrée... < 400 C ±2,5 C Degré d émission...préréglage 0.95 (peut être modifié manuellement) Temps de réaction... <500 msec Plage spectrale µm Rapport entre la distance et la plage de mesure à 1 Exactitude de répétition... ±0,5 % ou ±1 C (la plus grande valeur compte) Température de travail... 0 C - 50 C Température de stockage C - 60 C sans accu interchangeable Humidité relative de l air % HR sans condensation sous une température ambiante <30 C Tension de l accu interchangeable V Durée de marche de l accu... > 12 h avec toutes les fonctions Poids avec l accu interchangeable g cas de contact avec les yeux, rincer soigneusement avec de l eau et consulter immédiatement un médecin. Cet appareil n est pas destiné à être utilisé par des personnes (y compris des enfants) présentant des capacités restreintes au niveau physique, sensoriel ou mental, ou qui manquent d expérience ou de connaissances, à moins que de telles personnes soient surveillées par une autre personne compétente en matière de sécurité ou aient reçu de cette dernière les instructions adéquates concernant l utilisation de l appareil. Les enfants doivent être surveillés afin de garantir qu ils ne jouent pas avec l appareil. UTILISATION CONFORME AUX PRESCRIPTIONS Le thermomètre au laser convient à la mesure de la température sans contact ou à la mesure de la température avec une sonde de température du type «K». Comme déjà indiqué, cette machine n est conçue que pour être utilisée conformément aux prescriptions. AFFICHEUR Etat de charge de l accu Degré d émission Laser actif Degré d émission actif Alarme activée Maintenir la valeur Affichage en C ou en F Affichage primaire Affichage secondaire Blocage d interrupteur actif Mémorisation TOUCHES MANIEMENT Alarme activée/désactivée Vers le haut Mémorisation LED de projecteur d illumination marche/arrêt Réglages Vers le bas Modes de service Mesure de la température sans contact 1. Appuyer sur le poussoir de l interrupteur pendant 2 secondes. La température surfacique de l objet est mesurée. Le point laser repère le milieu du champ de mesure. Remarque: l objet devrait avoir une dimension plus grande que le champ de mesure. La dimension du champ de mesure dépend de l éloignement envers l objet (voir la figure sur la page 8). 2. Alors que le poussoir de l interrupteur est enfoncé, le symbole (Laser actif), la valeur primaire et la valeur secondaire sont affichés (dans l exemple, la température momentanée et la température moyenne). 3. Relâcher le poussoir de l interrupteur. L expression «HOLD» (maintenir) est affichée jusqu à ce que l affichage s éteigne après 7 secondes. Remarque: une modification rapide de la température ambiante (>10 C) influe sur la mesure. Commencer la mesure seulement si l appareil a atteint la température de la pièce (5 à 30 minutes, selon la modification de la température). MODES DE SERVICE La touche MODE permet de commuter entre les modes de service suivants : Température moyenne (AVG) La température moyenne est affichée dans la zone inférieure de l écran pendant la mesure de la température. Température maximale (MAX) La température maximale est affichée dans la zone inférieure de l écran pendant la mesure de la température. Température minimale (MIN) La température minimale est affichée dans la zone inférieure de l écran pendant la mesure de la température. MESURE DE LA TEMPERATURE PAR CONTACT AVEC LA SONDE DU TYPE «K» Avertissement Ne jamais connecter la sonde de température à un circuit de courant qui se trouve sous tension. Utiliser uniquement une sonde du type «K» avec cet appareil. 1. Enfoncer le poussoir de l interrupteur connecter la sonde. L appareil reconnaît la connexion d une sonde du type «K» et affiche la mesure de la température par contact (CON) sur l affichage secondaire. 2. Sur l afficheur, la valeur dans l affichage secondaire est actualisée en permanence jusqu à ce que la température de la sonde se soit équilibrée avec la température de l objet ou du liquide à mesurer. L afficheur s éteint après 20 minutes. 3. Lors de l utilisation de la sonde, les deux valeurs sont affichées respectivement comme affichage primaire et comme affichage secondaire sur l afficheur. L unité s éteint après que la sonde ait été retirée. L appareil commute sur la mesure IR pré-ajustée suite à une pression du poussoir de l interrupteur. 4. Si la fonction d alarme est activée, l alarme est déclenchée lors de la mesure IR, indépendamment du fait si la sonde de mesure est connectée ou non. REGLAGES Choisir un des réglages suivants avec la touche SET. Modifier les valeurs avec les touches flèches. Alarme de haut niveau (HI) Si la température ajustée est atteinte pendant une mesure, les expressions «HI» et clignotent. Alarme de bas niveau (LOW) Si la température ajustée est atteinte pendant une mesure, les affichages «LOW» et clignotent. Mémorisation (LOG) Sélectionner la place de mémoire souhaitée (1-20) avec les touches flèches. Enfoncer le poussoir de l interrupteur et mesurer la température. Appuyer sur la touche «LOG» et mémoriser la température affichée. 18 FRANÇAIS FRANÇAIS 19
11 Degré d émission (E) Ajuster le degré d émission souhaité (le préréglage est 0,95) avec les touches flèches. Le degré d émission est affiché pendant une mesure de la température. Prélever le degré d émission correspondant par rapport à la surface de l objet à mesurer depuis un tableau d émissions. Laser marche/arrêt ( ) Cette fonction active et désactive le laser. La mesure de la température a encore lieu. Commutation entre F / C (F) Les touches flèches permettent de commuter entre l unité de mesure «Fahrenheit» ou «Celsius». ENTRETIEN Nettoyer l ouverture du laser avec un chiffon doux et humide. Retirer l accu interchangeable avant le nettoyage. Avertissement! Dans le but d éviter des préjudices corporels, ne jamais immerger l appareil dans du liquide ou éviter que du liquide pénètre dans l appareil. Toujours tenir l appareil à l écart de la poussière et des saletés. Veiller à ce que la poignée reste propre, sèche et exempte d huile ou de graisse. Les produits de nettoyage et les solvants sont nocifs pour les matières plastiques et d autres composants isolants ; c est pourquoi il convient de nettoyer l appareil seulement avec un savon doux et un chiffon humide. Ne jamais utiliser de solvants combustibles à proximité de l appareil. Utiliser uniquement les accessoires Milwaukee et les pièces détachées Milwaukee. Faire remplacer les composants dont le remplacement n'a pas été décrit, par un des centres de service après-vente Milwaukee (observer la brochure avec les adresses de garantie et de service après-vente). Si besoin est, une vue éclatée de l'appareil peut être fournie. S'adresser, en indiquant bien le numéro à dix chiffres porté sur la plaque signalétique, à votre station de service après-vente (voir liste jointe) ou directement à Milwaukee Electric Tool, Max Eyth Straße 10, D Winnenden, Germany. SYMBOLES Veuillez lire avec soin le mode d emploi avant la mise en service DATI TECNICI Termometro laser C12 LTGE Laser classe... 2 Potenza massima... <1 mw Lunghezza d onda del laser nm Campo di temperatura infrarossi C C Precisione di misura infrarossi -30 C - 0 C... ±1,5 C +0.1/1 C 0 C C... ±1,0 C +0.02/1 C 120 C C... ±1,5 C oppure 1.5% dell indicazione, conta il valore maggiore 380 C C... ±2,0 C oppure 2% dell indicazione, conta il valore maggiore con una temperatura ambiente da 23 C a 25 C Distanza di misura min mm < 50 C, 100 mm > 50 C Risoluzione visualizzazioni... 0,1 C (visualizzazione primaria e secondaria) Campo di temperatura con misurazione a contatto C C Precisione di ingresso con misurazione a contatto... ± 1,1 C Risoluzione visualizzazione della temperatura... 0,1 C (visualizzazione primaria e secondaria) Campo di temperatura sonda tipo K C C Precisione di ingresso sonda tipo K... < 400 C ±2,5 C Grado di emissione...preimpostazione 0.95 (può essere modificata a mano) Tempo di risposta... <500 msec Gamma spettrale µm Rapporto distanza dal campo di misura : 1 Ripetibilità... ±0,5 % oppure ±1 C(conta il valore maggiore) Temperatura di lavoro... 0 C - 50 C Temperatura di stoccaggio C - 60 C senza accumulatore di ricambio Umidità relativa dell aria % RH senza condensa a <30 C di temperatura ambiente Tensione accumulatore di ricambio V Durata accumulatore... > 12 h con tutte le funzioni Peso con accumulatore di ricambio g Alarme activée, désactivée, muette Le bouton poussoir «Alarme» permet d activer ou de désactiver la tonalité d alarme si elle retentit ou aussi de la commuter sur le mode muet. La signalisation d alarme ne retentit plus. L affichage de la température continue de clignoter jusqu à ce que la température se trouve en dehors de la valeur ajustée. ETAT DE CHARGE DE L ACCU Le symbole de l accu indique l état de charge de l accu interchangeable. Recharger l accu interchangeable déchargé comme cela est indiqué dans le mode d emploi du chargeur. ACCUS Les nouveaux accus interchangeables atteignent leur pleine capacité après 4-5 cycles de chargement et déchargement. Recharger les accus avant utilisation après une longue période de non utilisation. Une température supérieure à 50 C amoindrit la capacité des accus. Eviter les expositions prolongées au soleil ou au chauffage. Tenir propres les contacts des accus et des chargeurs. Avant tous travaux sur la machine retirer l accu interchangeable. Ne pas regarder dans le rayon laser. 2 Le produit répond à la classe de laser 2, conformément à la norme IEC Ne pas jeter les appareils électriques dans les ordures ménagères! Conformément à la directive européenne 2002/96/EG relative aux déchets d équipements électriques ou électroniques (DEEE), et à sa transposition dans la législation nationale, les appareils électriques doivent être collectés à part et être soumis à un recyclage respectueux de l environnement. AVVERTENZA! E necessario leggere tutte le indicazioni di sicurezza e le istruzioni, anche quelle contenute nella brochure allegata. In caso di mancato rispetto delle avvertenze di pericolo e delle istruzioni operative si potrà creare il pericolo di scosse elettriche, incendi e/o incidenti gravi. Conservare tutte le avvertenze di pericolo e le istruzioni operative per ogni esigenza futura. NORME DI SICUREZZA Non guardare nel raggio laser e non puntarlo su altre persone. Non osservare il raggio laser con strumenti ottici di aiuto (binocolo, cannocchiale). Non rivolgere il laser su superfici riflettenti. Non esporre alla radiazione laser. Il laser può emettere una forte radiazione. Non utilizzare in ambienti pericolosi. Non utilizzare con pioggia, neve, in luoghi umidi o bagnati. Non utilizzare in aree a rischio di esplosione (fumo, polveri o materiali infiammabili), perché quando si inserisce o toglie l accumulatore di ricambio si possono produrre scintille. Ciò può provocare un incendio. Prima di inserire o togliere l accumulatore, bisogna staccare tutti i cavi e le linee dall oggetto da sottoporre a controllo e spegnere l apparecchiatura. Non gettare le batterie esaurite sul fuoco o nella spazzatura di casa. La Milwaukee offre infatti un servizio di recupero batterie usate. Nel vano d innesto per la batteria del caricatore non devono entrare parti metalliche.(pericolo di cortocircuito). Le batterie del System C12 sono ricaricabili esclusivamente con i caricatori del System C12. Le batterie di altri sistemi non possono essere ricaricate. Nel caso di batterie danneggiate da un carico eccessivo o da temperature alte, l'acido di queste potrebbe fuoriuscire. In caso di contatto con l'acido delle batterie lavarsi immediatamente con acqua e sapone. In caso di contatto con gli occhi risciacquare immediatamente con acqua per almeno 10 minuti e contattare subito un medico. Il presente apparato non è destinato all uso da parte di persone (bambini compresi) con abilità fisiche, sensoriali o intellettuali limitate o da parte di persone con mancanza di esperienza o mancanze delle necessarie conoscenze, salvo che vengano sorvegliate da una persona responsabile per la loro sicurezza o che siano state da quest ultima istruita su come utilizzare l apparato stesso. Sorvegliare i bambini per accertarsi che non giochino con l apparato. UTILIZZO CONFORME Il termometro laser è adatto alla misurazione della temperatura senza contatto, oppure alla misurazione della temperatura mediante una sonda termica di tipo K. Utilizzare il prodotto solo per l uso per cui è previsto. DISPLAY Stato della carica accumulatore Grado di emissione Laser attivo Grado di emissione attivo Allarme on Mantieni valore Visualizzazione C oppure F Visualizzazione primaria Visualizzazione secondaria Blocco interruttore attivo Salva 20 FRANÇAIS ITALIANO 21
12 TASTI COMANDO Allarme on/off Su Salva LED proiettore on/off Impostazioni Giù Modi operativi Misurazione della temperatura senza contatto 1. Premere l interruttore per 2 secondi. Viene misurata la temperatura superficiale dell oggetto. Il punto laser marca il centro del campo di misura Avvertenza: l oggetto dovrebbe essere più grande del campo di misura. La dimensione del campo di misura dipende dalla distanza dall oggetto (si veda la figura a pagina 8). 2. Quando si preme l interruttore vengono visualizzati l icona (laser attivo), il valore primario e il valore secondario (nell esempio la temperatura momentanea e la temperatura media). 3. Rilasciare l interruttore. Viene visualizzato HOLD finché l indicazione non si spegne dopo 7 secondi. Avvertenza: un cambiamento repentino della temperatura ambiente (>10 C) incide sulla misurazione. Iniziare con la misurazione solo quando lo strumento ha raggiunto la temperatura del locale (da 5 a 30 minuti, dipende dal cambiamento della temperatura). Temperatura minima (MIN) Durante la misurazione della temperatura, nella parte bassa del display viene visualizzata la temperatura minima. MISURAZIONE DELLA TEMPERATURA CON CONTATTO CON SONDA TIPO K Avvertimento Non collegare mai la sonda termica ad un circuito elettrico sotto tensione. Con questo strumento utilizzare solo sonde del tipo K. 1. Collegare la sonda, bisogna premere l interruttore. Lo strumento rileva il collegamento di una sonda di tipo K e visualizza la misurazione della temperatura con contatto (CON) nella visualizzazione secondaria. 2. Sul display il valore nella visualizzazione secondaria viene costantemente aggiornato, finché la temperatura della sonda non è allineata alla temperatura dell oggetto o del liquido da misurare. Dopo 20 min. il display si spegne. 3. Utilizzando la sonda vengono visualizzati ambedue i valori, rispettivamente come lettura primaria e come lettura secondaria. Dopo la rimozione della sonda, l unità si disattiva. Azionando l interruttore a pulsante, l apparecchio passa alla misurazione IR di default. 4. Se è attivata la funzione di allarme, questa interviene sulla misurazione IR a prescindere dalla connessione o meno della sonda di misurazione. IMPOSTAZIONI Selezionare una delle seguenti impostazioni premendo il tasto SET. Modificare i valori con l aiuto dei tasti di direzione. Grado di emissione (E) Impostare il grado di emissione desiderato con l aiuto dei tasti di direzione (0,95 è il valore predefinito). Durante la misurazione di una temperatura viene visualizzato il grado di emissione. Desumere da una tabella delle emissioni il relativo grado di emissione rispetto alla superficie dell oggetto da misurare. Laser on/off ( ) Accende e spegne il laser. La misurazione della temperatura continua. Commutazione F / C (F) Commutare con i tasti di direzione tra l unità di misura Fahrenheit oppure Celsius. Allarme on, off, muto Attivare o disattivare l allarme premendo il tasto Allarme, oppure commutare l allarme su silenzioso quando suona. L indicatore d allarme si spegne. L indicazione della temperatura continua a lampeggiare, finché la temperatura si muove al di fuori del valore impostato. MANUTENZIONE Pulire il foro del laser con un panno morbido, umido. Togliere l accumulatore di ricambio prima della pulizia Avvertimento! Per evitare danni alle persone, non immergere lo strumento mai in liquidi ed evitare che del liquido penetri nello strumento Togliere sempre la sporcizia e la polvere dallo strumento. Tenere l impugnatura pulita, asciutta e priva di olio o grasso. I detergenti e i solventi danneggiano le materie plastiche e le altre parti isolanti, pertanto pulire lo strumento solo con un sapone neutro e un panno umido. Non utilizzate mai solventi infiammabili nelle vicinanze dello strumento. Usare solo accessori Milwaukee e pezzi di ricambio Milwaukee. Gruppi costruttivi la cui sostituzione non è stata descritta, devono essere fatti cambiare da un punto di servizio di assistenza tecnica al cliente Milwaukee (vedi depliant garanzia/ indirizzi assistenza tecnica ai clienti). In caso di mancanza del disegno esploso, può essere richiesto al seguente indirizzo: Milwaukee Electric Tool, Max Eyth Straße 10, D Winnenden, Germany. SIMBOLI Leggere attentamente le istruzioni per l uso prima di mettere in funzione l elettroutensile. Prima di iniziare togliere la batteria dalla macchina. Non guardare nel raggio laser. 2 Il prodotto corrisponde alla classe laser 2 ai sensi della IEC MODI OPERATIVI Commutare tra i seguenti modi operativi premendo il tasto MODE: Temperatura media (AVG) Durante la misurazione della temperatura, nella parte bassa del display viene visualizzata la temperatura media. Allarme alto (HI) Se durante una misurazione si raggiunge la temperatura impostata, allora le indicazioni HI e lampeggiano Allarme basso (LOW) Se durante una misurazione si raggiunge la temperatura impostata, allora le indicazioni LOW e lampeggiano STATO DELLA CARICA ACCUMULATORE Il simbolo dell accumulatore indica lo stato della carica dell accumulatore. Ricaricare gli accumulatori scarichi come indicato nelle istruzioni sull uso del carica-batterie BATTERIE Le batterie nuove raggiungono la loro piena capacità dopo 4-5 cicli di carica e scarica. Batterie non utilizzate per molto tempo devone essere ricaricate prima dell uso. A temperature superiori ai 50 C, la potenza della batteria si riduce. Evitare di esporre l accumulatore a surriscaldamento prolungato, dovuto ad esempio ai raggi del sole o ad un impianto di riscaldamento. Non gettare le apparecchiature elettriche tra i rifiuti domestici. Secondo la Direttiva Europea 2002/96/CE sui rifiuti di pparecchiature elettriche ed elettroniche e la sua attuazione in conformità alle norme nazionali, le apparecchiature elettriche esauste devono essere accolte separatamente, al fine di essere reimpiegate in modo eco-compatibile. Temperatura massima (MAX) Durante la misurazione della temperatura, nella parte bassa del display viene visualizzata la temperatura massima. Salva (LOG) Selezionare con i tasti di direzione l area di memoria desiderata (1-20). Premere l interruttore e misurare la temperatura. Premere il tasto LOG e salvare la temperatura visualizzata. 22 ITALIANO ITALIANO 23
SNP3000_UM_LV_2.2.indd
 Register your product and get support at www.philips.com/welcome Philips Presenter SNP3000 LV Lietotāja rokasgrāmata 1 a b c d e g f h 2 3 4 LASER LIGHT DO NOT STARE INTO BEAM CLASS 2 LASER PRODUCT Wavelength
M12HV.indd
 Original instructions Originalbetriebsanleitung Notice originale Istruzioni originali Manual original Oorspronkelijke gebruiksaanwijzing Original brugsanvisning Original bruksanvisning Bruksanvisning i
V28PD.indd
 V 28 PD Instructions for use Gebrauchsanleitung Instruction d utilisation Istruzioni d uso Instrucciones de uso Instruções de serviço Gebruiksaanwijzing Brugsanvisning Bruksanvisning Käyttöohje Ïäçãßåò
Mounting_Instruction_Owl_Class_II_High_Bay_
 VIZULO OWL LED high bay Mounting instruction Montāžas instrukcija Mонтажная инструкция IEC EN 60598 IP66 min 40 C max + 50 C (+45 C)* 198-264 V AC * Depends on configuration. Check label or technical specification.
Dual TEMP PRO
 Dual TEMP PRO 1 Darbības instrukcija Rezultāta nolasījums 5 Ievietotas zondes nolasījums HACCP pārbaudes gaismas diods (LED) SCAN poga (infrasarkanā) Režīma poga Zondes poga (zondes ievietošanas) Ievads
K 5 ( )
") Detaļu saraksts (1.180-633.0) K 5 27.01.2016 www.kaercher.com LV Lapa 2 / 66 Lapa 3 / 66 Lapa 4 / 66 Satura rādītājs Pasūtīšanas norādījumi K 5 (1.180-633.0) Short spare parts list 201 Spare parts list
Detaļu saraksts (1.180-633.0) K 5 27.01.2016 www.kaercher.com LV Lapa 2 / 66 Lapa 3 / 66 Lapa 4 / 66 Satura rādītājs Pasūtīšanas norādījumi K 5 (1.180-633.0) Short spare parts list 201 Spare parts list
/8 10/2018 EL 340 EL 380 EL 420 IT BG BS CS DA DE EL EN ES ET FI FR HR HU LT LV MK NL NO Tosaerba elettrico con conducente a piedi MANUALE DI
 171505669/8 10/2018 EL 340 EL 380 EL 420 IT BG BS CS DA DE EL EN ES ET FI FR HR HU LT LV MK NL NO Tosaerba elettrico con conducente a piedi MANUALE DI ISTRUZIONI ATTENZIONE: prima di usare la macchina,
series_155
 RAILING SERIES 155 RIPO fabrika SIA Hanzas Street 2, Pinki, Babite district, LV 2107, Latvia 155 Alumīnija margu sērija Aluminum railing series AL.01 AL.02 AL.03 AL.04 AL.05 AL.06 AL.07 AL.08 AL.09 155
State Revenue Services of the Republic Latvia Talejas iela 1, Riga LV-1978 Latvia Ihr Vor- und Zuname Ihre Straße und Hausnummer Ihre Postleitzahl Ihr
 State Revenue Services of the Republic Latvia Talejas iela 1, Riga LV-1978 Latvia Ihr Vor- und Zuname Ihre Straße und Hausnummer Ihre Postleitzahl Ihr Wohnort aktuelles Datum Ihre ZINSPILOT-Kundennummer
/5 02/2019 E300 E320 E380 IT BG BS CS DA DE EL EN ES ET FI FR HR HU LT LV MK NL NO Tosaerba elettrico con conducente a piedi MANUALE DI ISTRU
 171505829/5 02/2019 E300 E320 E380 IT BG BS CS DA DE EL EN ES ET FI FR HR HU LT LV MK NL NO Tosaerba elettrico con conducente a piedi MANUALE DI ISTRUZIONI ATTENZIONE: prima di usare la macchina, leggere
indd
 2212-20 Original instructions Originalbetriebsanleitung Notice originale Istruzioni originali Manual original Oorspronkelijke gebruiksaanwijzing Original brugsanvisning Original bruksanvisning Bruksanvisning
pro-fra.p p65
 p r o e q u i p m e n t Mode d emploi CM 1200/11/500 D SILENT SDS N de cde. 25469 CE www.contimac.be IT Conservare questo manuale d istruzioni per poterlo consultare in futuro GB Preserve this handbook
7. Tēma: Polinomi ar veseliem koeficientiem Uzdevums 7.1 (IMO1982.4): Prove that if n is a positive integer such that the equation x 3 3xy 2 + y 3 = n
: Prove that if n is a positive integer such that the equation x 3 3xy 2 + y 3 = n") 7. Tēma: Polinomi ar veseliem koeficientiem Uzdevums 7.1 (IMO1982.): Prove that if n is a positive integer such that the equation x xy 2 + y = n has a solution in integers x, y, then it has at least three
7. Tēma: Polinomi ar veseliem koeficientiem Uzdevums 7.1 (IMO1982.): Prove that if n is a positive integer such that the equation x xy 2 + y = n has a solution in integers x, y, then it has at least three
NISSAN LEAF & LEAF e+ tabula, Nissan papildu pakalpojumi LV-04C-1186 NISSAN LEAF
 & LEAF e+ tabula, Nissan papildu pakalpojumi. CENU LAPA Transmisija LEAF 40 kwh Acenta 100% elektrisks 4x2 Acenta 100% elektrisks 4x2 N-Connecta 100% elektrisks 4x2 Tekna 100% elektrisks 4x2 LEAF 62 kwh
FVO 204 INSTALLATION ET MISE EN SERVICE FRANÇAIS INSTALLATION AND STARTING INSTRUCTIONS ENGLISH INSTALLAZIONE E MESSA IN SERVIZIO ITALIANO INSTALACIÓN
 FVO 204 INSTALLATION ET MISE EN SERVICE FRANÇAIS INSTALLATION AND STARTING INSTRUCTIONS ENGLISH INSTALLAZIONE E MESSA IN SERVIZIO ITALIANO INSTALACIÓN Y INSTRUCCIONES DE PUESTA EN MARCHA ESPAÑOL N.M.S.
Deeper Smart Sonar START Technical Specifications Weight: 2.1oz / 60g Size: 60 x 65 x 65-mm / 2.3 x 2.5 x 2.5in Sonar Type: Single beam Frequency (Bea
 Deeper Smart Sonar START Technical Specifications Weight: 2.1oz / 60g Size: 60 x 65 x 65-mm / 2.3 x 2.5 x 2.5in Sonar Type: Single beam Frequency (Beam cone): 120 khz, 40 Depth Range Max/Min: Max 165ft
BA_ROSCOPE_i2000_Umschlag_0818.indd
 ROSCOPE i2000 ROSCOPE i2000 DE Bedienungsanleitung EN Instructions for use FR Instruction d utilisation ES Instrucciones de uso IT Istruzioni d uso NL Gebruiksaanwijzing PT Instruções de serviço DA Brugsanvisning
943184
 Oras Medipro INSTALLATION AND MAINTENANCE GUIDE Contents DK Indholdsfortegnelse EE Sisukord FI Sisällysluettelo LT Turinys LV Saturs NO Innhold PL Spis treści RU Coдержание SE Innehållsförteckning UA
K1000S.indd
 K 1000 S Original instructions Originalbetriebsanleitung Notice originale Istruzioni originali Manual original Oorspronkelijke gebruiksaanwijzing Original brugsanvisning Original bruksanvisning Bruksanvisning
Oracle SQL teikuma izpildes plāns (execution plan)
") SQL teikuma izpildes plāns gints.plivna@gmail.com Kas es esmu? Pieredze darbā ar Oracle kopš 1997 Oficiālais amats sistēmanalītiėis Rix Technologies Oracle sertificēto kursu pasniedzējs Affecto Latvija
SQL teikuma izpildes plāns gints.plivna@gmail.com Kas es esmu? Pieredze darbā ar Oracle kopš 1997 Oficiālais amats sistēmanalītiėis Rix Technologies Oracle sertificēto kursu pasniedzējs Affecto Latvija